sugar cookie crisps

Sugar Cookie Crisps

I found this recipe (called Sugar Cookies X) at allrecipes.com in November of 2000, and I’ve been making it ever since. They are sugary and crispy delicious.

Preheat oven to 350*F.

In a large bowl, mix till creamy:
2 c. white sugar
1 c. vegetable oil
1 c. butter
1 tsp. vanilla extract
2 eggs

Mix the dry ingredients together and add them to the creamed mixture, stirring to combine well.
1 tsp. cream of tartar
1 tsp. baking soda
4 c. flour
1 tsp. salt

Chill the dough an hour.

Form the dough into small balls and roll in sanding sugar.

sanding sugar

pretty in pink

Place them on a cookie sheet lined with parchment paper. Place 15 cookies to a sheet, as they do spread.

ready to bake

Bake at 350*F for 8-10 minutes. Cool on wire rack.

cookies!

Christmas cookies

Makes 9 dozen.

I store them in single layers, in plastic containers, between waxed paper sheets.

stored for Christmas

cookie crumbs

That’s all that’s left. Everything else is in the freezer. 🙂

PS: a note from baking these in 2012…if you sprinkle extra sugar on top the cookie after baking, while the cookie is still hot from the oven, the sugar will stick and make the cookie even prettier.

~~Rhonda

naptime for buttercup

You can find Buttercup under the bubble light tree every afternoon, where she enjoys a long nap before DD gets home from school. She doesn’t bother the ornaments…just makes a little nest and snuggles in.

nap time for Buttercup

And if DD is late, Buttercup prowls the front hall, crying until she gets home. 🙂

~~Rhonda

Christmas prep

Last weekend we got a lot of decorating done. My daughter-in-law and my sister came to help. The dining room was finished, with the exception of one window sill. I need to paint a flowerpot white to complete that project.

DH and our daughter-in-law put up the snow tree. “Snowing” it is the final (and most fun) part. They gently laid handfuls of shredded artificial snow on the branches.

snowing the tree

I made the snowball ornaments for this tree years ago.

snow and snow balls

Our daughter helped her sister-in-law sprinkle the topping of iridescent snow over the finished tree. I had to ask them to turn around and look at me. All I had were pictures of backs. 🙂 Side note…you can’t go wrong with a Little Giant ladder! Every time we need to get up to something, we remark on how glad we are to have it!

snowing the tree

A little greenery over the picture and a little snow on the cupboard tree, and we’re almost done.

dining room cupboard

Silver spindles hang from the reproduction lighting.

dining room light

The windowsills need some candles and then we’ll be done with the dining room. All but the pick up…I confess there are a few boxes and odds and ends left in the room. But we’re well on our way with the decorating!

~~Rhonda

Christmas card putz houses

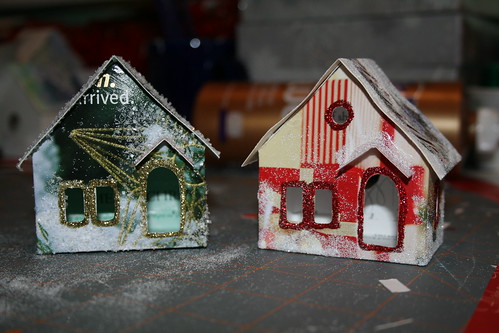
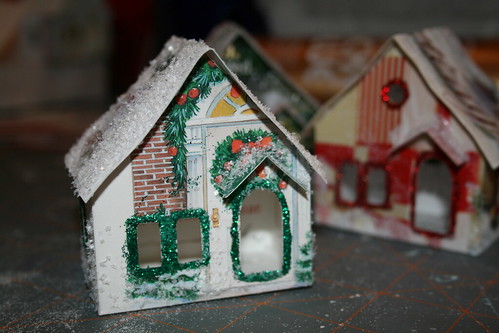
Putz houses, also called “glitter houses,” are little houses that make up a Christmas village. Popular from the 1920s on, they can be made from cardboard, card stock, and even old Christmas cards.

I drew the pattern for this house based on the pattern for the Stone Cottage on the Little Glitter House site, which has patterns for different kinds of buildings. I made it a bit smaller than the given pattern and made a few minor changes to it.

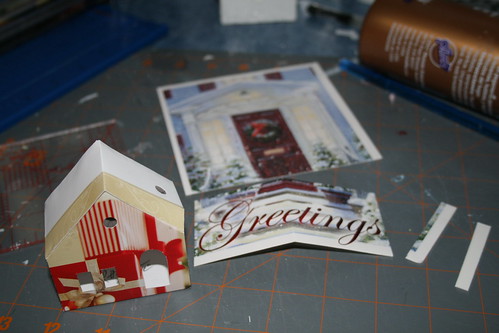
To make a house, using a Christmas card, choose a card that will accommodate the pattern. The card should be large enough, when open, to cover most of the pattern. Some fudging of the pattern can be done. An additional piece of Christmas card can be added to the side of the pattern, if necessary, or the roof section can be cut a bit shorter than the pattern because, after the house is assembled, another piece will be glued over the roof section of the pattern to make a roof with an overhang.

Christmas card Putz houses

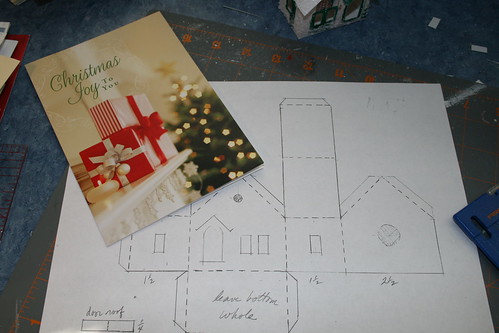
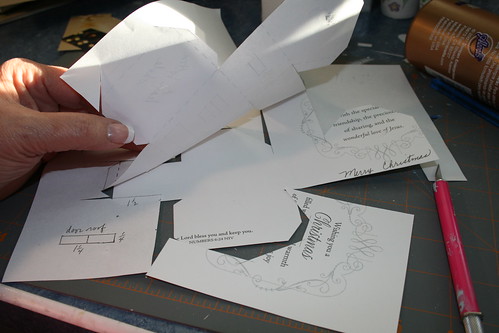
I open the card and place the pattern over it, then hold it up to the desk lamp so I can move the pattern to best fit the picture on the card.

Christmas card Putz houses

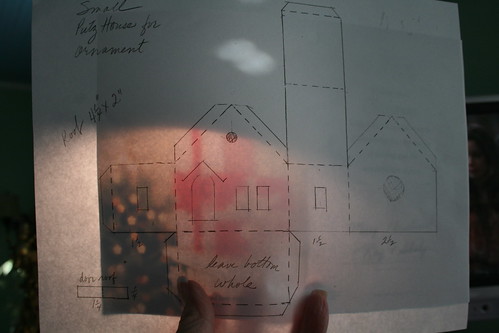
Sometimes I change the pattern by switching the door and the front windows to accommodate the picture on the card.

Christmas card Putz houses

Cut the windows and doors first, then cut the pattern, using an X-acto knife and a straightedge. On this card, I adhered the pattern to the front of the card, but I found as I made more that it works better to adhere the pattern to the inside of the card.

Christmas card Putz houses

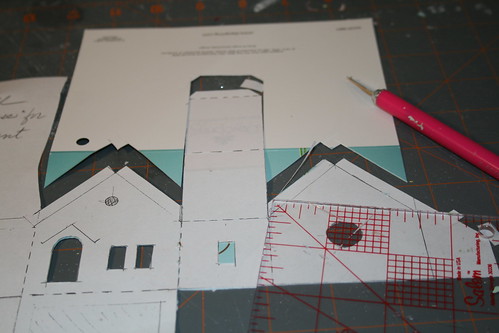
After the pattern is cut, score the fold lines, then remove the pattern from the card. Oops, I forgot to cut the windows and doors before cutting the pattern…

Christmas card Putz houses

Christmas card Putz houses

Christmas card Putz houses

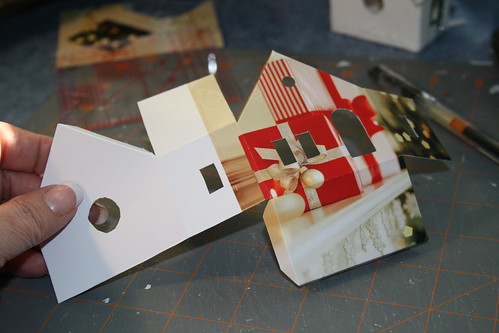
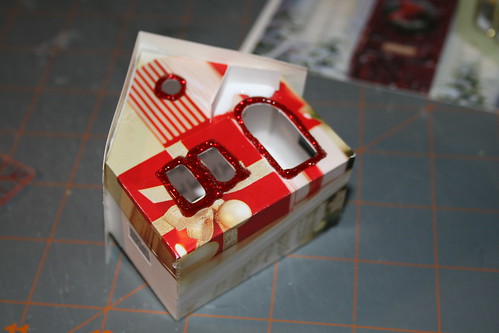
I glue the bottom and sides of the house first, then, when the glue is dry, I glue down the roof section.

Christmas card Putz houses

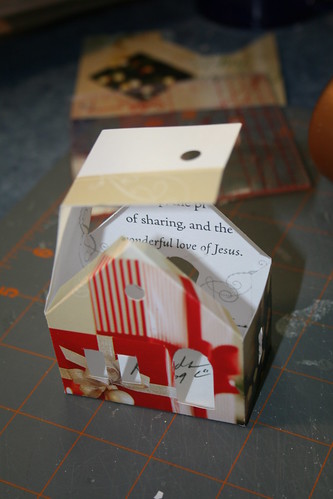
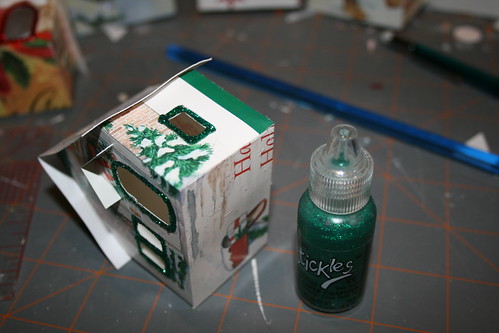
When the house is assembled, I work on the roof. Following the size given on the pattern, cut a rectangle for the roof, crease it down the middle and glue it to the top of the house. This piece is usually from another card, as the cards I have aren’t large enough for the house pattern *and* the roof piece.

Christmas card Putz houses

Christmas card Putz houses

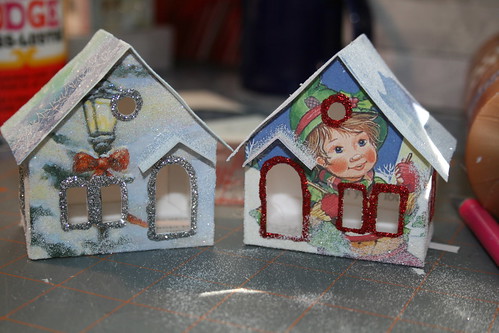
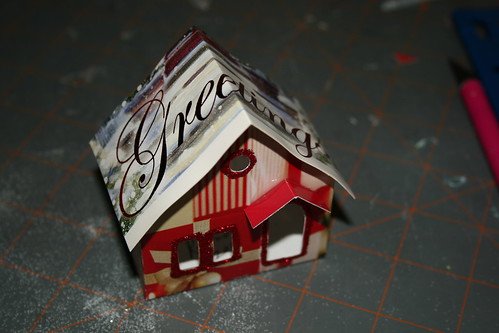
I cut a small piece (1.25″x1/4″) to make a roof over the door and glue it to the front of the house. The windows and door are outlined in glitter glue. The house stays on its back until the glue and the glitter glue (I used Stickles) is dry. Then the side windows are done, one drying before the next one is done.

Christmas card Putz houses

Christmas card Putz houses

After all the glitter glue is dry, the house is ready for the next step.

Christmas card Putz house

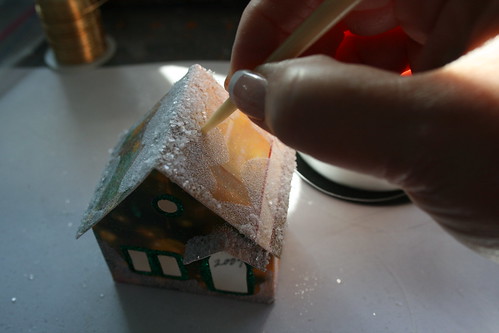
I use Mod Podge to paint a snow design on the house, then glitter it with a white glitter.

Christmas card Putz house

When dry, the Mod Podge will be clear and glossy under the glitter. I did totally glitter a few houses, but like the snow patterned glitter better. I also used a very coarse glitter on a couple of houses. Which do you like better?

Christmas card Putz house

Christmas card Putz house

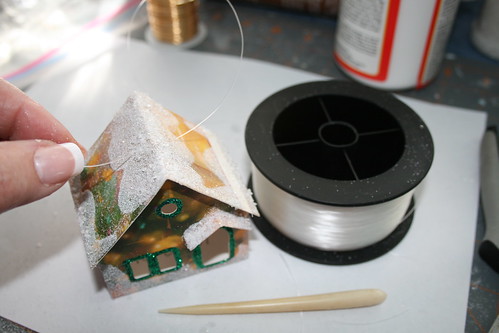
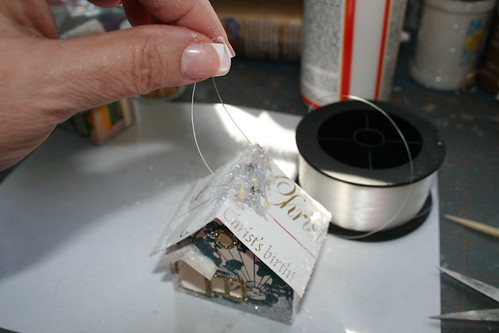
Fishing line made good hanging loops.

fishing line for the hanger

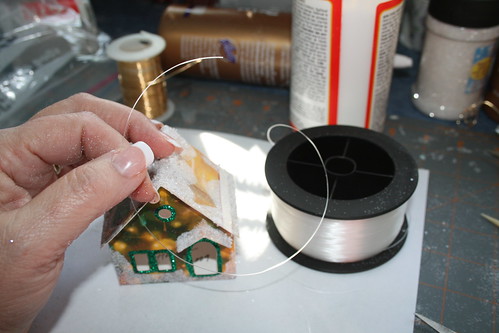
I used my vintage ivory sewing stiletto to make holes in the roof for adding the loop to hang the ornaments. It worked better than anything else I tried.

punching holes for the hanger

The line went right through.

string the fishing line

Knot it and it’s ready to hang.

ready to hang on the tree

Here’s a link to the ornament pattern. When it opens, click 100%. It may not print to scale, but the proportions should be OK. In that case, the roof, which is supposed to be cut 4.25″ x 2″ may have to be cut down by an 1/8″ or so. Cut it, place it on the house, and see what you think.

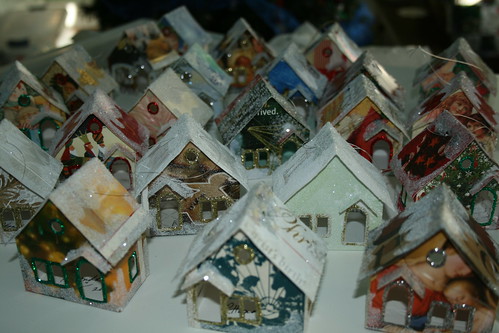
And here are the houses I made. 🙂

it takes a village

If you would like to see some of my more elaborate Putz houses, as well as other Christmas ornaments I have made from upcycled holiday cards, please visit my Etsy shop.

ChristmasNotebook at Etsy

~~Rhonda 🙂

pizza braid

Yesterday, for supper, I made this pizza braid. So good! Everyone loved it. We’ll be making it again.

pizza braid

pizza braid

I must say, I altered the recipe a bit.

The dough recipe was as follows:

1 pkg. (1 scant T.) yeast
1 c. very warm water
1/4 c. sugar [I used 2 T. sugar…I didn’t want the pizza crust to be too sweet.]
1/2 tsp. salt
1 egg
2 T. butter [I used 2 T. olive oil instead of butter]
3 c. flour [I added 2 T. ground flax and 2 T. wheat germ.]

I didn’t do anything like this filling…

1/2 lb. ground beef
2 oz. pepperoni, sliced in quarters
1/2 chopped onion
1/2 chopped green bell pepper
1/2 can mushrooms, chopped
8 oz. tomato sauce
1/4 tsp. garlic powder
1 1/2 tsp. Italian seasoning
salt and pepper
8 oz. shredded mozzarella cheese

Instead, I spread some crushed tomatoes down the middle of the bread. I sprinkled the tomatoes with dried basil, dried oregano, and garlic powder, then spread 2 cups of mozzarella over the tomatoes before braiding the bread. You could use just about any kind of filling in this. Next time, I want to make the filling with hamburger, taco seasoning, and cheddar cheese.

You can visit this site for pictures to guide you through braiding the bread. The site has lovely and helpful pictures. And it’s very easy to do. It makes a great meal and one your kids would love to help you with.

~~Rhonda

menu plan monday ~ november 9, 2009

I’m planning to finish the Putz house display this week. Almost done!

Putz house display

Putz house display

Hopefully, the menu won’t suffer from the amount of Christmas prep that needs to be done.

Monday
Pizza Braid

Tuesday
spaghetti / homemade sauce
homemade rolls
green salad

Wednesday
Sour Cream and Dill Chicken
egg noodles
corn
grilled asparagus
spinach salad

Thursday
Cheesy Potato Sausage soup

Friday
Parmesan crusted tilapia
corn
steamed red potatoes
sugar snap peas
green salad

Saturday
ham / turkey sandwiches
cheese
grapes
chips

Sunday
crock pot roast beef
baby baked potatoes
orange glazed carrots
spinach salad

You’ll find a lot more menus, recipes, and ideas at Menu Plan Monday.

~~Rhonda

tomato soup

This soup was scheduled for the menu this week, but we used it last Friday instead. It turned out well, so I’m posting the recipe.

tomato soup and grilled cheese sandwiches

The bread for the sandwiches came out of the oven and was immediately sliced and toasted. Oh, so good!

Tomato Soup
You can use fresh celery and onion in this if you like. Dice and sweat the amount you want in some vegetable oil or butter and add them to the soup. But I want something fast and easy, so I use alternative ingredients. DH is allergic to onion, so I have to use a small amount of dry onion in recipes rather than lovely fresh onions.

3 cups cooked small pasta
1 (29-ounce) can crushed tomatoes
1 (29-ounce) can tomato sauce
Salt and freshly ground black pepper to taste
1 tsp celery seed
1 tsp. dry onion
1/4 tsp. garlic powder (or 1 clove garlic, minced)
2 cups chicken broth
2 bay leaves
2 tsp. dry basil
1 cup half ‘n half (cream or milk may be substituted)

Combine all ingredients. Heat and serve. Yummy as leftovers, too, though the pasta breaks up a bit.

~~Rhonda

it’s snowing in the kitchen

The snowflakes are up in the kitchen. Fifteen or so hang from the 12′ ceiling on mirrored strings and my snowflake ornament collection hangs on the window garlands.

Hanging the ceiling snowflakes.

hanging the ceiling snowflakes

Snowflake ornament collection.

snowflake ornaments on window garland

Looks so festive! ~~Rhonda 🙂

menu plan monday ~ november 2, 2009

I am sure most of you are enjoying these crisp, sunny, autumn days. I certainly am. It’s time to get the last of the garden chores done before winter sets in. At the back door, the houseplants need to come inside. The papyrus plants are beginning to go dormant, though these plants haven’t had a frost yet. Once inside, where it’s warmer, they will come out of that and start putting out new shoots again.

indoor pots need to go back in

Here’s the menu for the week. My sister is planning to come again next weekend to help with Christmas decorating, so I’ve planned something we can have ready to eat when we are hungry.

Monday
eat out

Tuesday
baked salmon with honey mustard glaze
steamed sugar snap peas
corn
steamed red potatoes
green salad

Wednesday
hamburgers / homemade buns
Mexican Chopped salad

Thursday
roast chicken
roasted potatoes
stir-fry zucchini
corn
green salad

Friday
pork roast
mashed potatoes
Ken Shoe Green Beans
corn
green salad

Saturday
pulled pork / homemade buns
chips
grapes

Sunday
BBQ pork steaks
baked potatoes
peas
Caesar salad

I’m hoping Sunday will be nice enough to grill out. Sounds good.

You can peruse more menus and recipe ideas at Menu Plan Monday. Planning a menu saves time, money and frustration. If you don’t do it already, give it a try!

~~Rhonda

glorious sunshine

After almost two weeks of rain and clouds, the sun has finally made an appearance.

back yard carpet of oak leaves

Leaves blanket everything.

autumn bird bath

The big oak behind the house is beautiful.

Southern oak behind our house

This ginkgo tree was a Mother’s Day gift 10 or 12 years ago.

ginkgo

In the woods, the elm leaves are bright yellow with spots of chocolate brown.

elm

The red and orange sassafras leaves have already fallen. Only a few yellow ones remain.

sassafras

The grasses will stay pretty all winter.

the grasses will be beautiful all winter

Even though we are in the waning days of autumn, a few flowers bloom here and there, around the yard.

asters

Even the rhododendrons have put out some blossoms. I’ve never seen this bush bloom in the fall before.

the rhodie is blooming

And a few irises are reblooming. The purple iris from the family farm are always some of the earliest irises to bloom in the spring and we usually get a stalk or two in the fall.

old purple iris

The miniature iris ‘Baby Blessed’ is a great rebloomer. With enough moisture, it will rebloom several times during the season.

'Baby Blessed'

Some of the most beautiful days of the year occur in autumn. But autumn will wane quickly. Get out there and enjoy it while you can.

waning days of the garden

~~Rhonda