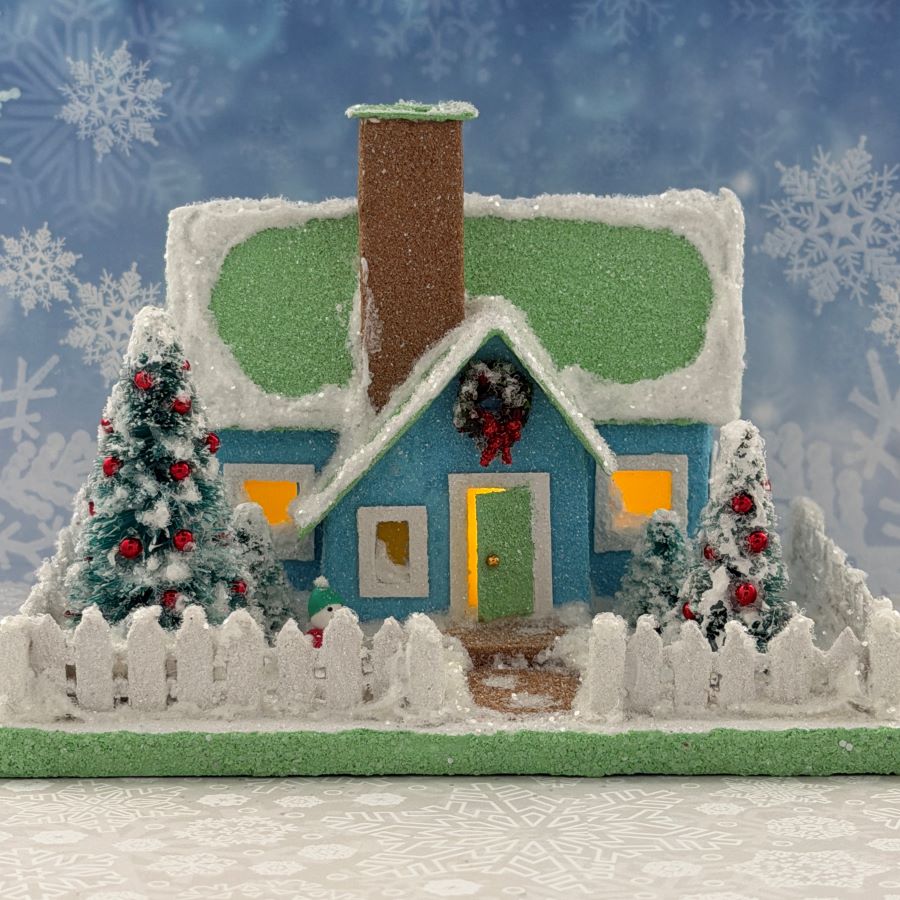
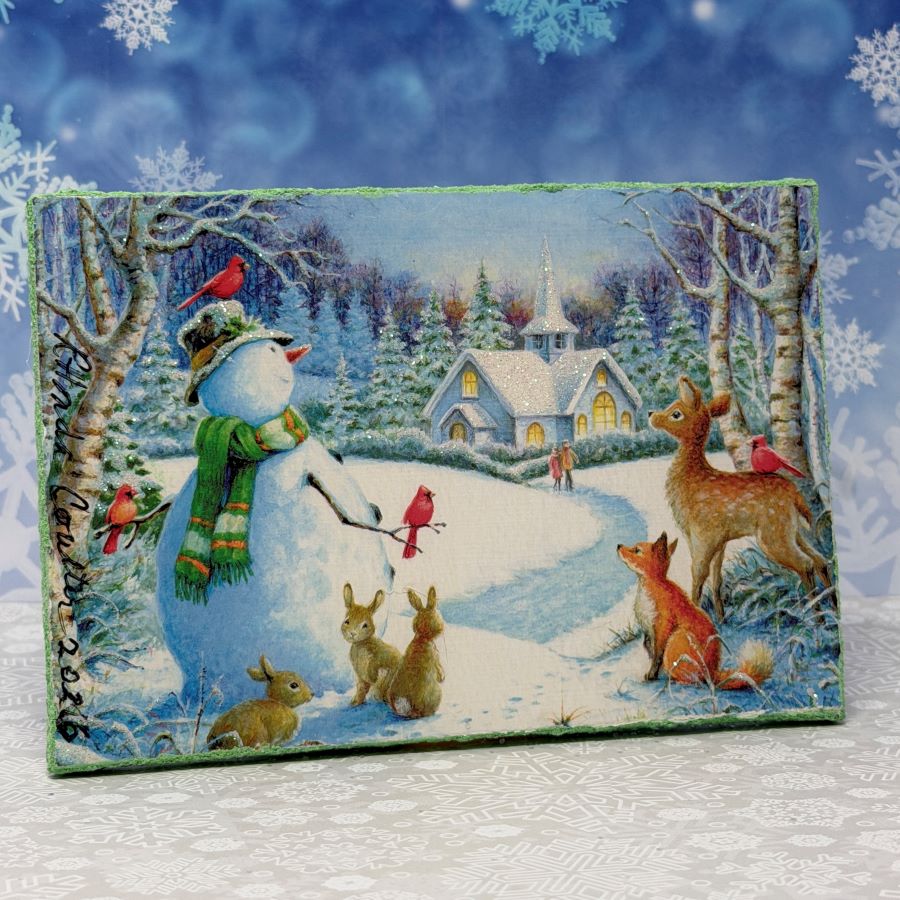
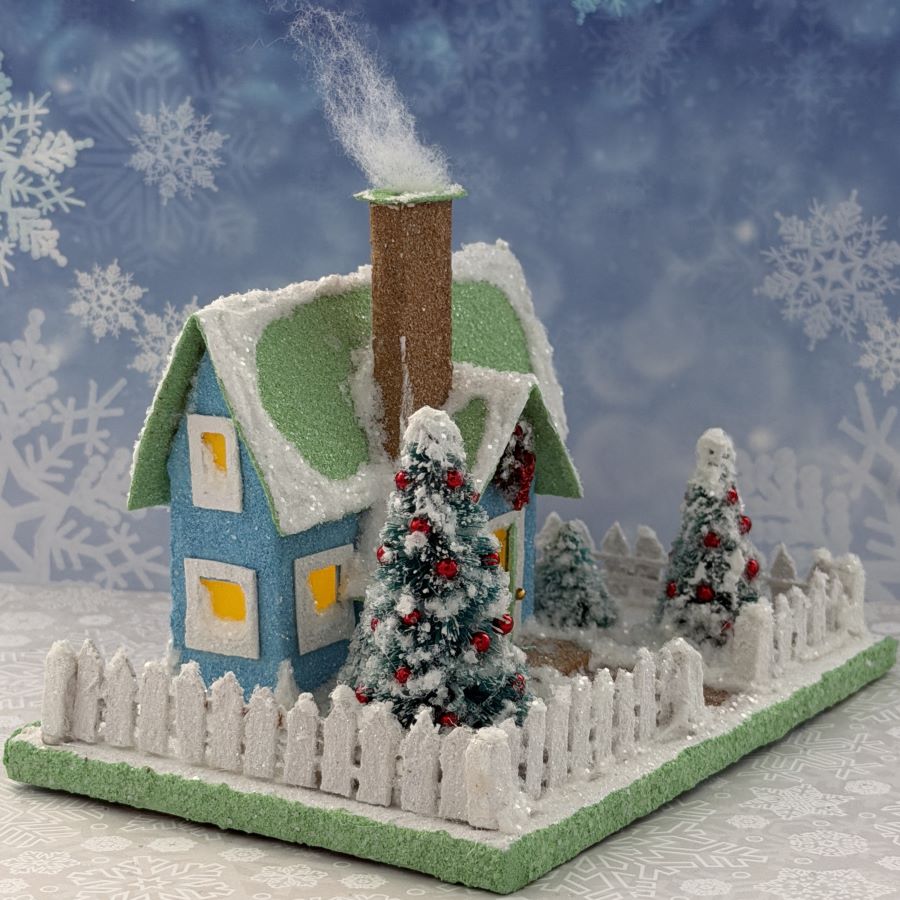
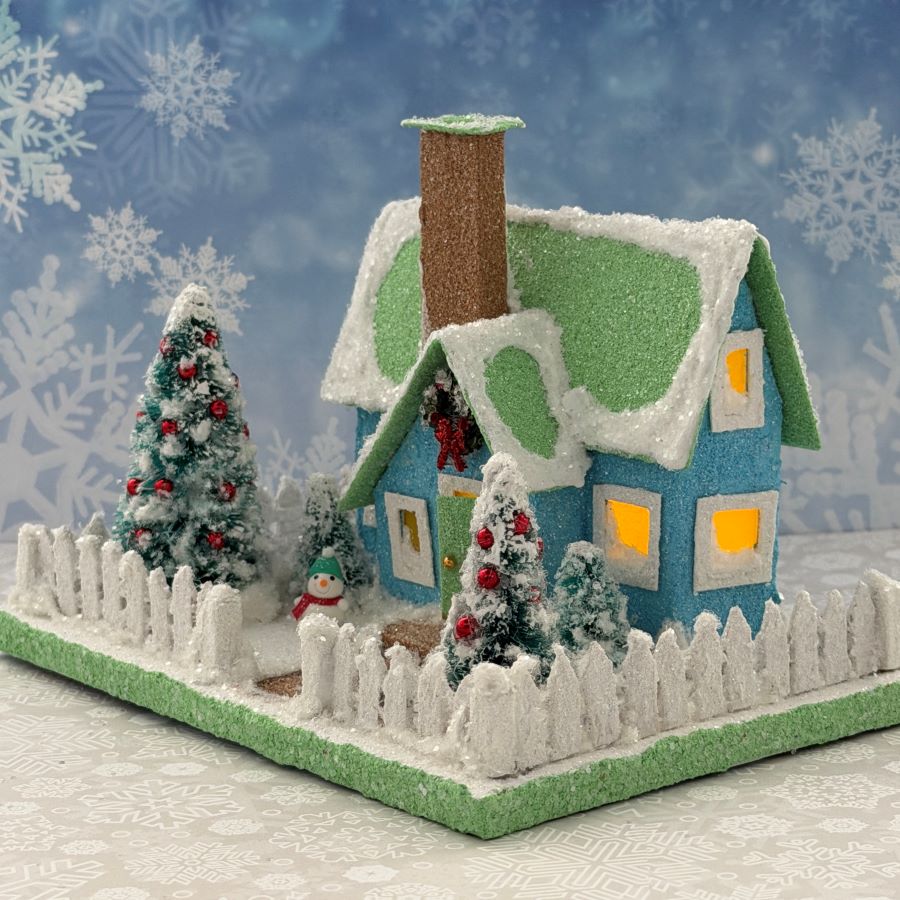
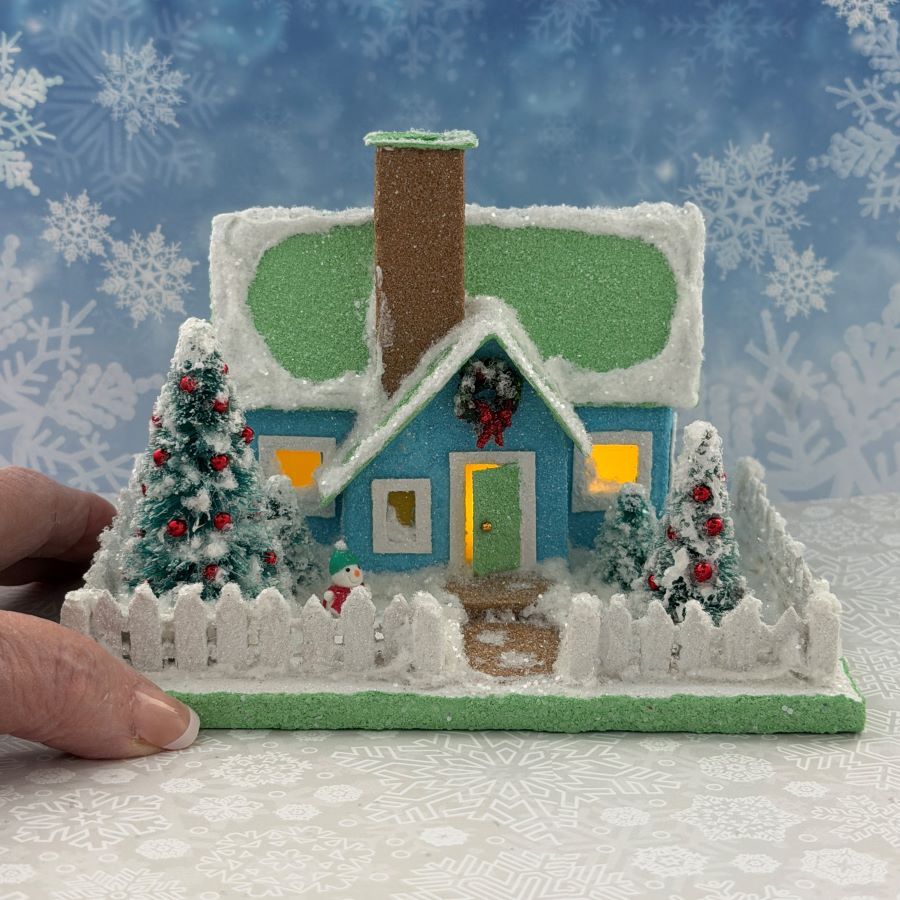
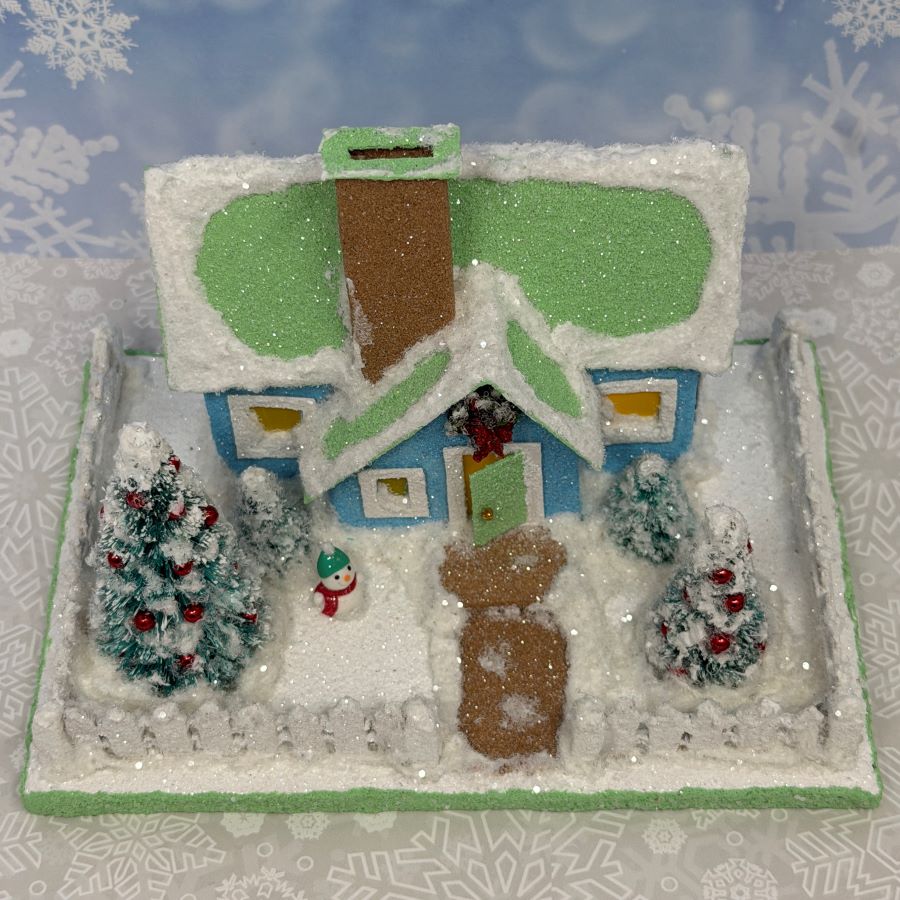
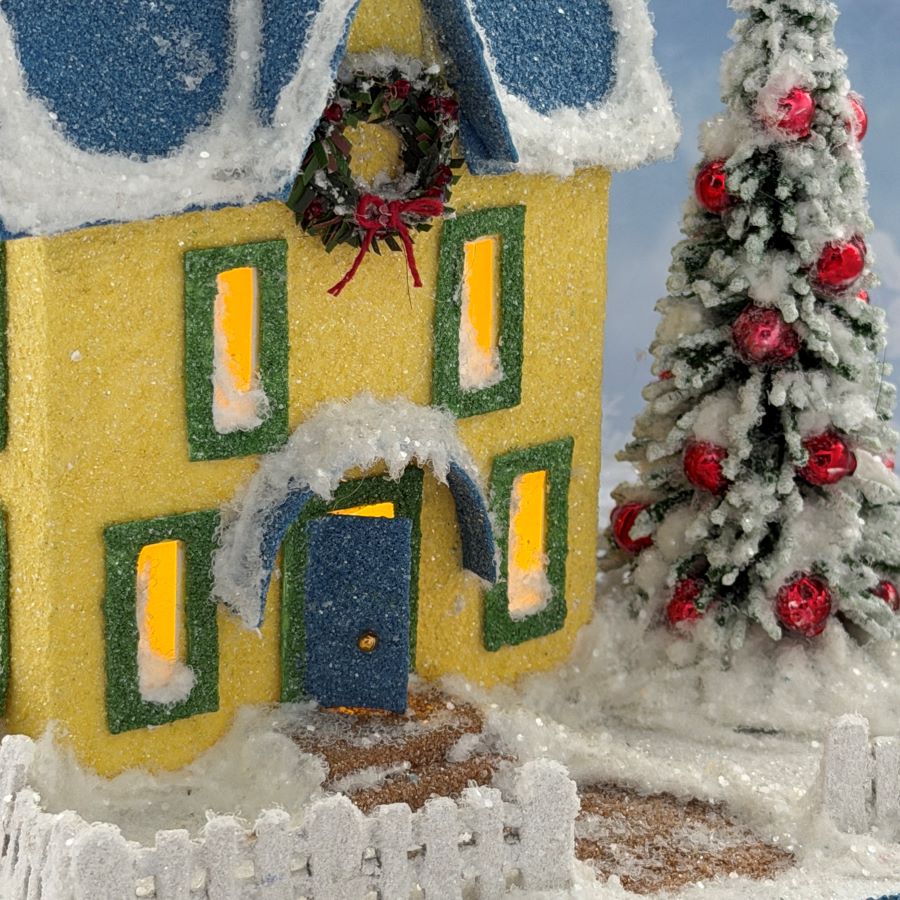
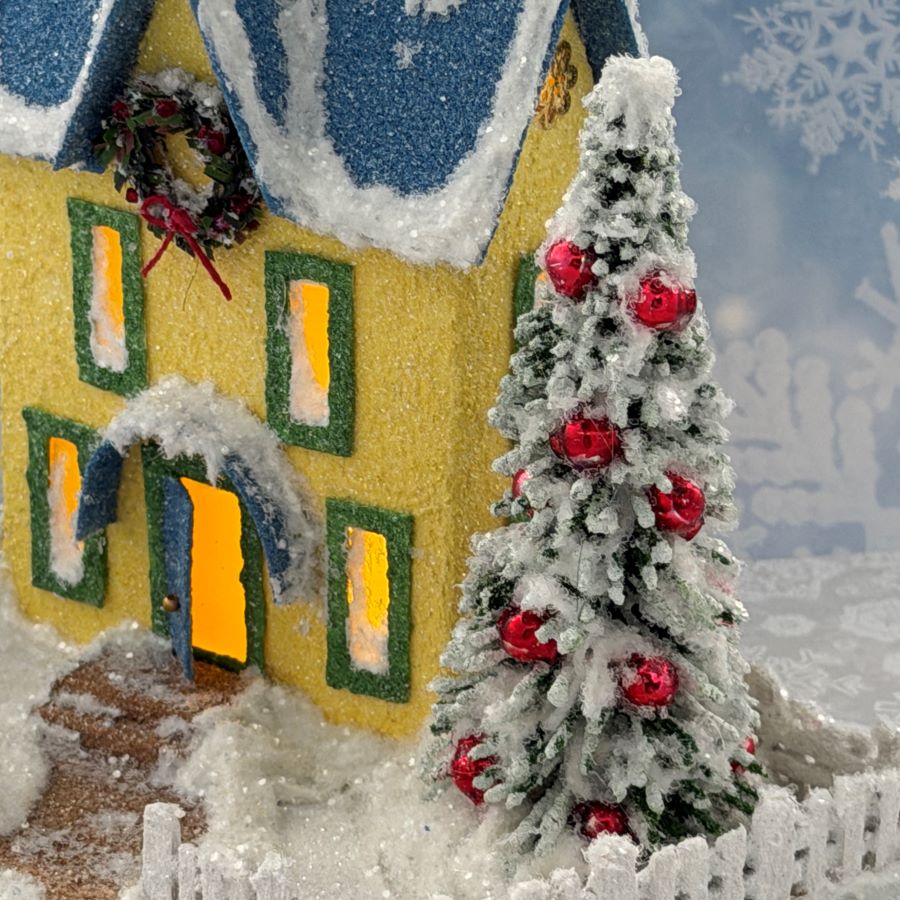
This Tudor Revival cottage is all set for Christmas. The base measures 6 1/2″ wide by 4 1/2″ deep. The Putz is 4 1/2″ tall as measured from the bottom of the base to the top of the chimney. I like to use upcycled greeting cards to make the bases for my putz houses. This card features a snowman and his woodland friends, with a country church in the background.
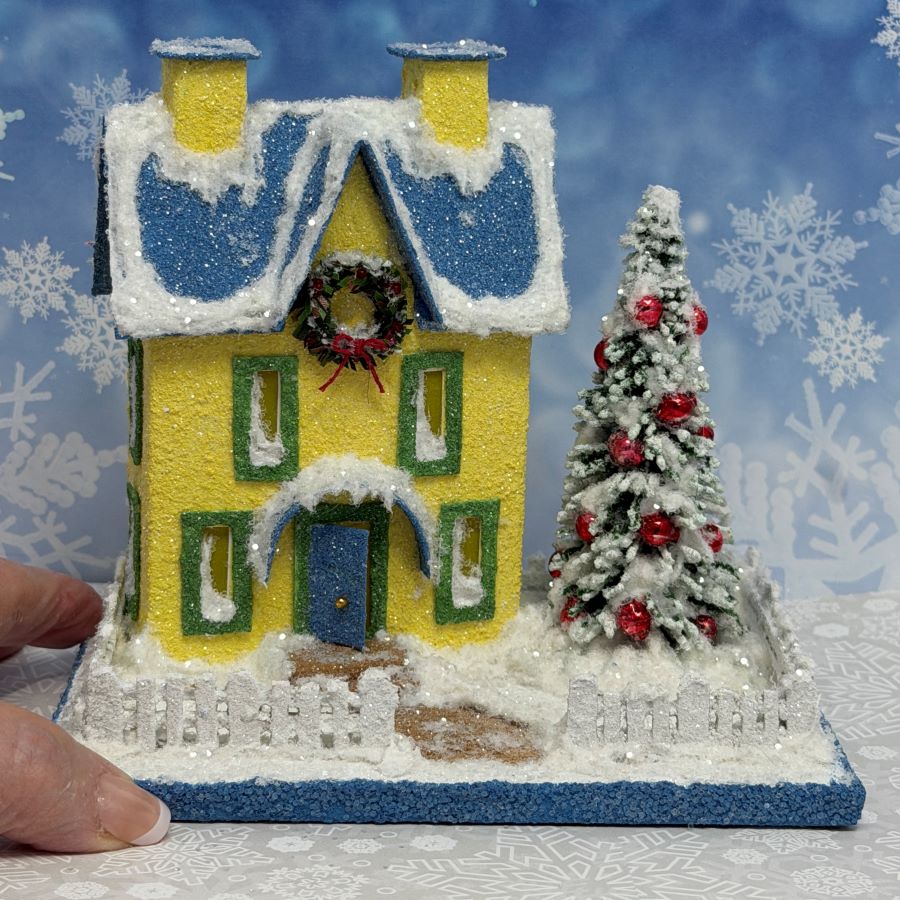
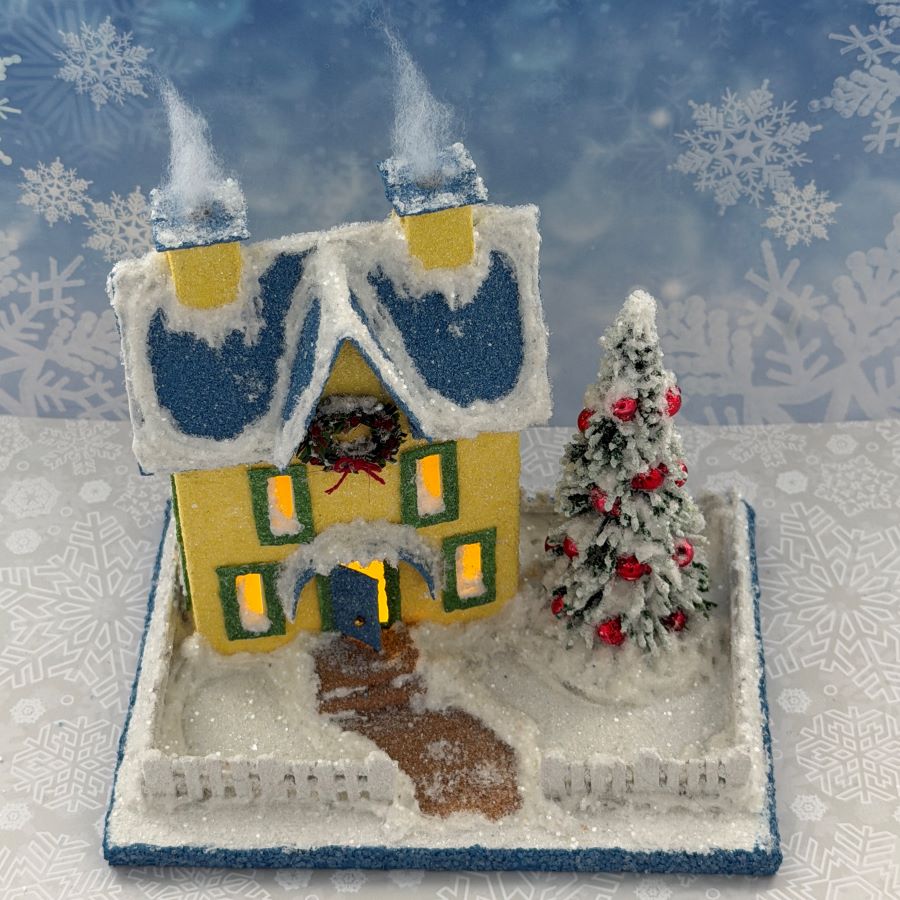
A puff of smoke is included with the house. It tucks into the chimney and easily removable if not needed.
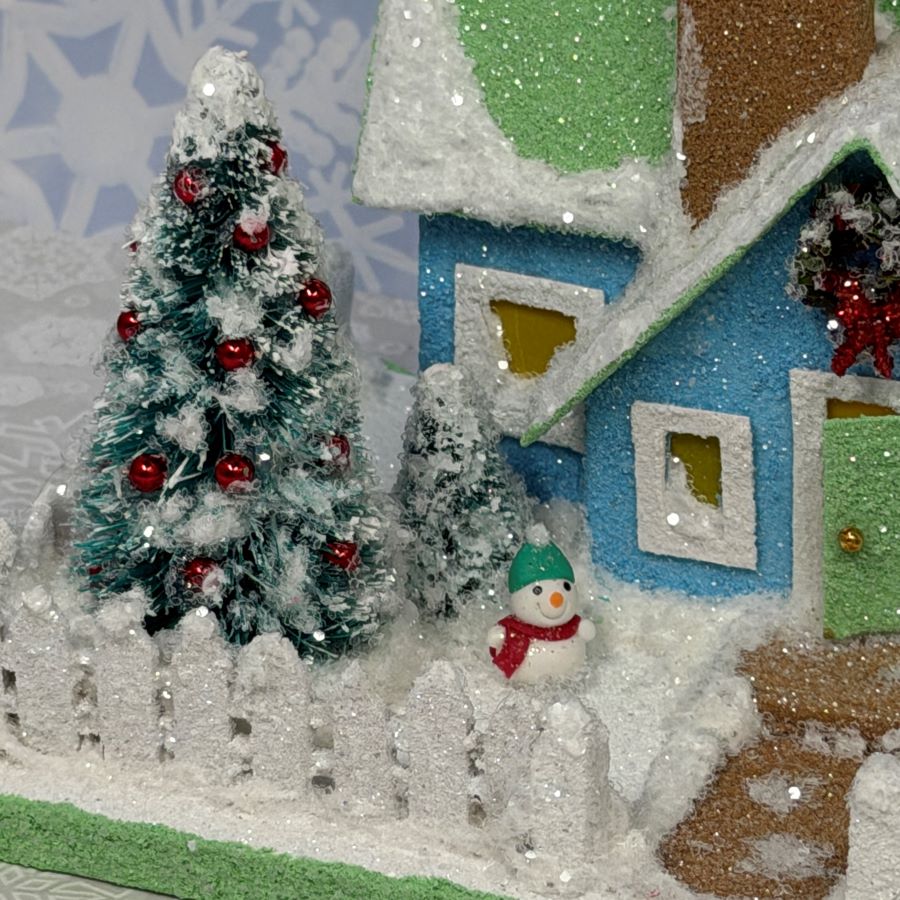
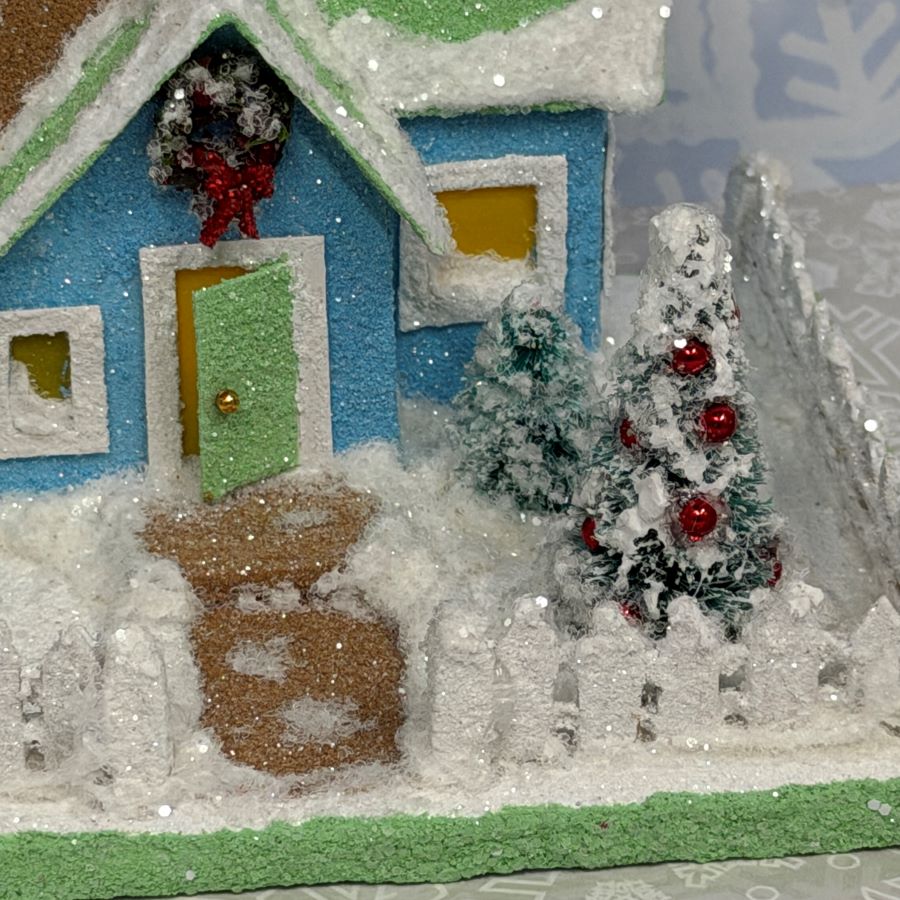
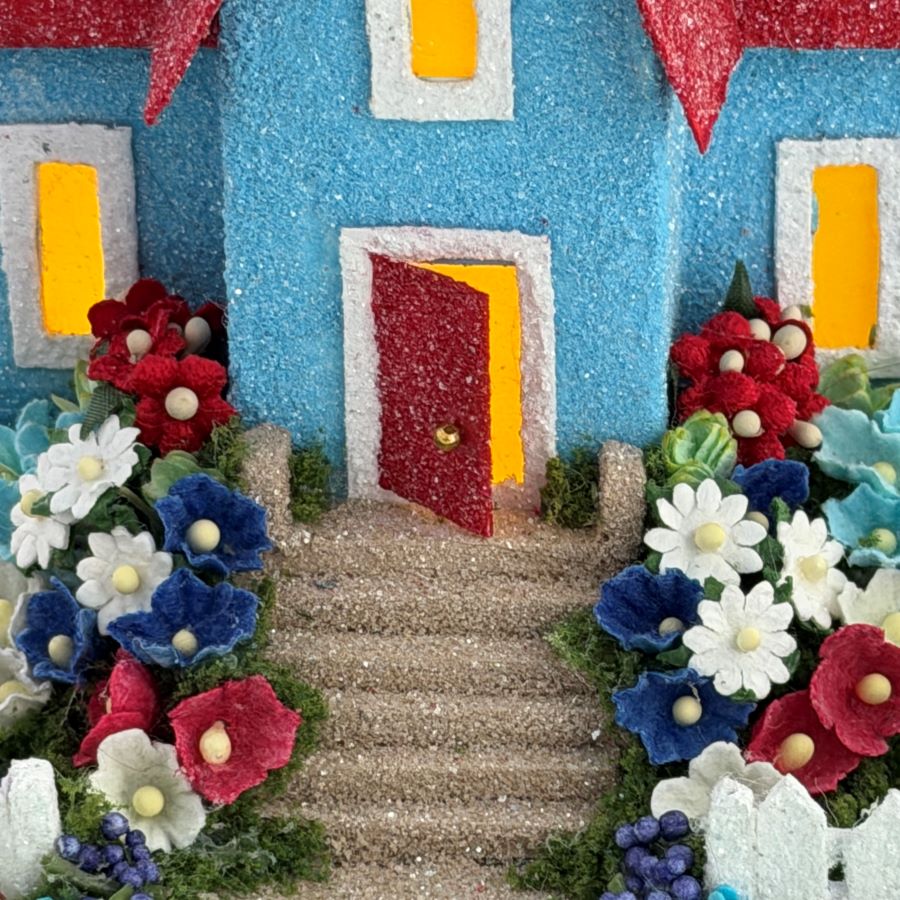
Small red beads decorate the two larger bottle brush trees. In the front yard, a snowman waits to greet Christmas company. I made the wreath that hangs over the front door.
I make the picket fences for my putz houses from wooden coffee stir sticks.
To see this putz, as well as more of my putz houses and Christmas ornaments I have made from upcycled holiday cards, please visit my Etsy shop.
All proceeds from my Etsy shop benefit Kenya Mercy Ministries. Run by native Kenyans, KMM works with the urban poor of Nairobi, Kenya, particularly the children and their families who live in Kibera, the largest urban slum in Africa. Thank you for your purchase from my shop and the help it provides for the children of Kibera.
If you’re interested in making picket fences, see my tutorial: Making Picket Fences
If you have questions about about my posted putz houses, or about creating your own putz houses, please ask. I am happy to share what I have learned about the art of putzing.
If you would like to create your own putz houses, check out my putz tutorials for more information. My blog is searchable, as well. You may find turorials that aren’t listed on the tutorial page.
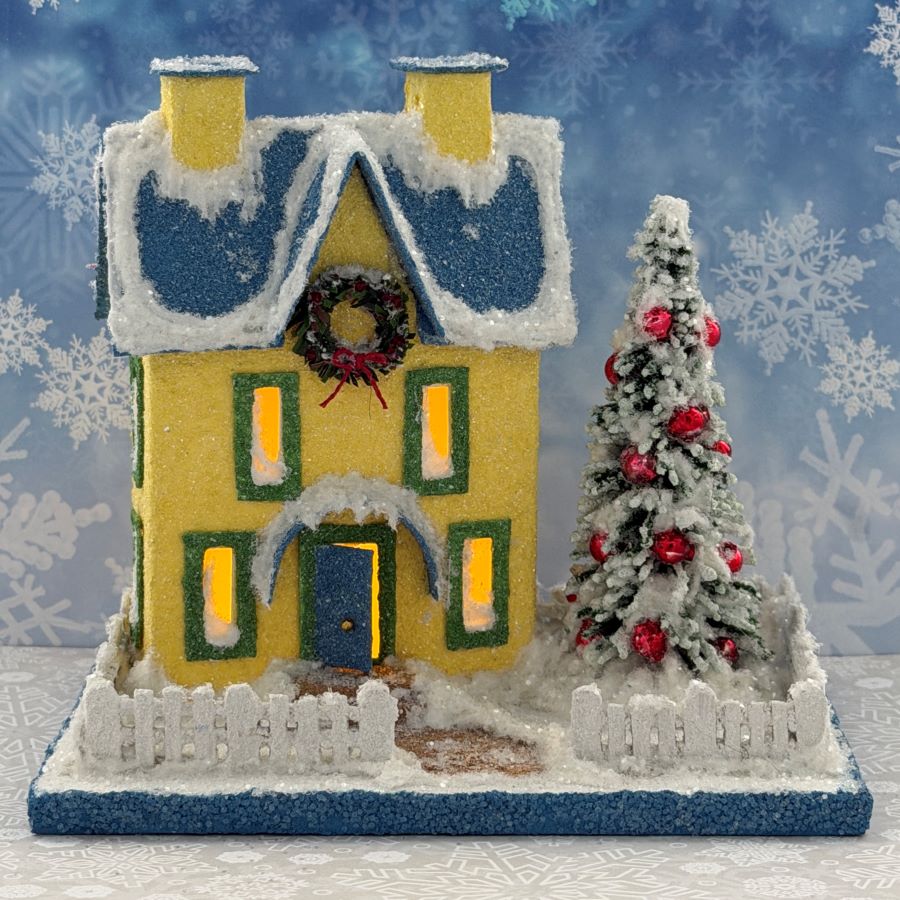
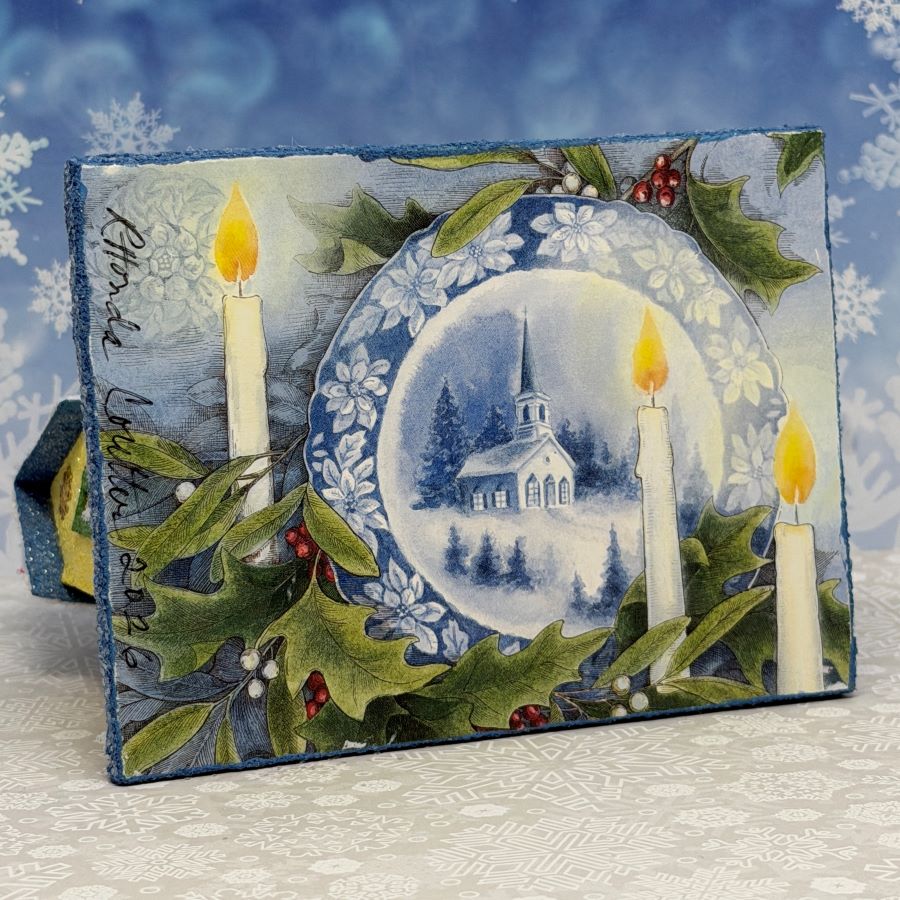
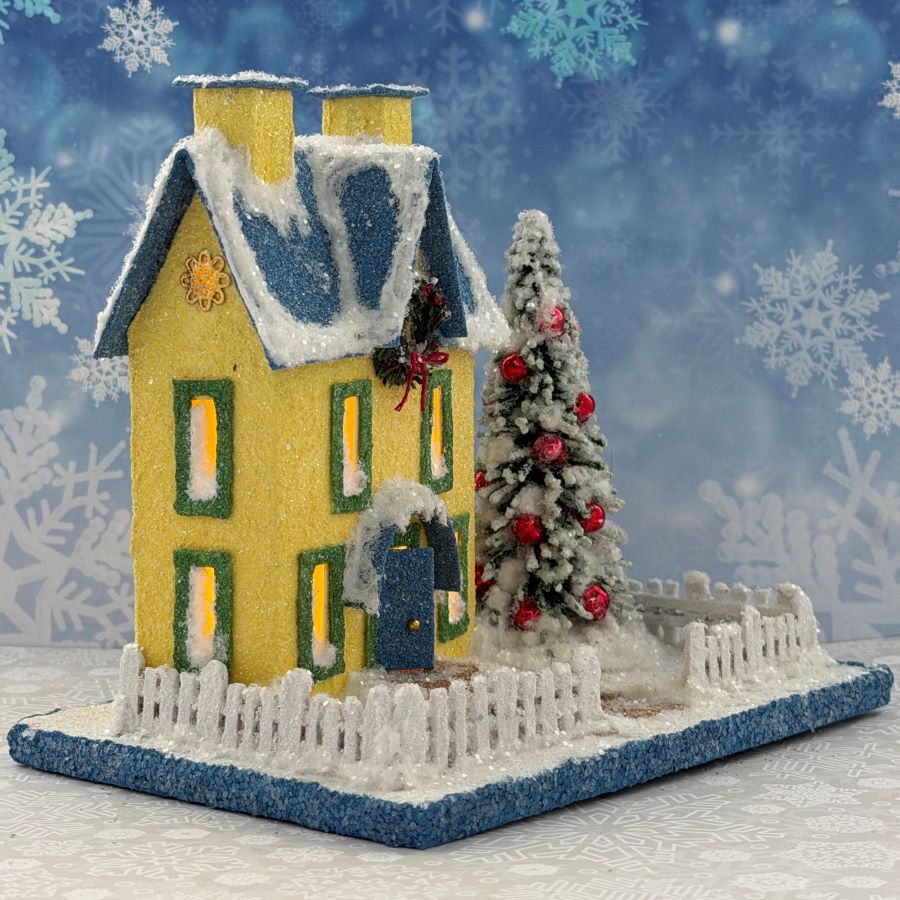
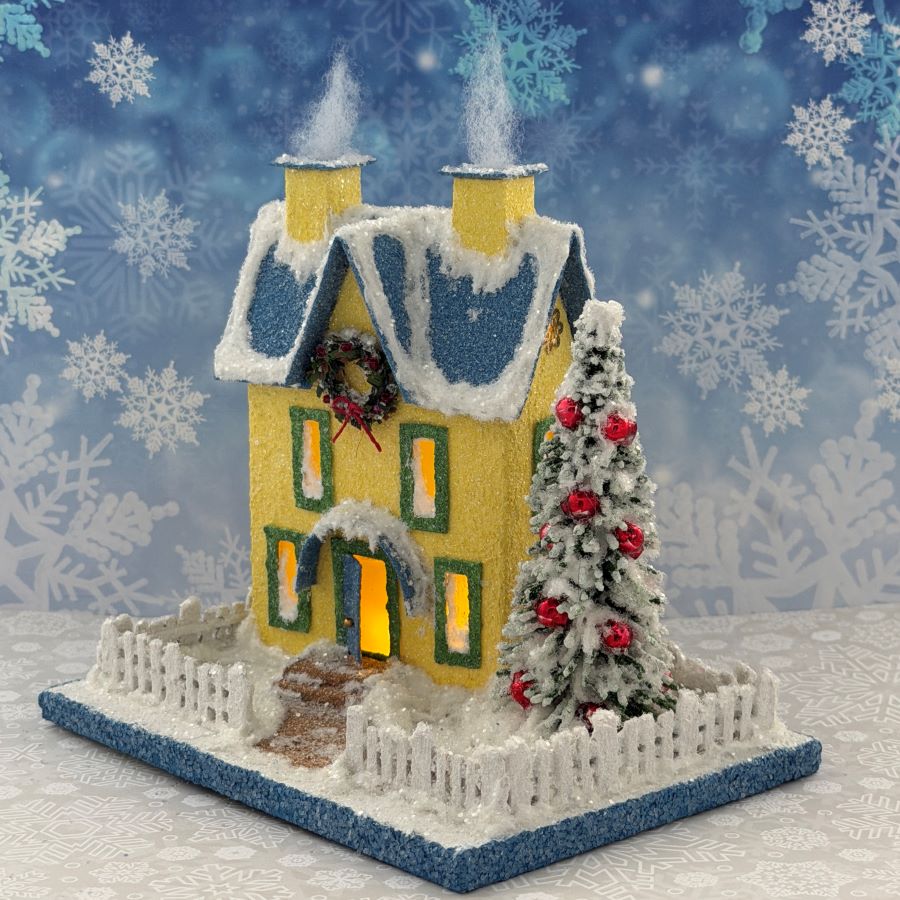
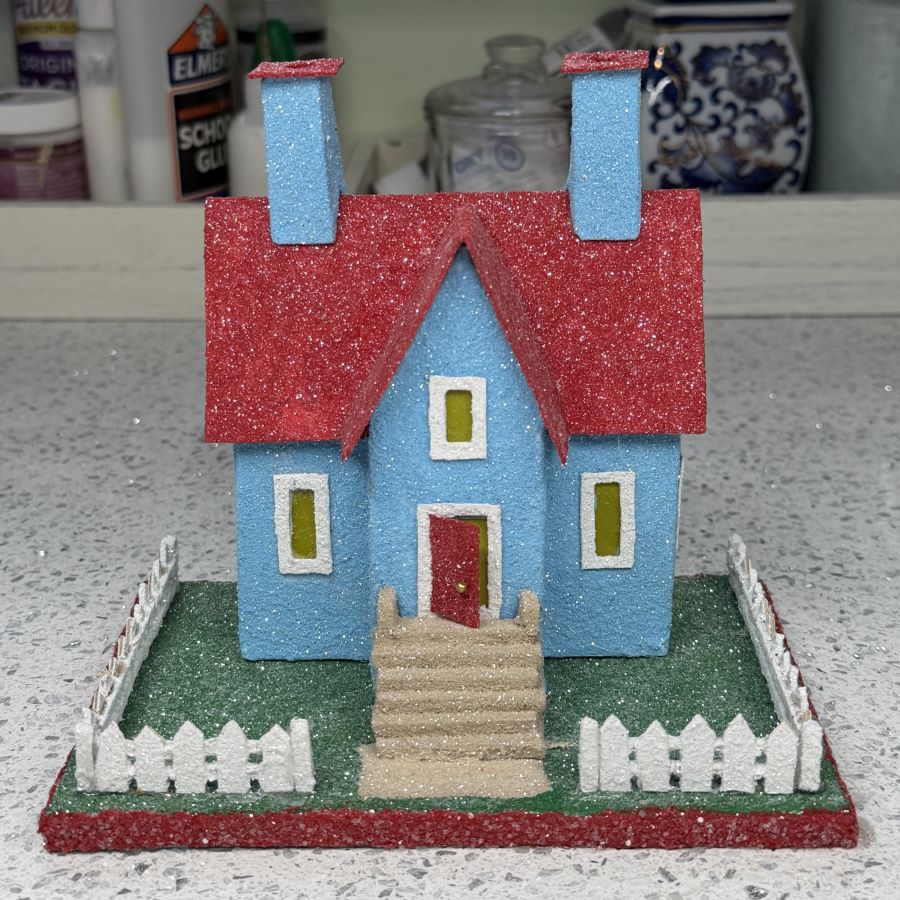
I drew this pattern in 2024. The base measures 6″ wide by 4 1/2″ deep. The Putz is 5 1/2″ tall as measured from the bottom of the base to the top of the chimneys. I make the bases for all my Putz houses from upcycled greeting cards. This card features holly, candles and a Christmas plate with a picture of a country church on it.
I use coffee stir sticks to make the picket fence. Puffs of smoke tuck into the chimneys and are removable if not needed.
Red, vintage mercury beads, faux snow and clear glitter decorate the bottle brush tree. A handmade wreath hangs over the front door.
The entire scene is liberally dusted with clear glitter. Pictures do not show how beautifully this little glitter house sparkles in the light. The house sets at an angle on the base.
To see this putz, as well as more of my putz houses and Christmas ornaments I have made from upcycled holiday cards, please visit my Etsy shop.
All proceeds from my Etsy shop benefit Kenya Mercy Ministries. Run by native Kenyans, KMM works with the urban poor of Nairobi, Kenya, particularly the children and their families who live in Kibera, the largest urban slum in Africa. Thank you for your part in helping these children when you purchase items from my shop!
If you’re interested in making picket fences, see my tutorial: Making Picket Fences
If you have questions about about my posted putz houses, or about creating your own putz houses, please ask. I am happy to share what I have learned about the art of putzing.
If you would like to create your own putz houses, check out my putz tutorials for more information. My blog is searchable, as well. You may find turorials that aren’t listed on the tutorial page.
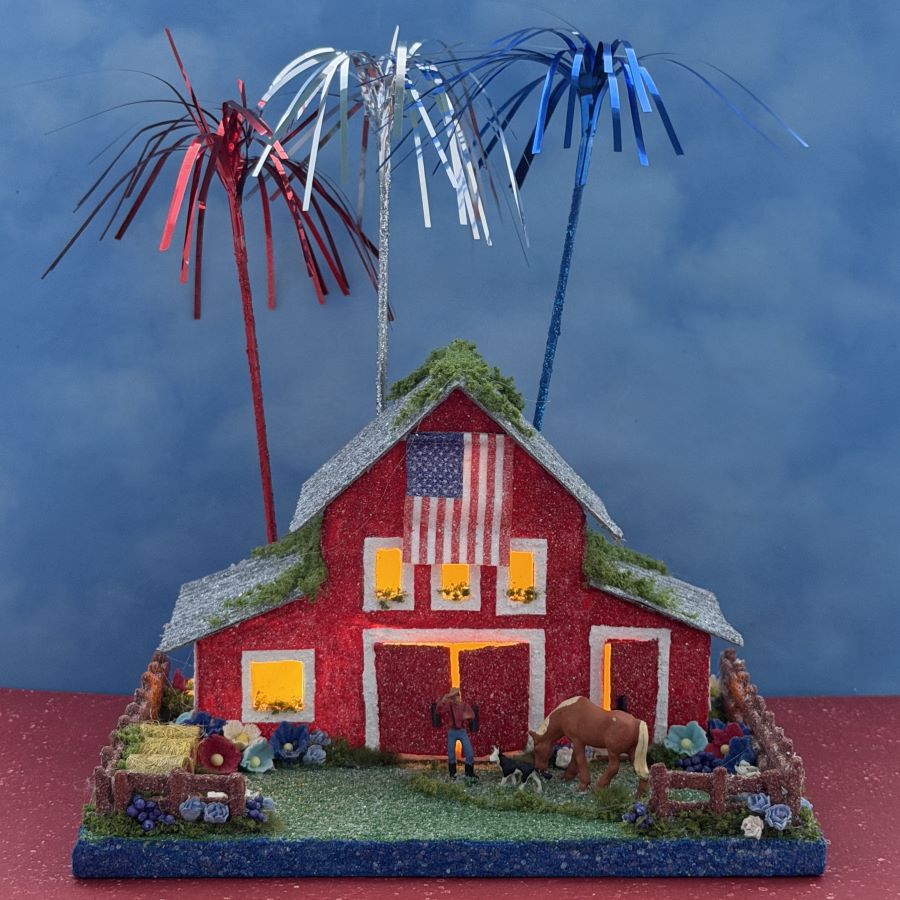
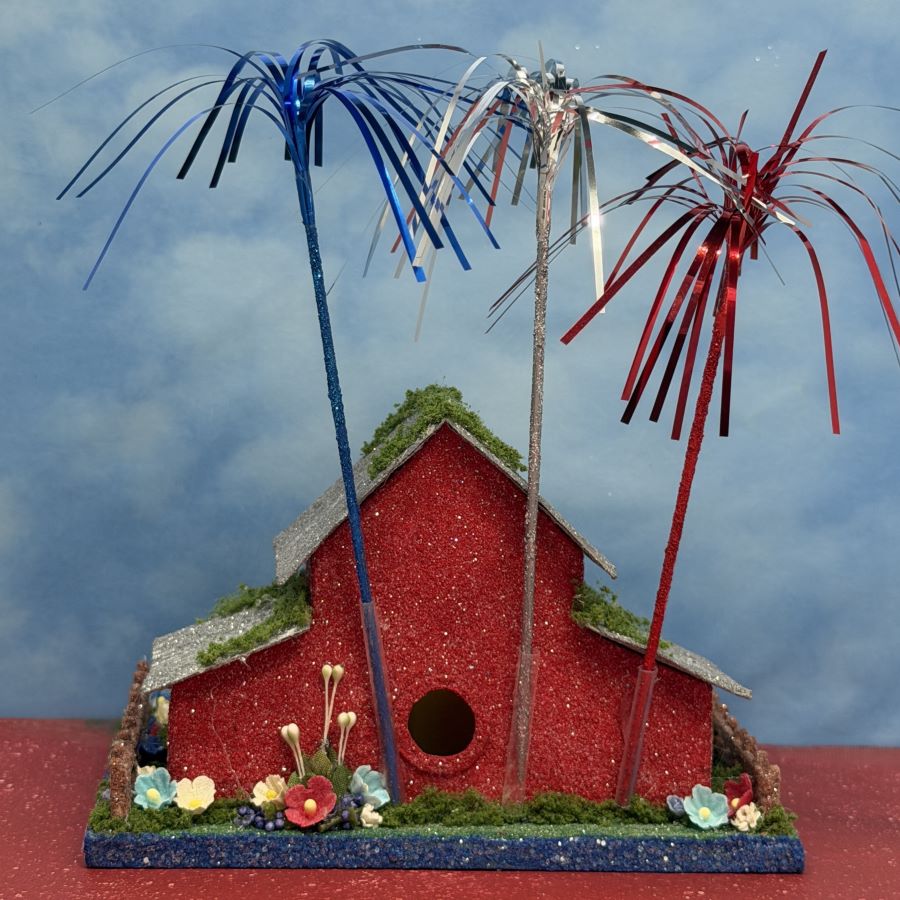
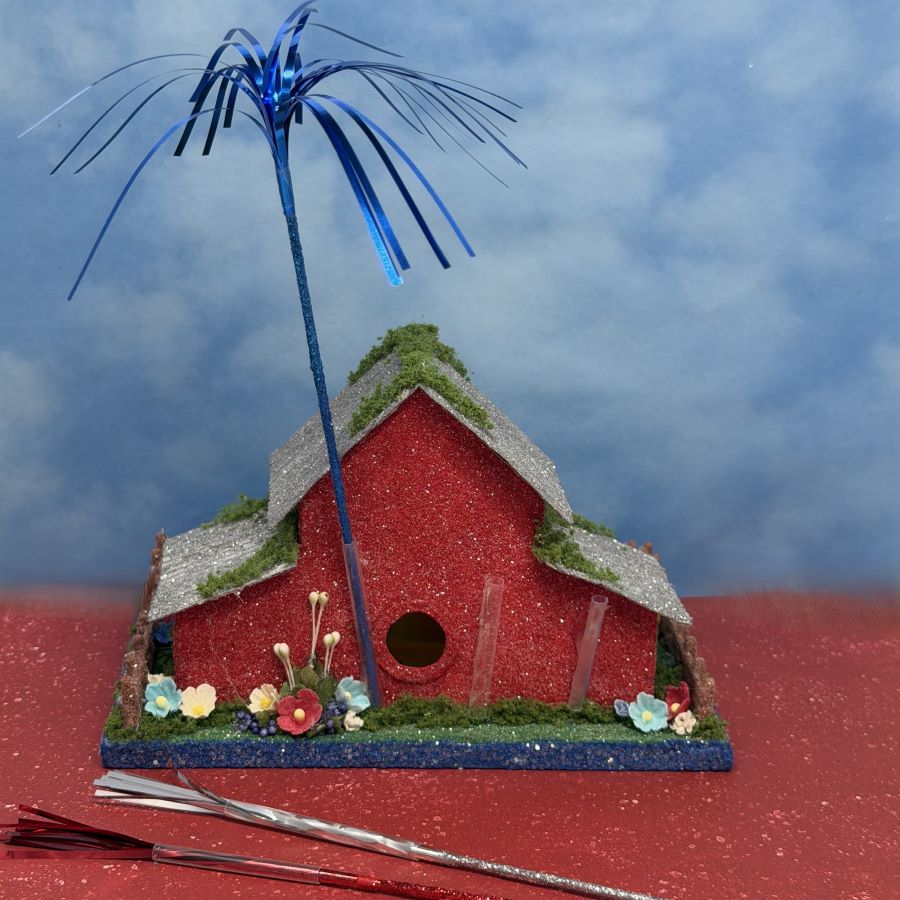
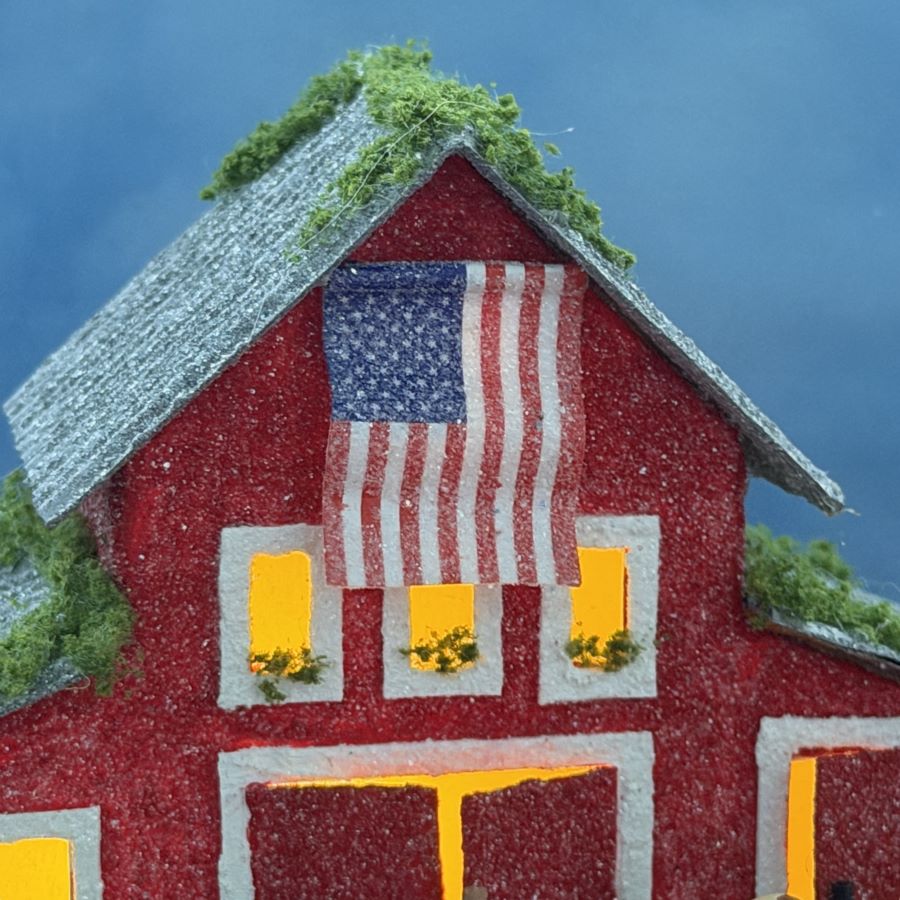
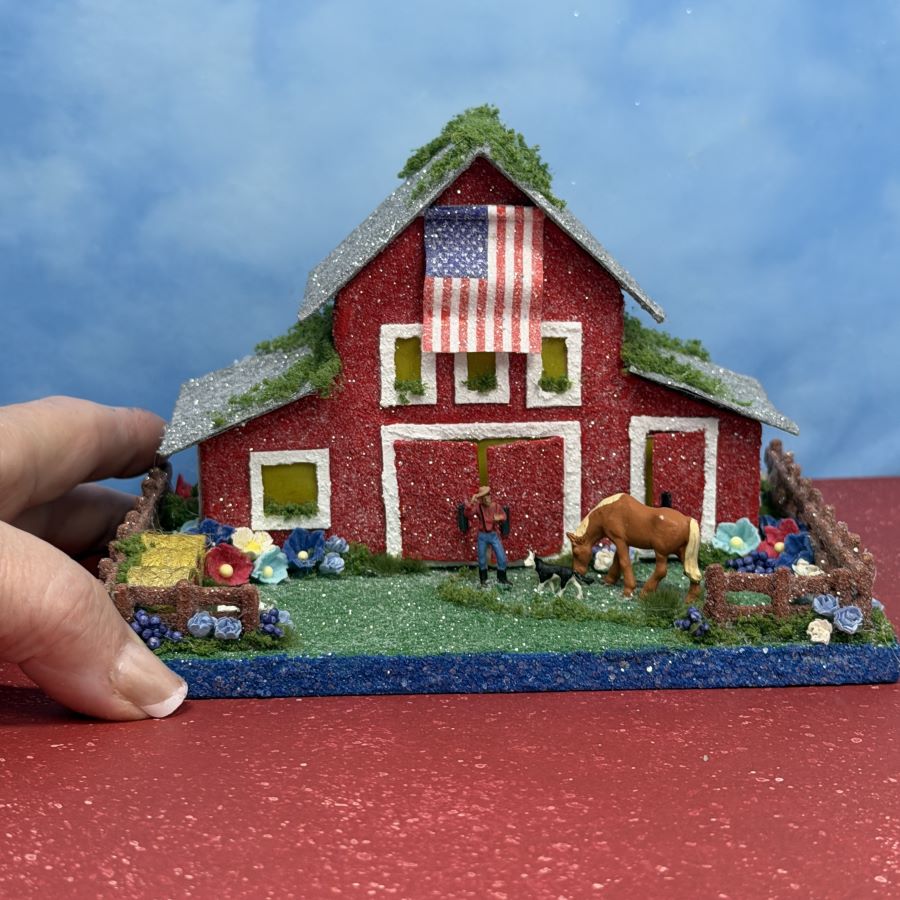
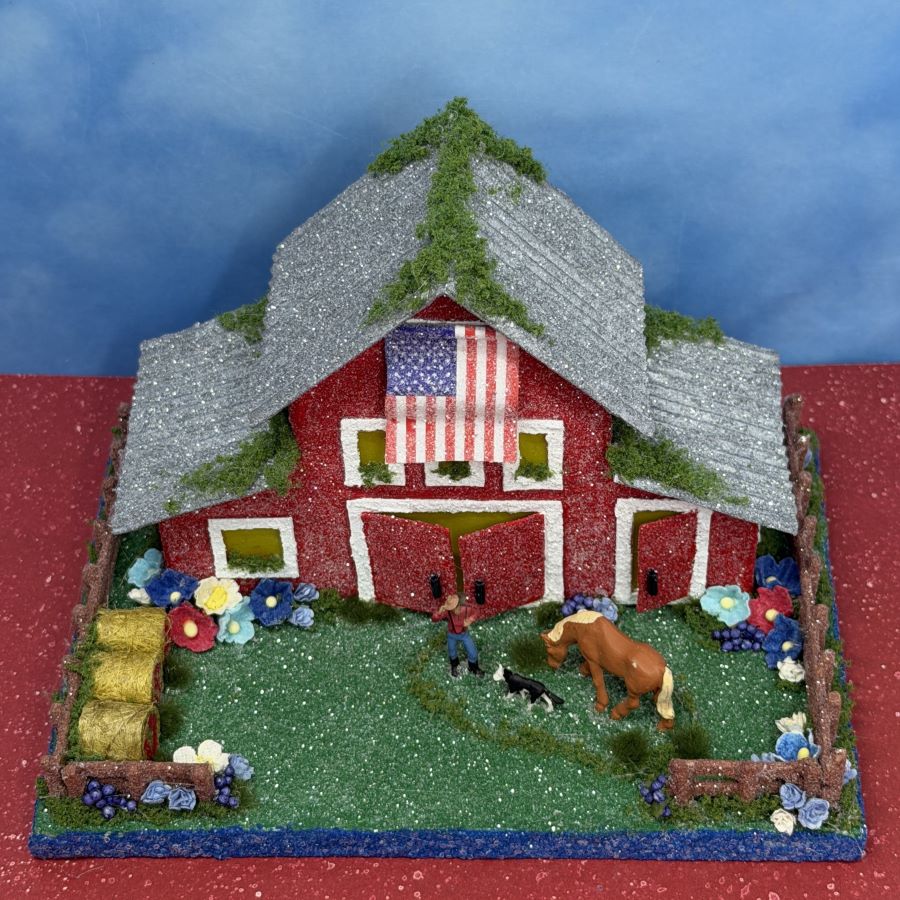
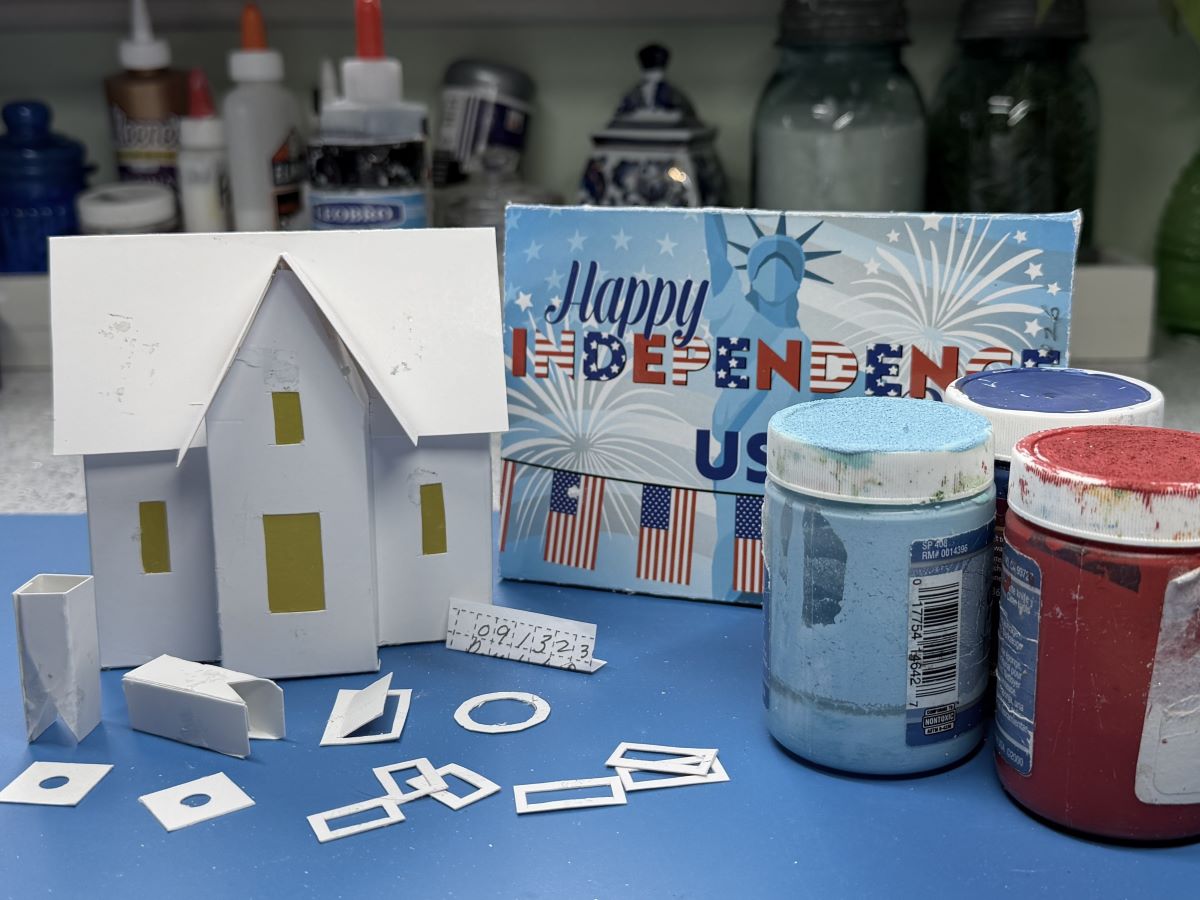
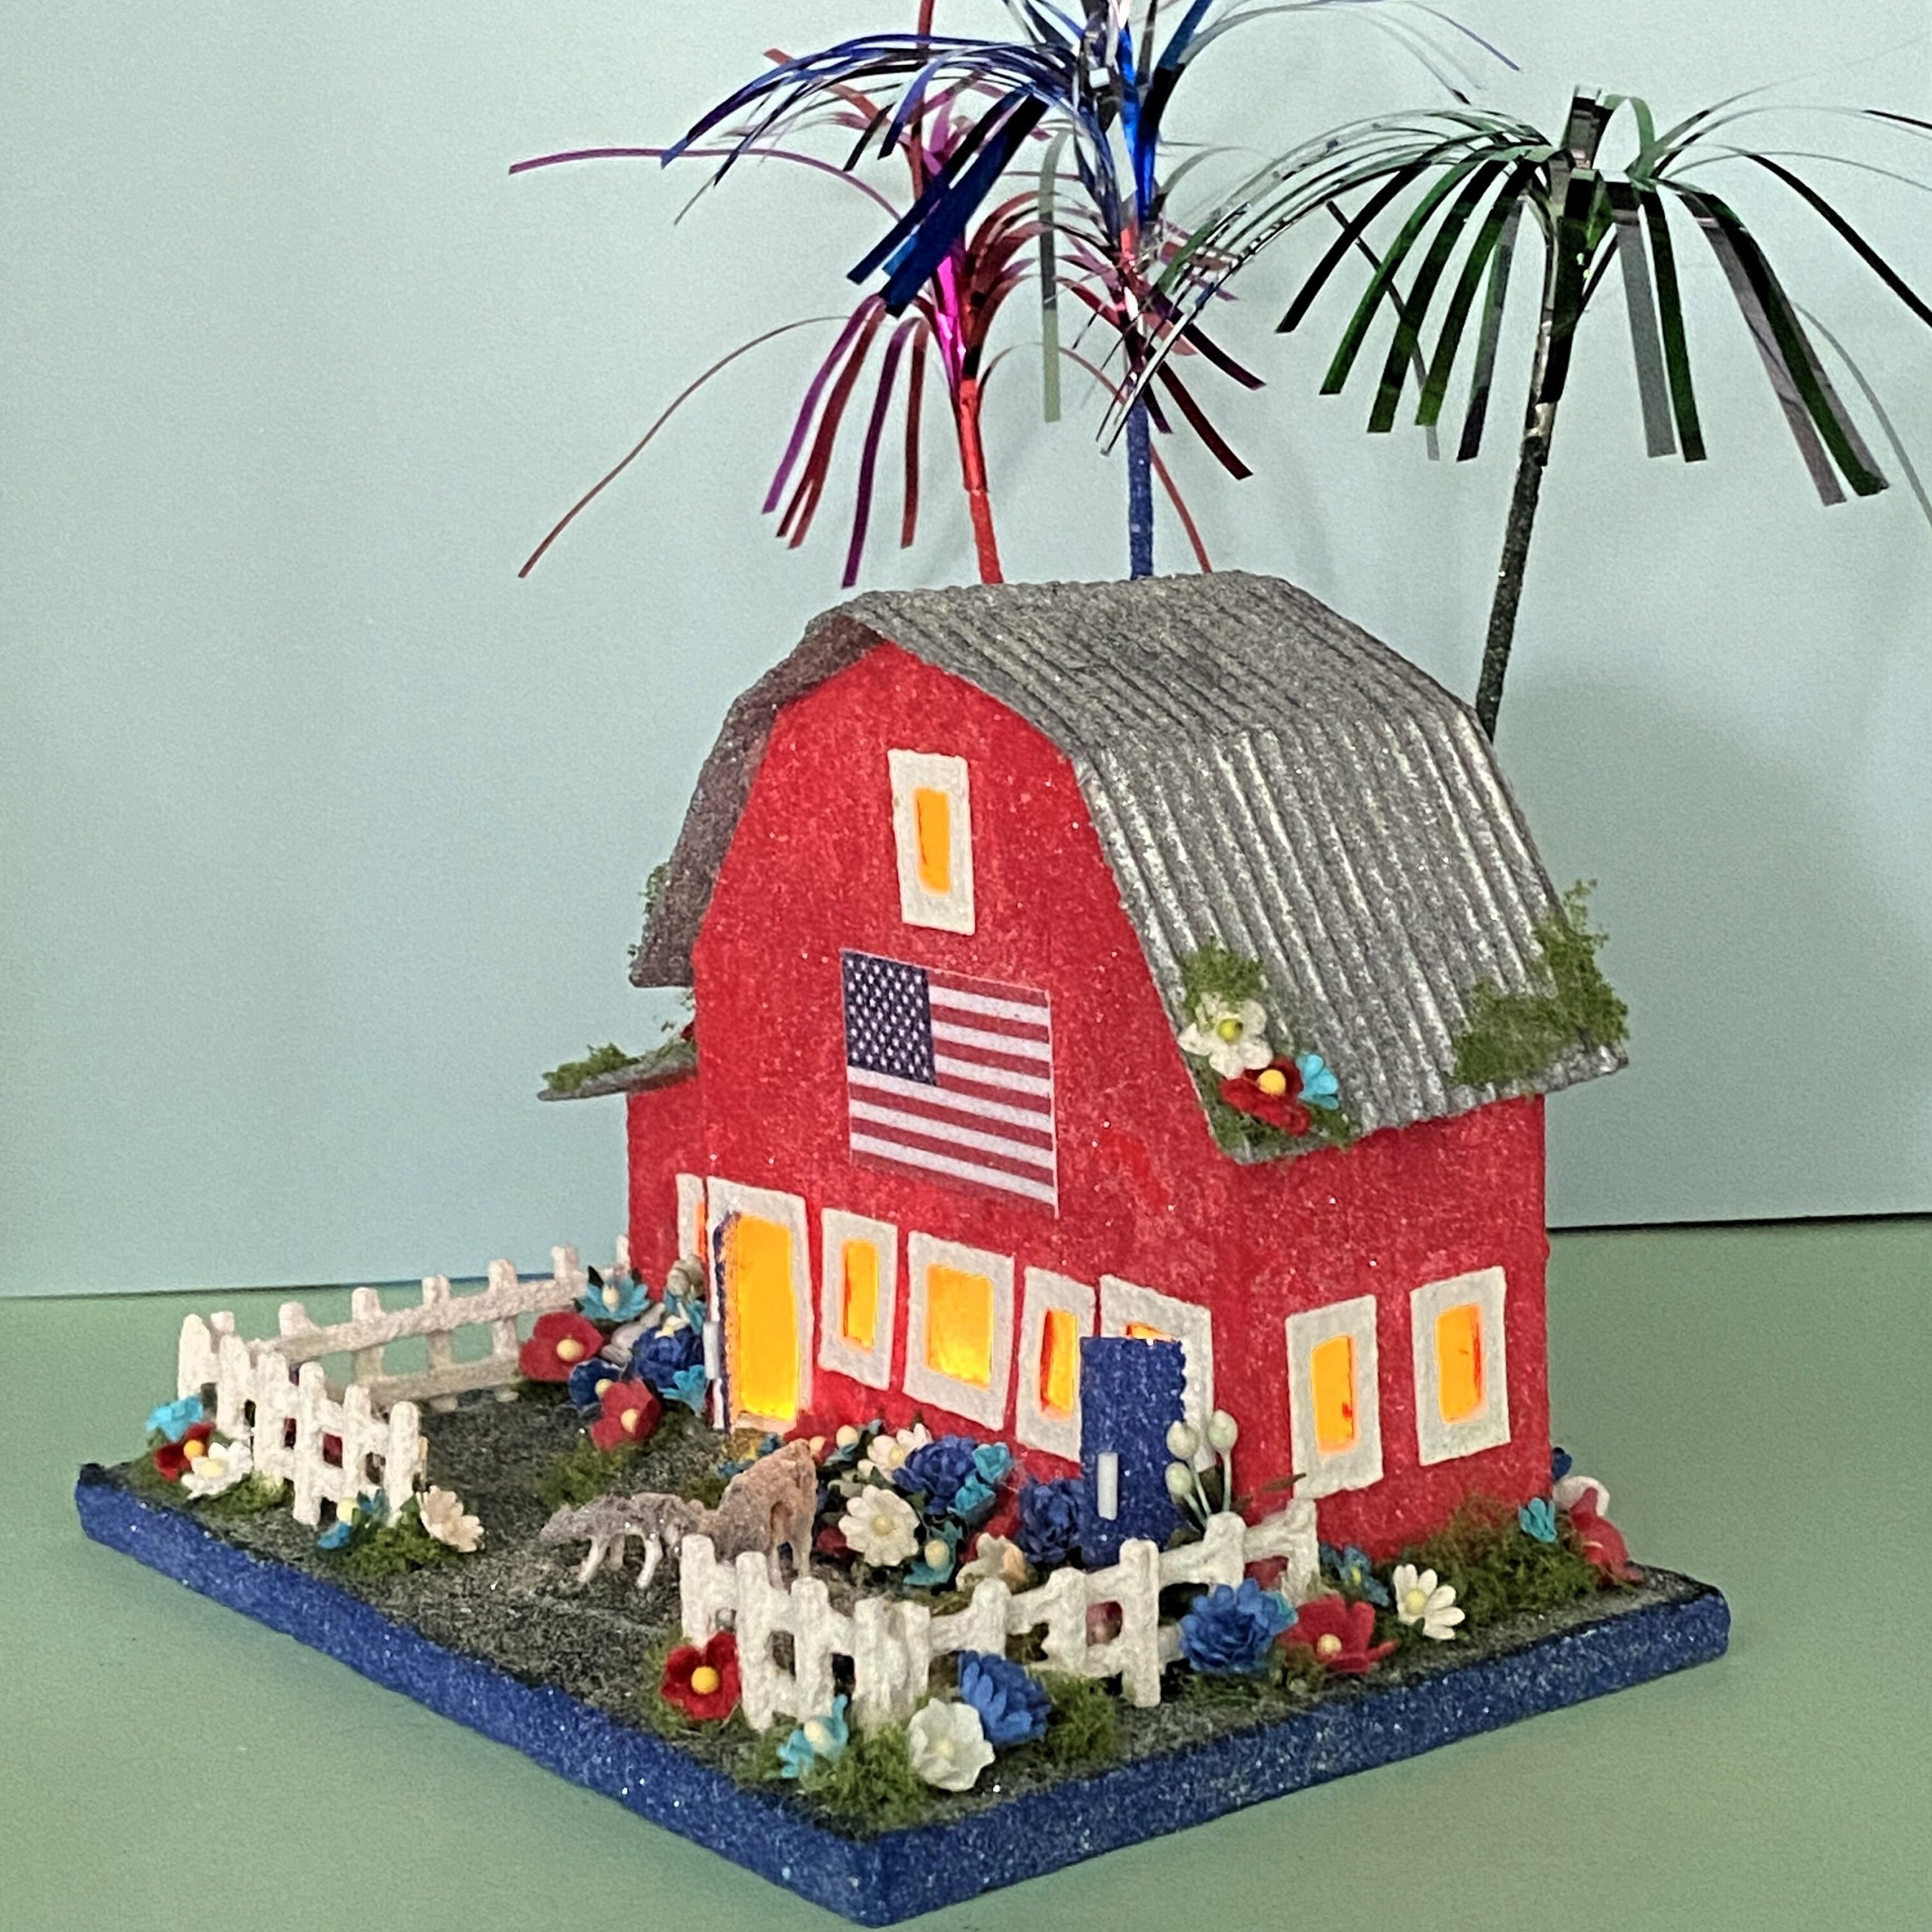
This Independence Day barn is a reminder of the farm families of the United States who have worked for generations, providing food for our country and the world.
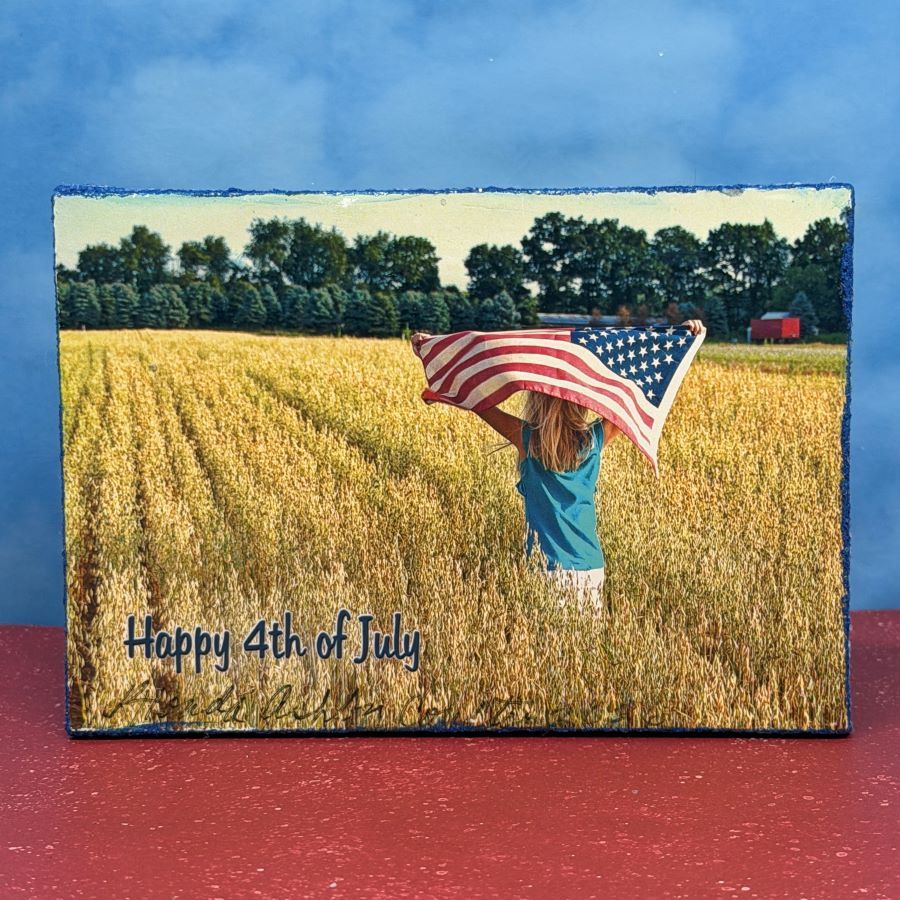
One of my favorite cards makes the base of this Fourth of July putz barn. I love this image of a young girl, running though the wheat field with the American flag flying behind her. It reminds me of my childhood. Both sets of grandparents lived 15-20 miles from my family. We saw one or the other, or both, almost every weekend. We spent many, many Sunday dinners at my mother’s parents’ home with uncles, aunts and cousins in attendance. In later years, we went to my father’s parents’ home on the Fourth and celebrated with fireworks.
I drew this pattern in February of this year. The flag hides another window in the haymow.
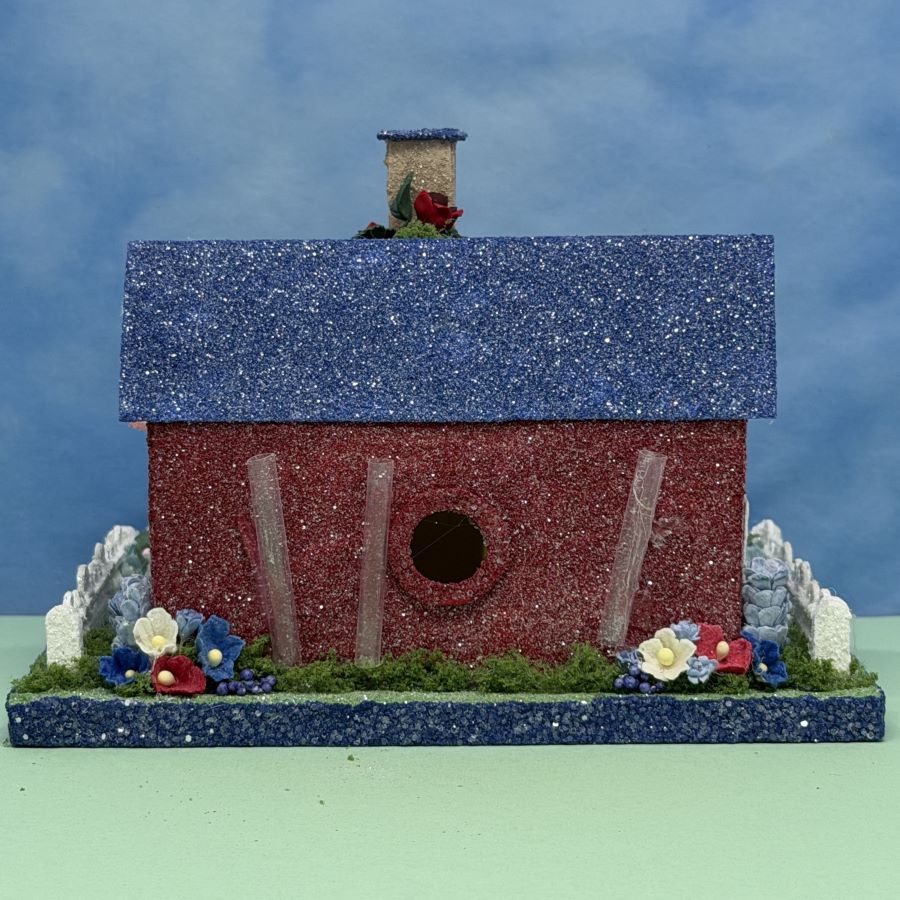
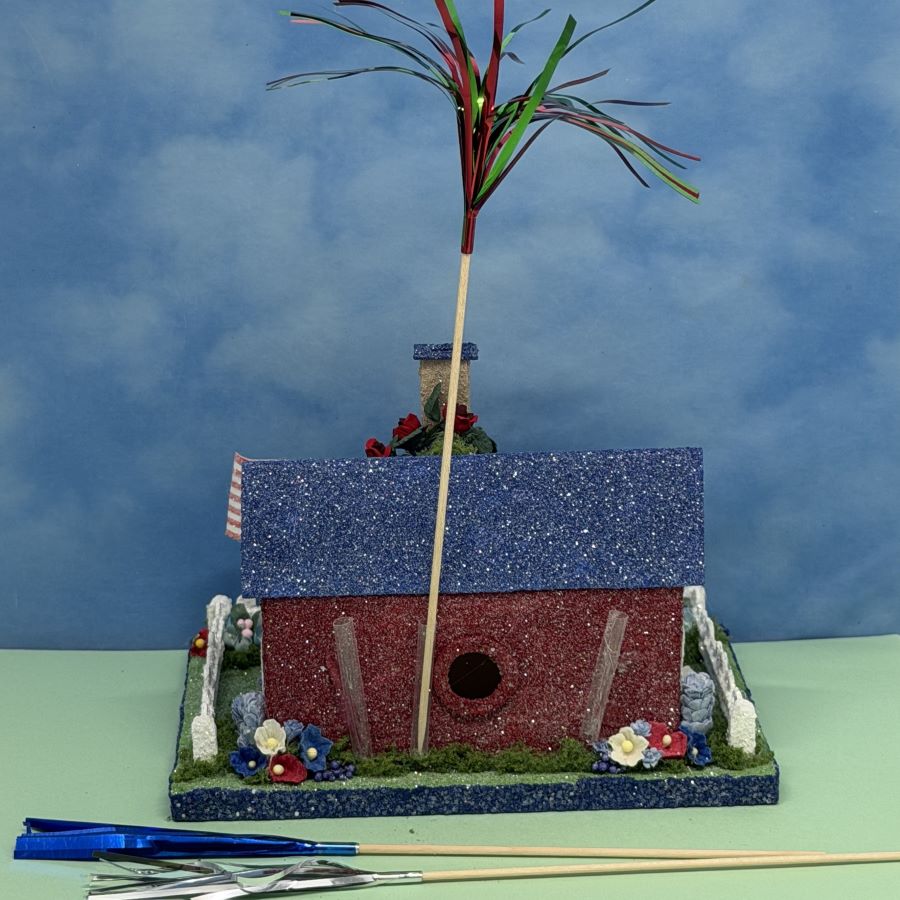
Clear plastic tubes glued to the back of the barn hold the fireworks. The fireworks can be removed for storage.
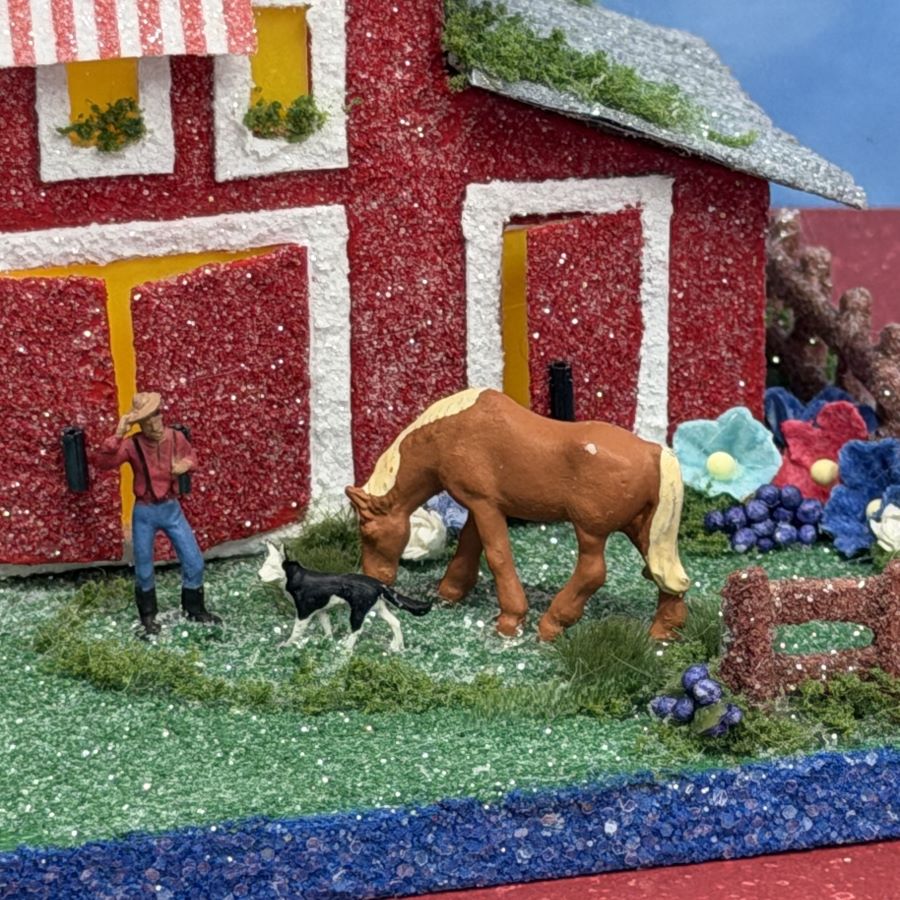
I made the post and board fence from craft matchsticks and slivered popsicle sticks. The barnyard features three haybales marked with U S A, the farmer, a horse and a favorite dog.
The peak of the barn roof holds the flag where it can catch the breeze.
The putz is 6 1/2″ wide by 4 1/4″ deep and is 4 1/4″ tall. With the fireworks, it is 7″ tall.
To see this putz, as well as more of my putz houses and Christmas ornaments I have made from upcycled holiday cards, please visit my Etsy shop.
All proceeds from my Etsy shop benefit Kenya Mercy Ministries. Run by native Kenyans, KMM works with the urban poor of Nairobi, Kenya, particularly the children and their families who live in Kibera, the largest urban slum in Africa. Thank you for your part in helping these children when you purchase items from my shop!
If you have questions about about my posted putz houses, or about creating your own putz houses, please ask. I am happy to share what I have learned about the art of putzing.
If you would like to create your own putz houses, check out my putz tutorials for more information. My blog is searchable, as well. You may find turorials that aren’t listed on the tutorial page.
I make putz houses in three sizes. ORIGINAL-size houses tend to be 5-6″ tall. An execption would be a church. The main body of the church fits the ORIGINAL size dimensions, but it will have an added height of two or three inches due to the steeple or bell tower. MINI putz houses are usually 3-4″ tall, and TINY MINI houses are under 3″ tall.
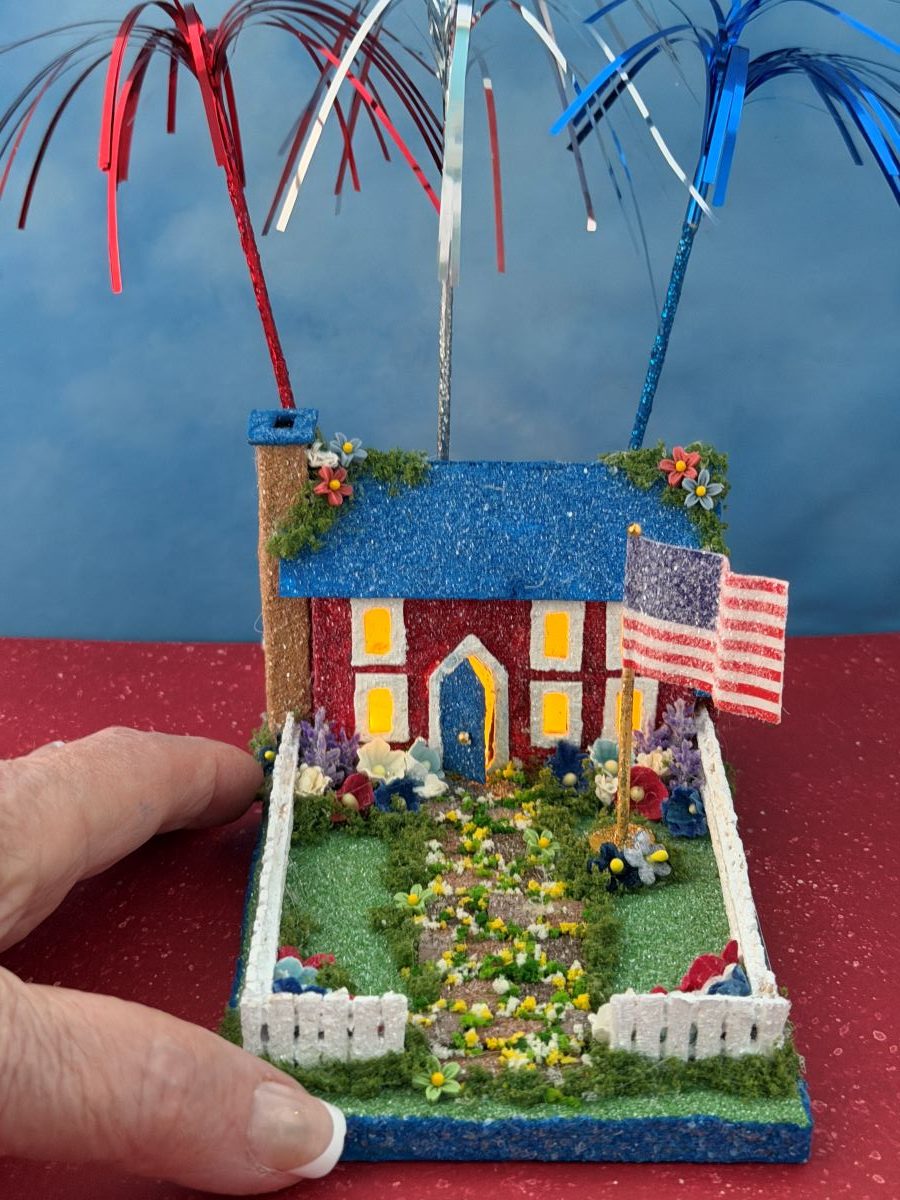
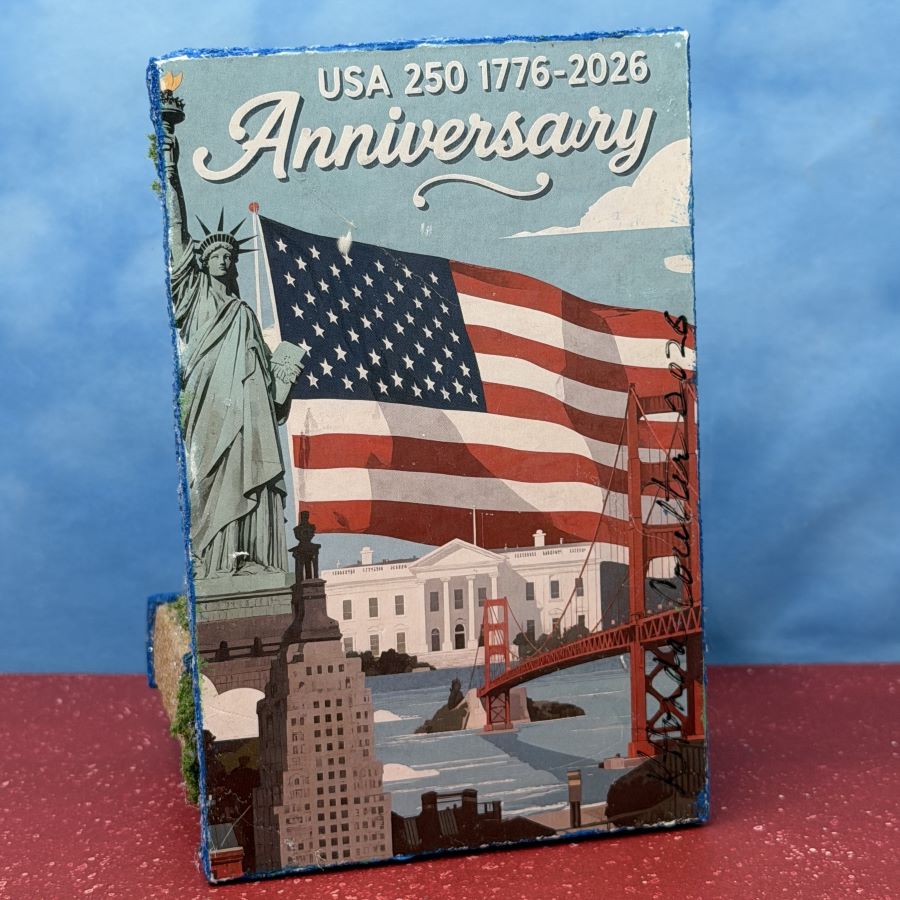
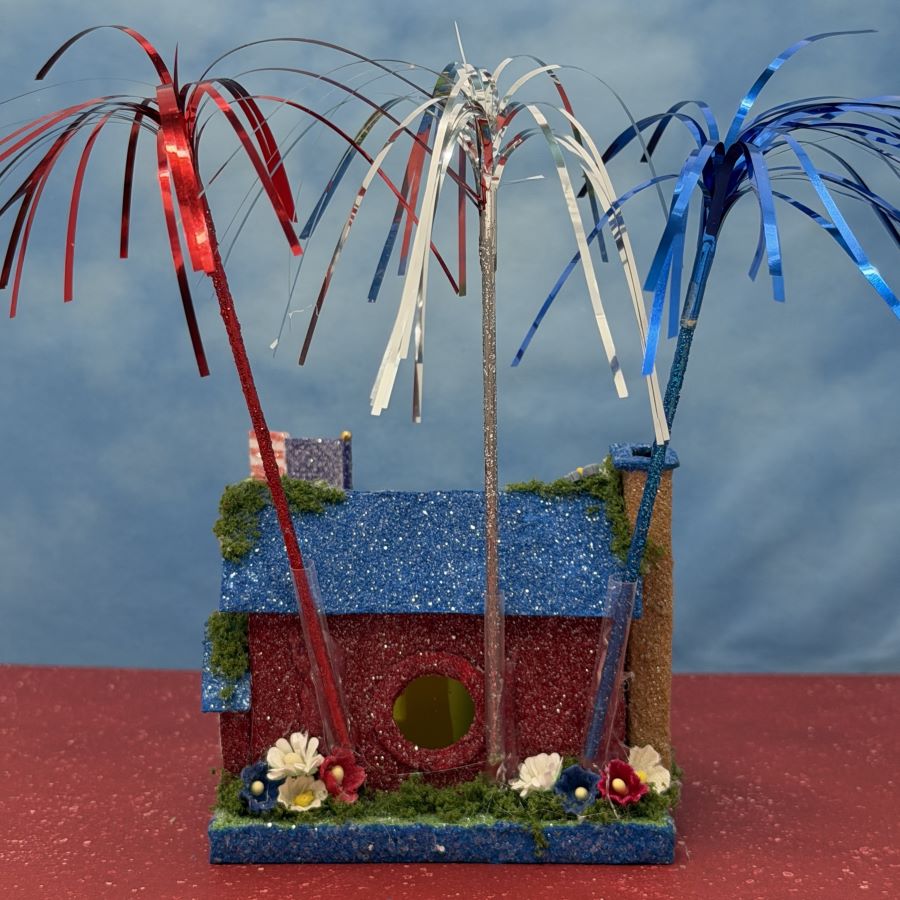
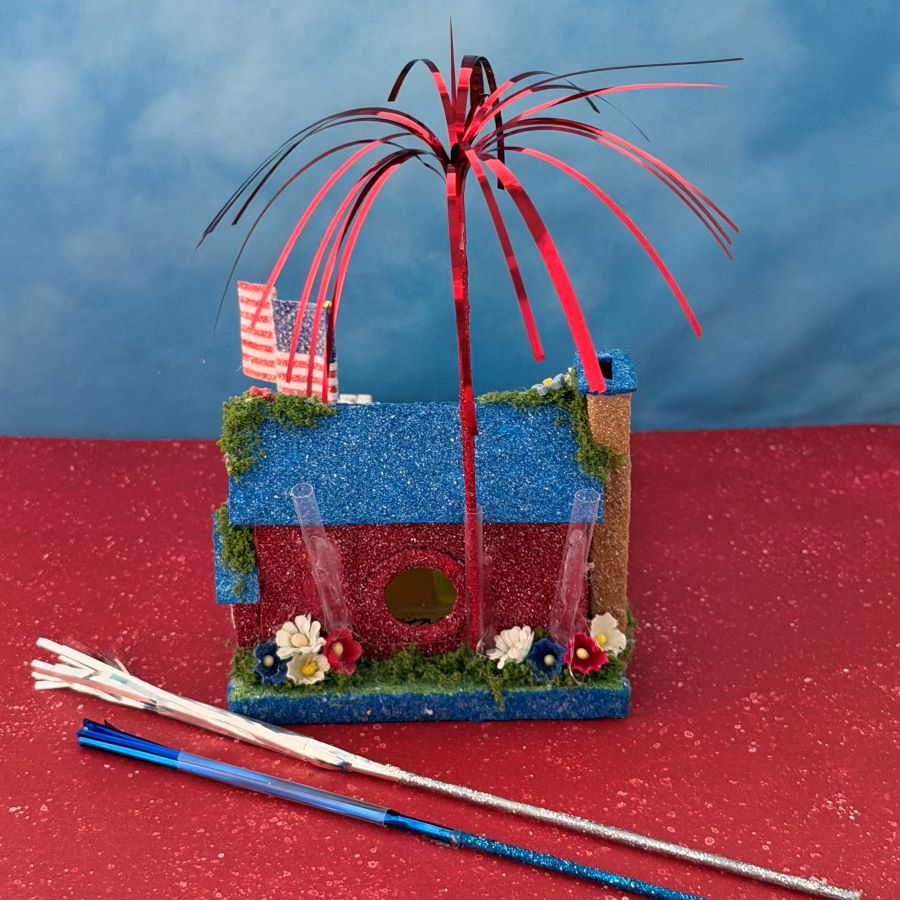
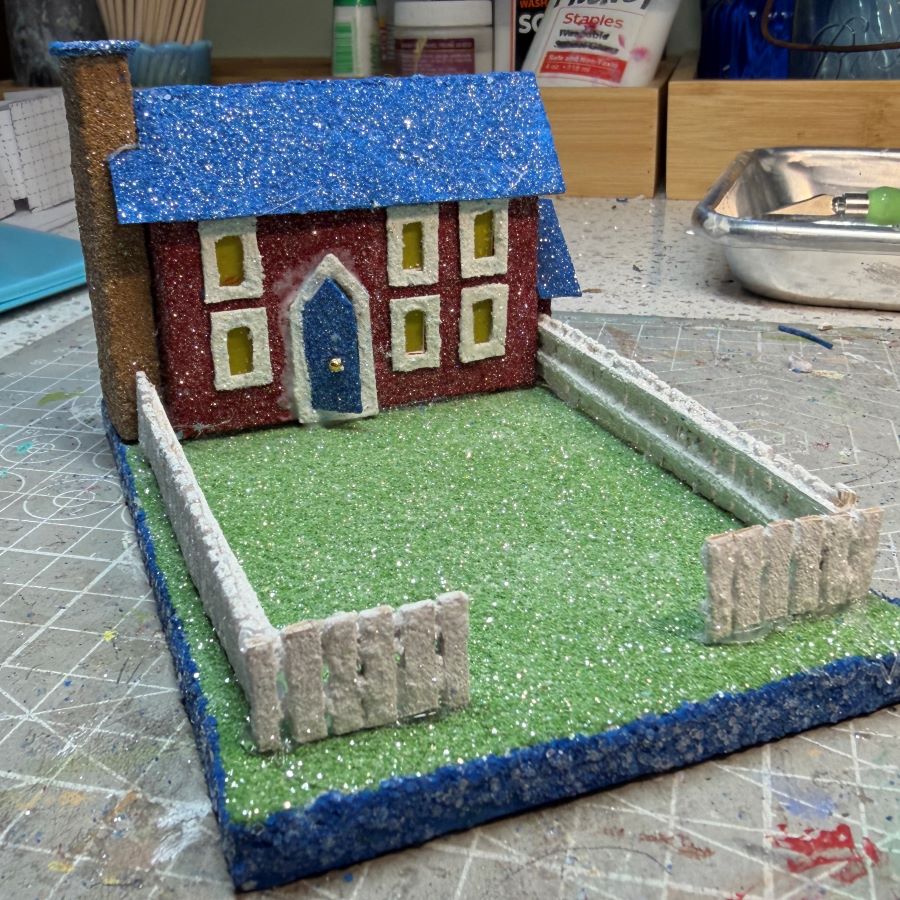
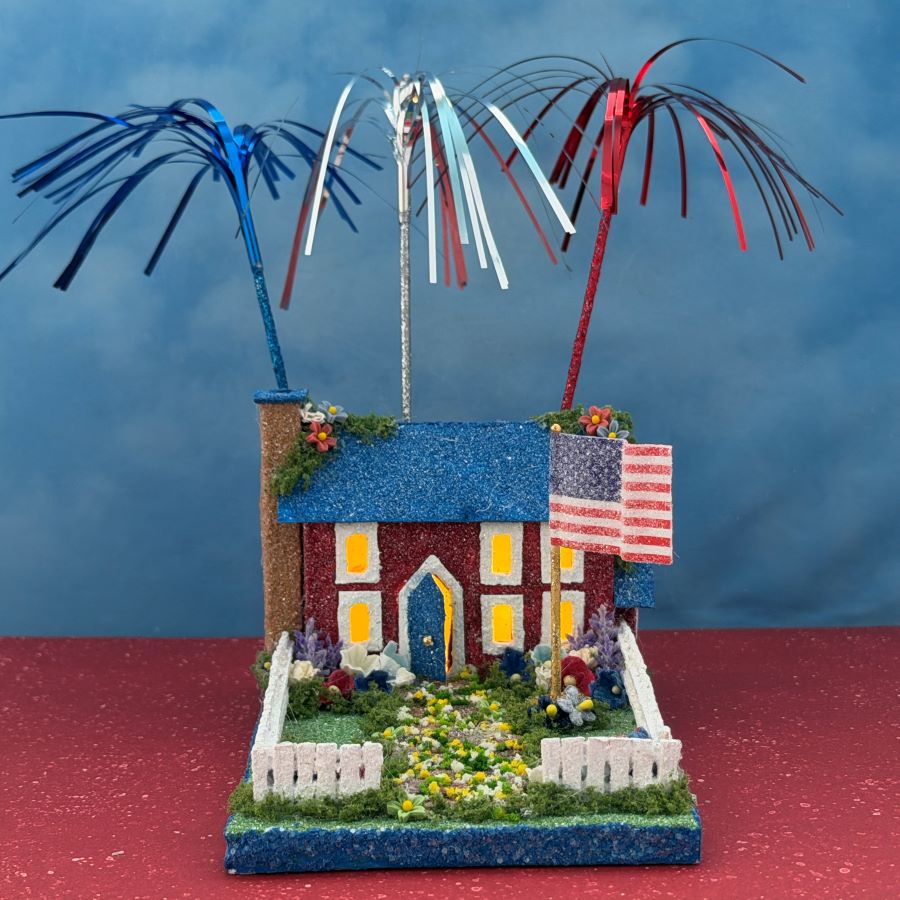
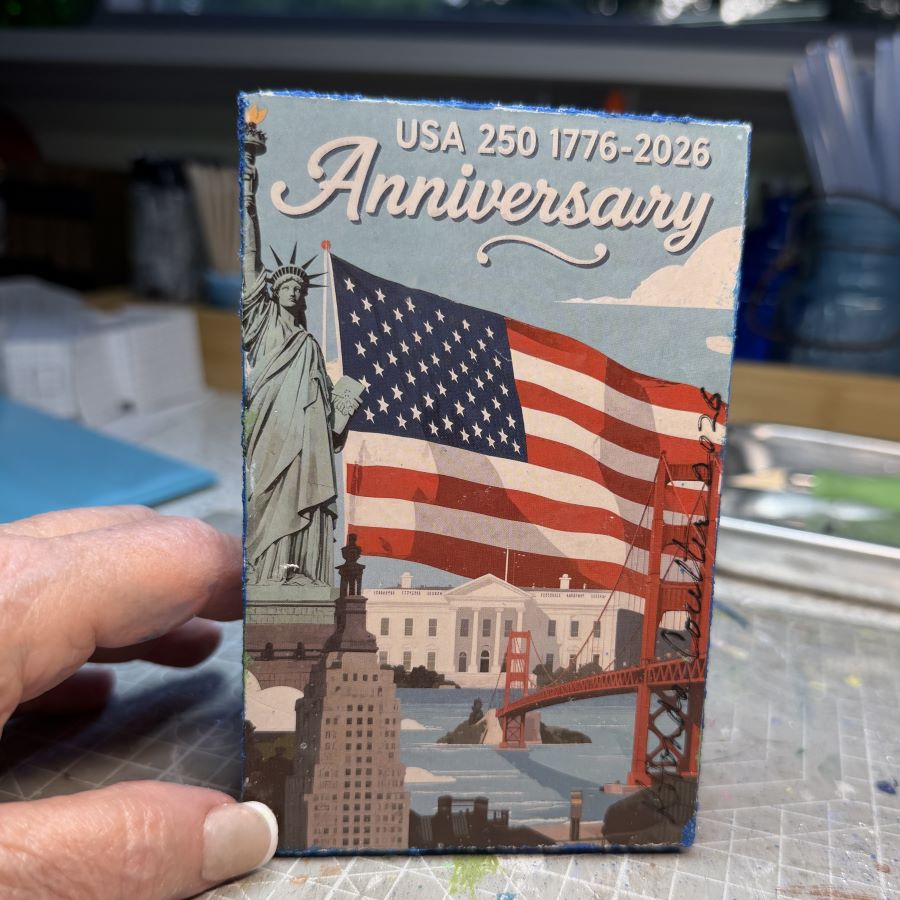
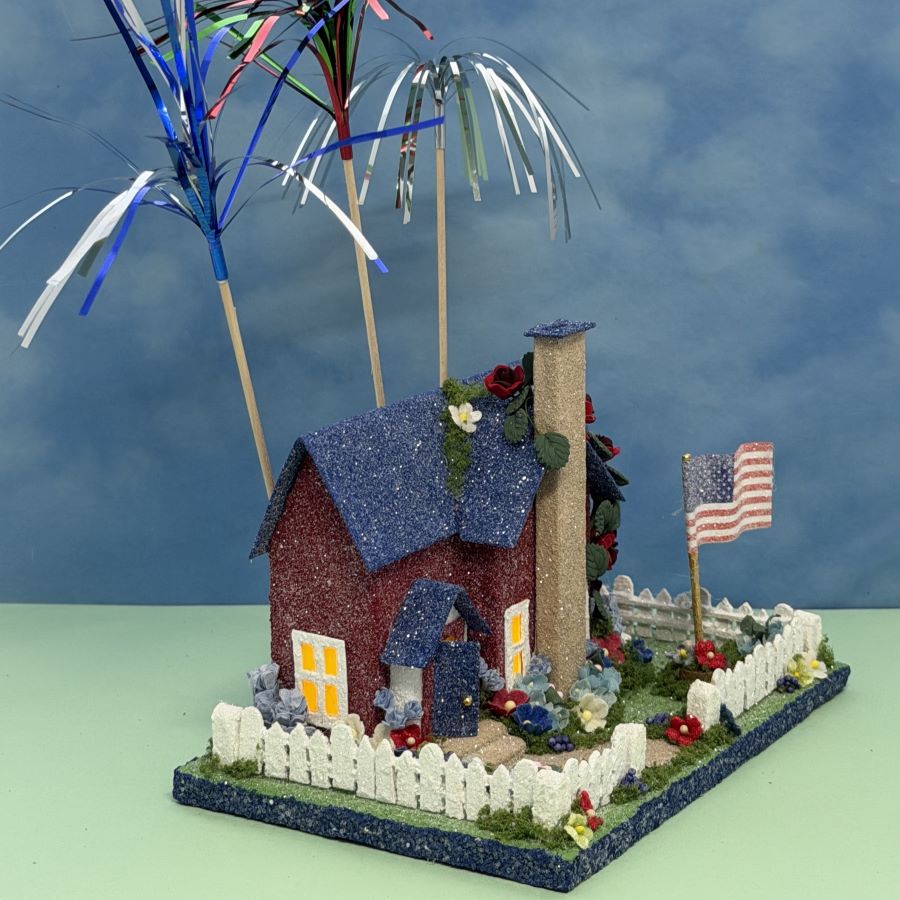
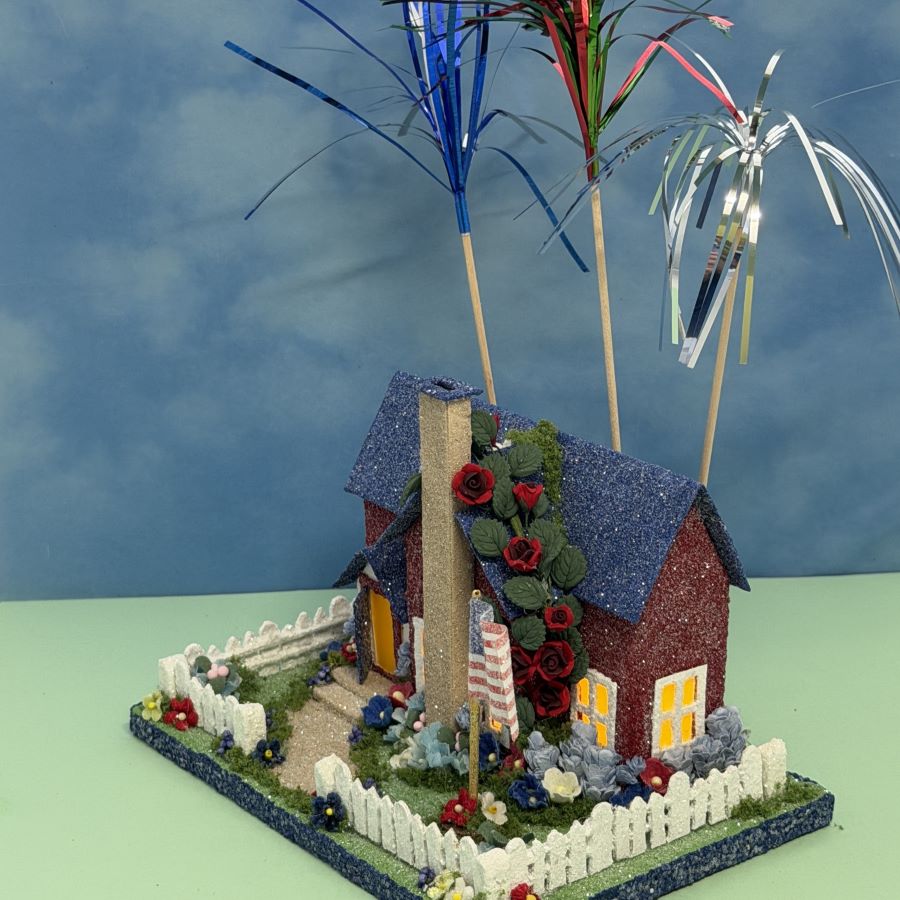
I wanted to use these small, 250th anniversary notecards for the Fourth to use as bases, but to fit the card, the house had to be small. Thus, a MINI. The putz base measures 3 1/2″ by 5 1/2″. The putz is 2 3/4″ tall, as measured from the bottom of the base to the top of the chimney. The fireworks add another 3″ to the height.
The fireworks fit into clear tubes on the back of the putz house. Each firework is easily removed for storage.
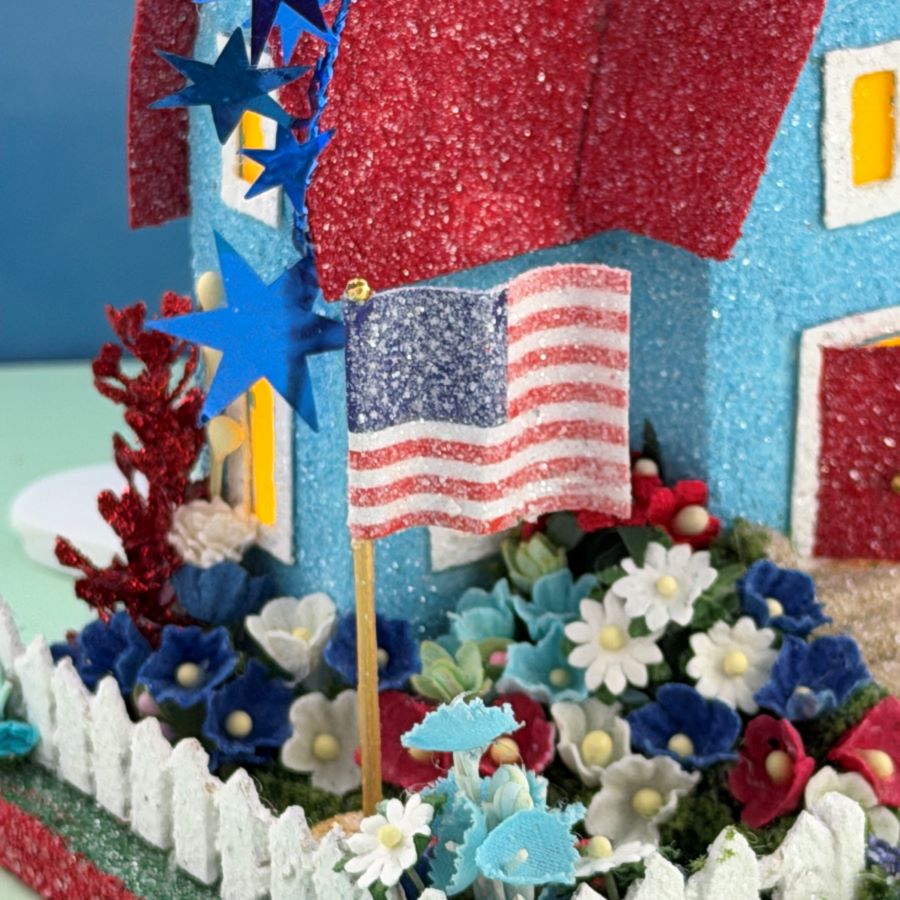
The USA flag waves proudly in the front yard. A handcrafted, wooden picket fence enclosed the yard.
Tiny sponge flock outlines the stepping stone sidewalk, creating a carpet of tiny flowers. Larger paper, velvet and acrylic flowers decorate the front yard.
From plain to Fourth of July ready! This MINI putz makes a great holiday centerpiece.
To see this putz, as well as more of my putz houses and Christmas ornaments I have made from upcycled holiday cards, please visit my Etsy shop.
All proceeds from my Etsy shop benefit Kenya Mercy Ministries. Run by native Kenyans, KMM works with the urban poor of Nairobi, Kenya, particularly the children and their families who live in Kibera, the largest urban slum in Africa. Thank you for your part in helping these children when you purchase items from my shop!
If you’re interested in making picket fences, see my tutorial: Making Picket Fences
If you have questions about about my posted putz houses, or about creating your own putz houses, please ask. I am happy to share what I have learned about the art of putzing.
If you would like to create your own putz houses, check out my putz tutorials for more information. My blog is searchable, as well. You may find turorials that aren’t listed on the tutorial page.
I make putz houses in three sizes. ORIGINAL-size houses tend to be 5-6″ tall. MINI putz houses are usually 3-4″ tall and TINY MINI houses are under 3″ tall. I found small, 250th anniversary notecards for the Fourth. To fit the card, the house had to be small. As you can see, it juuussttt fit. If I had checked the fit before painting the house I could have left the little addition off of the right side, but it fits so it stays. This MINI-size putz house is ready for landscaping.
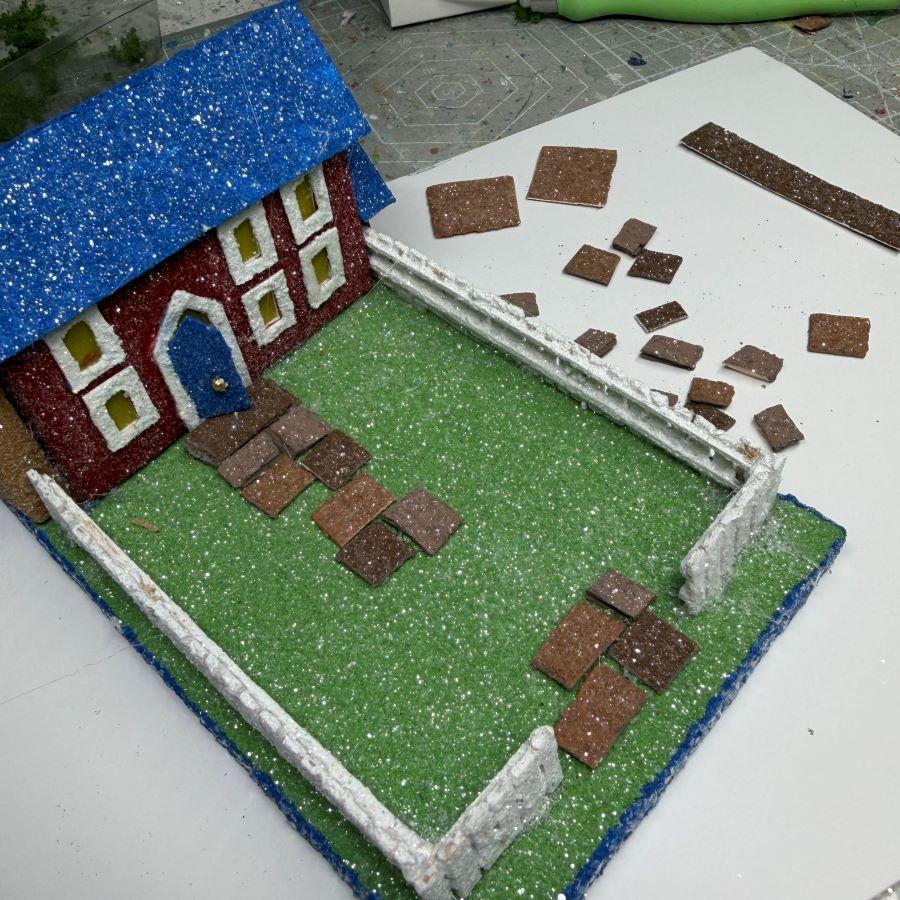
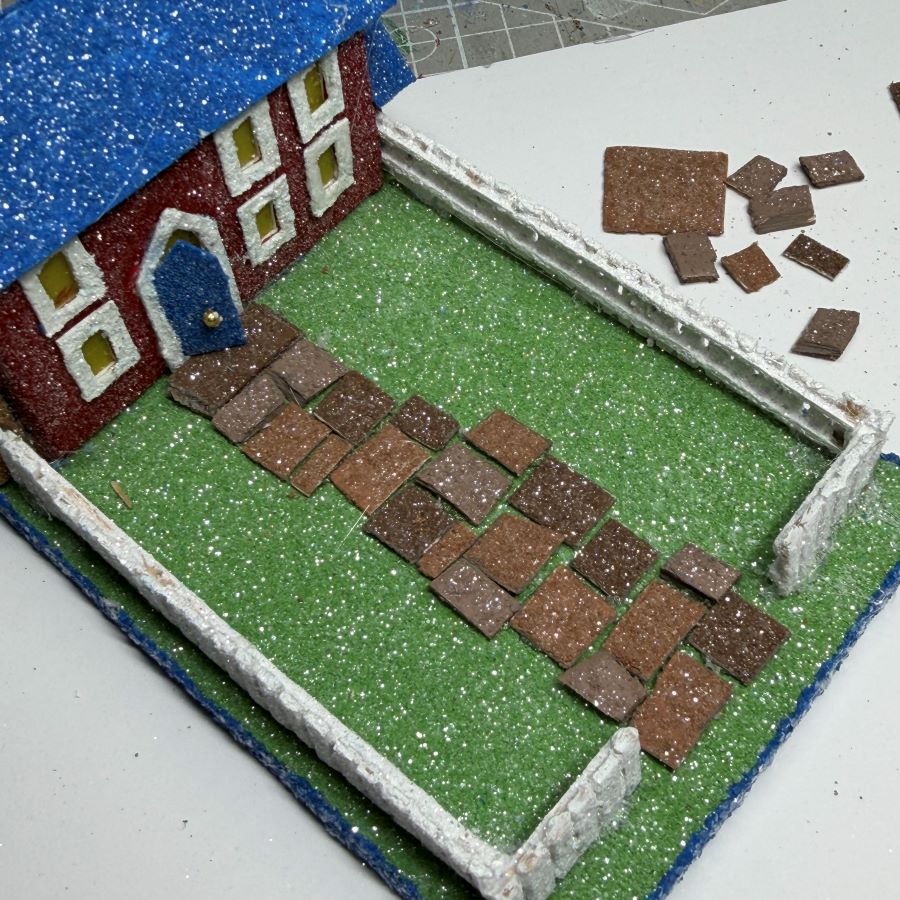
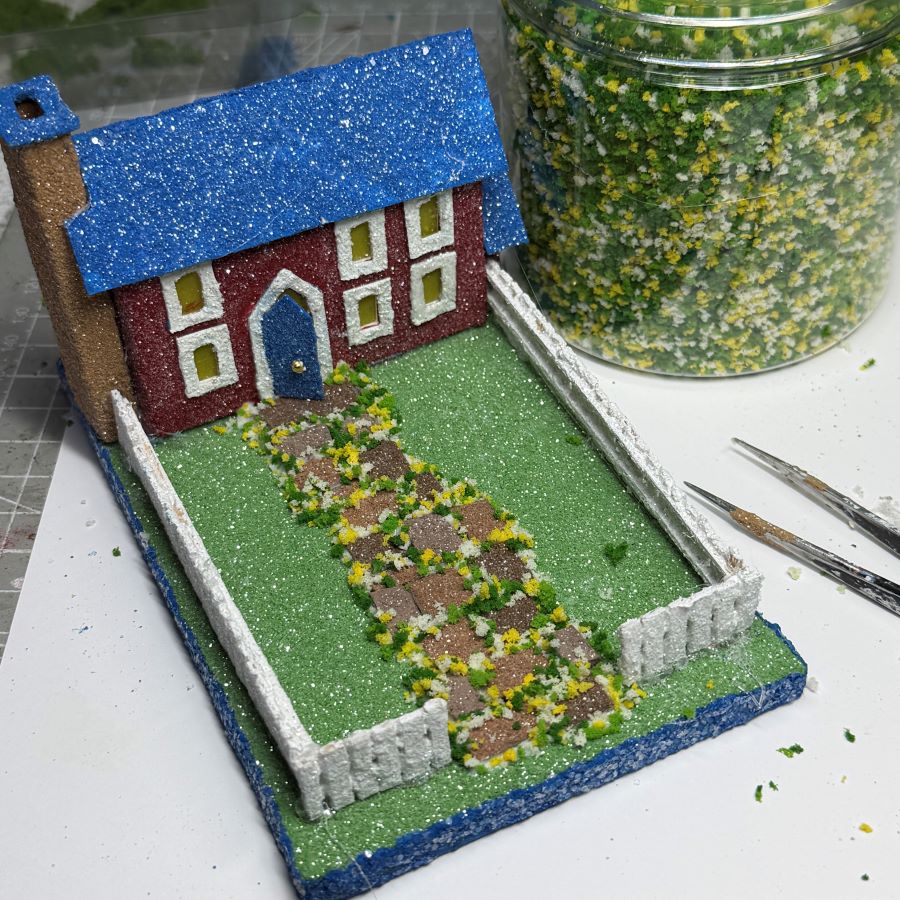
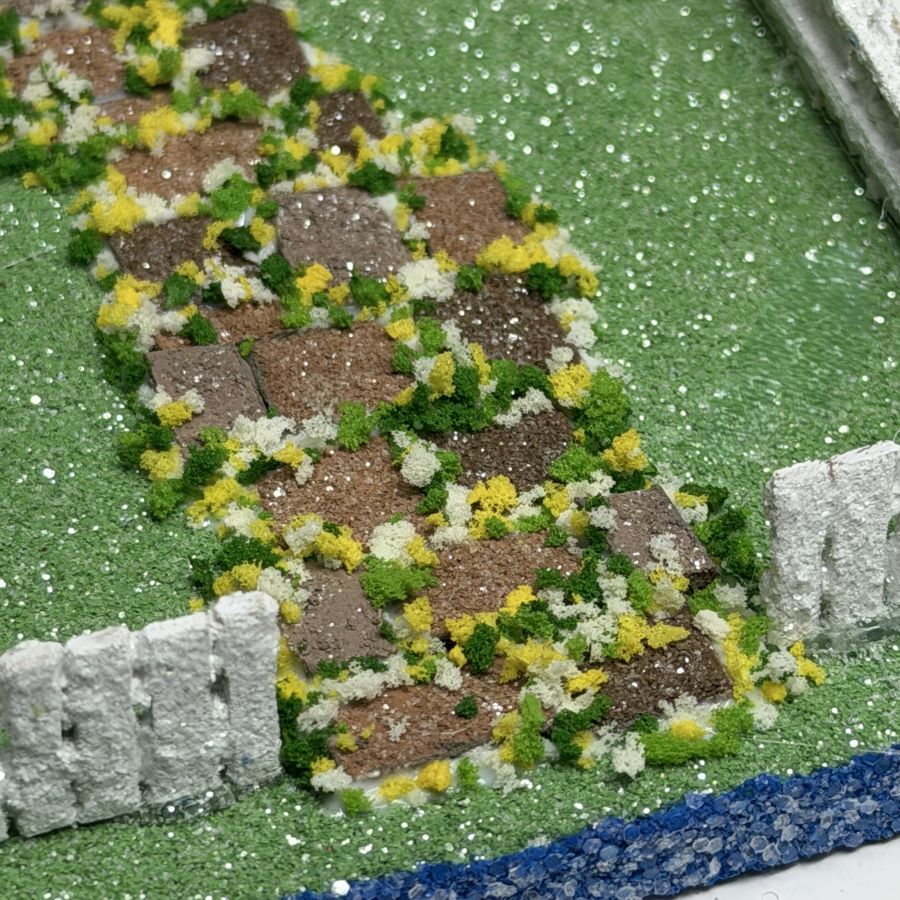
I wanted to make a stepping stone sidewalk, using painted bits of cardboard I found in my “sidewalks” supply drawer. There were three shades of brown. After cutting them in various sizes, I used a brown magic marker to color the cut sides of each piece. I glued them to the base, using hot glue. I started at both ends to meet in the middle. The final few “stones” were cut to fit the remaining space.
I used this very small, sponge flock in two shades of green, yellow and white. Using a glue dispenser with a fine tip, I outlined the stones, then sprinked flock over them. I pressed the flock gently into the glue, then gently shook the base over a glitter tray to catch the loose flock. In the righthand picture, you may notice I missed a spot betweet two stones. An easy fix. I haven’t tried this technique before, but I like the way it turned out. When viewed in person, it looks like tiny flowers blooming among the stones.
I will post pictures of the finished putz house later this weekend.
If you’re interested in making picket fences, see my tutorial here: Making Picket Fences
If you have questions about this technique, about my posted putz houses, or about creating your own putz houses, please ask. I am happy to share what I have learned about the art of putzing.
To see more of my putz houses, as well as Christmas ornaments I have made from upcycled holiday cards, please visit my Etsy shop.
All proceeds from my Etsy shop benefit Kenya Mercy Ministries. Run by native Kenyans, KMM works with the urban poor of Nairobi, Kenya, particularly the children and their families who live in Kibera, the largest urban slum in Africa. Thank you for your part in helping these children when you purchase items from my shop!
Would you like to create your own putz houses? Check out my putz tutorials for more information. My blog is searchable, as well. You may find turorials that aren’t listed on the tutorial page.
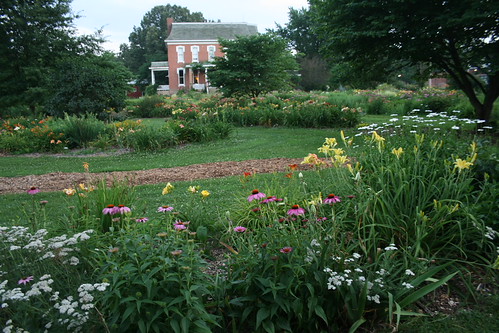
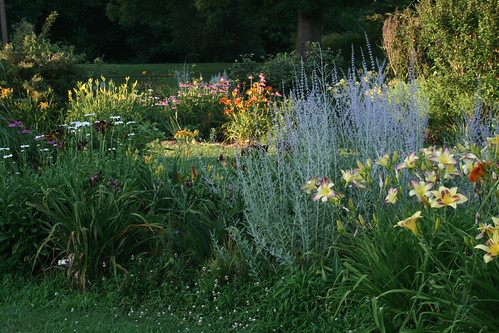
At our previous home, we had expansive gardens featuring daylilies, hosta and many perennials. Looks like a lot of work, doesn’t it? We were younger then…
Most of those plants were non-natives. It hadn’t occurred to us to work with natives. At our present home we are striving to have a more eco-friendly garden, though we still treasure many of those plants from the old house. Daylilies, hostas and perennials accompanied us to our new home when we moved.
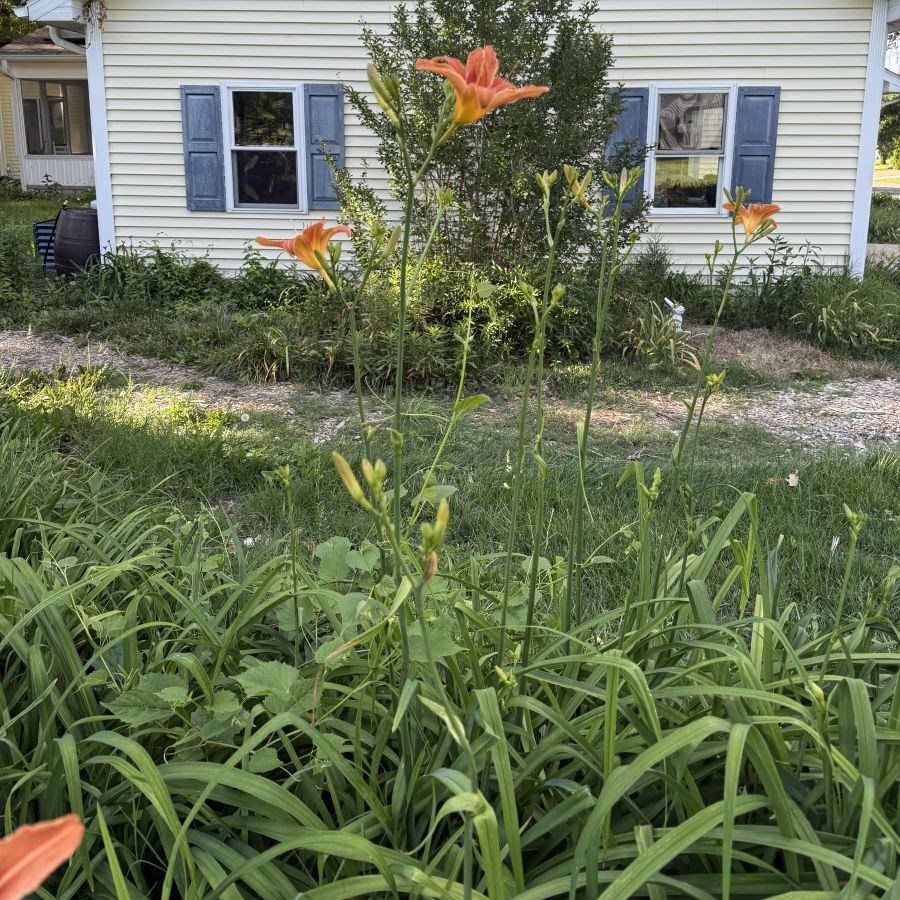
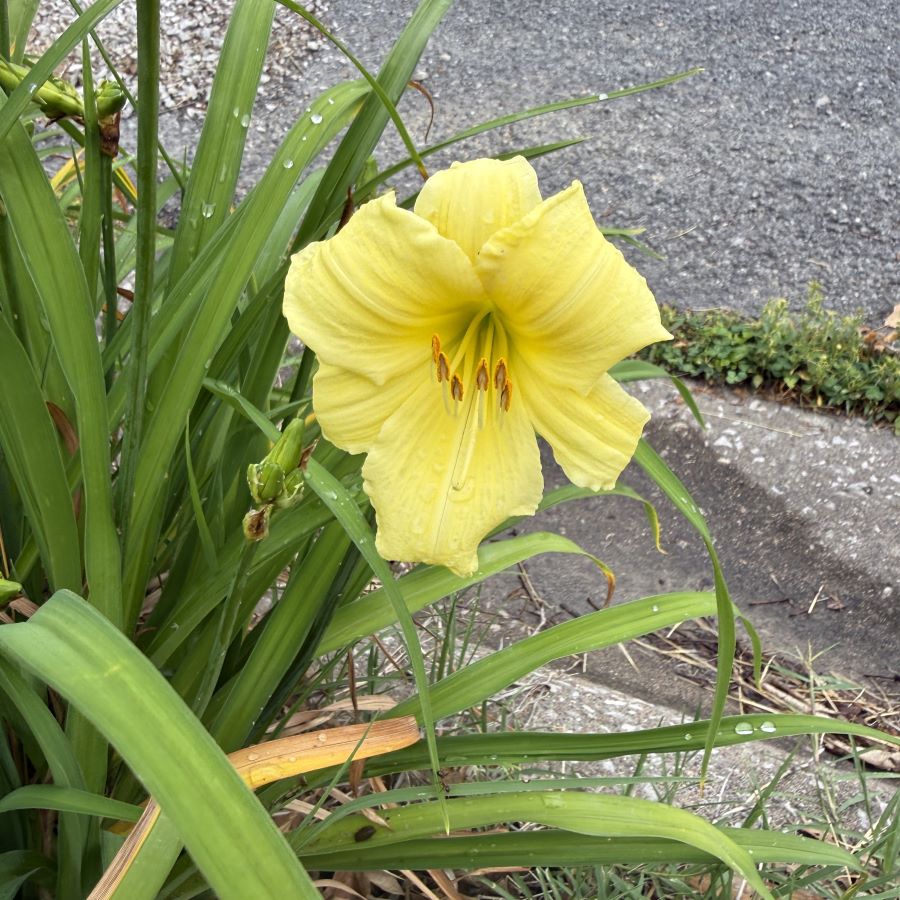
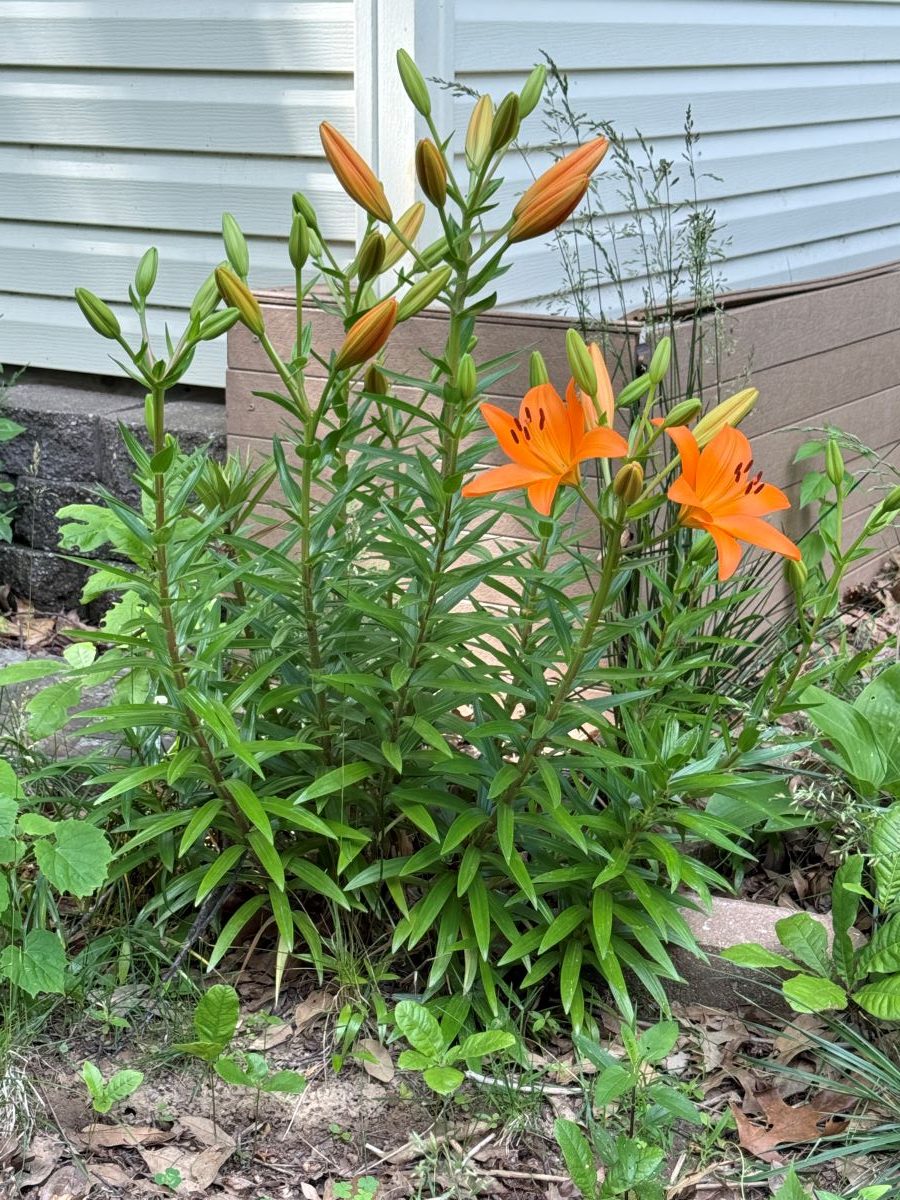
The first of the daylilies are blooming. For us, that signals the waning of spring and the waxing of summer. We aren’t sure of the name of the daylily on the left. After more plants bloom around it, we will check our list of that bed. We should be able to identify it. The one on the right is ‘Fragrant Treasure.’ This yellow daylily is one of the first to bloom in our garden. It grows to about 24″.
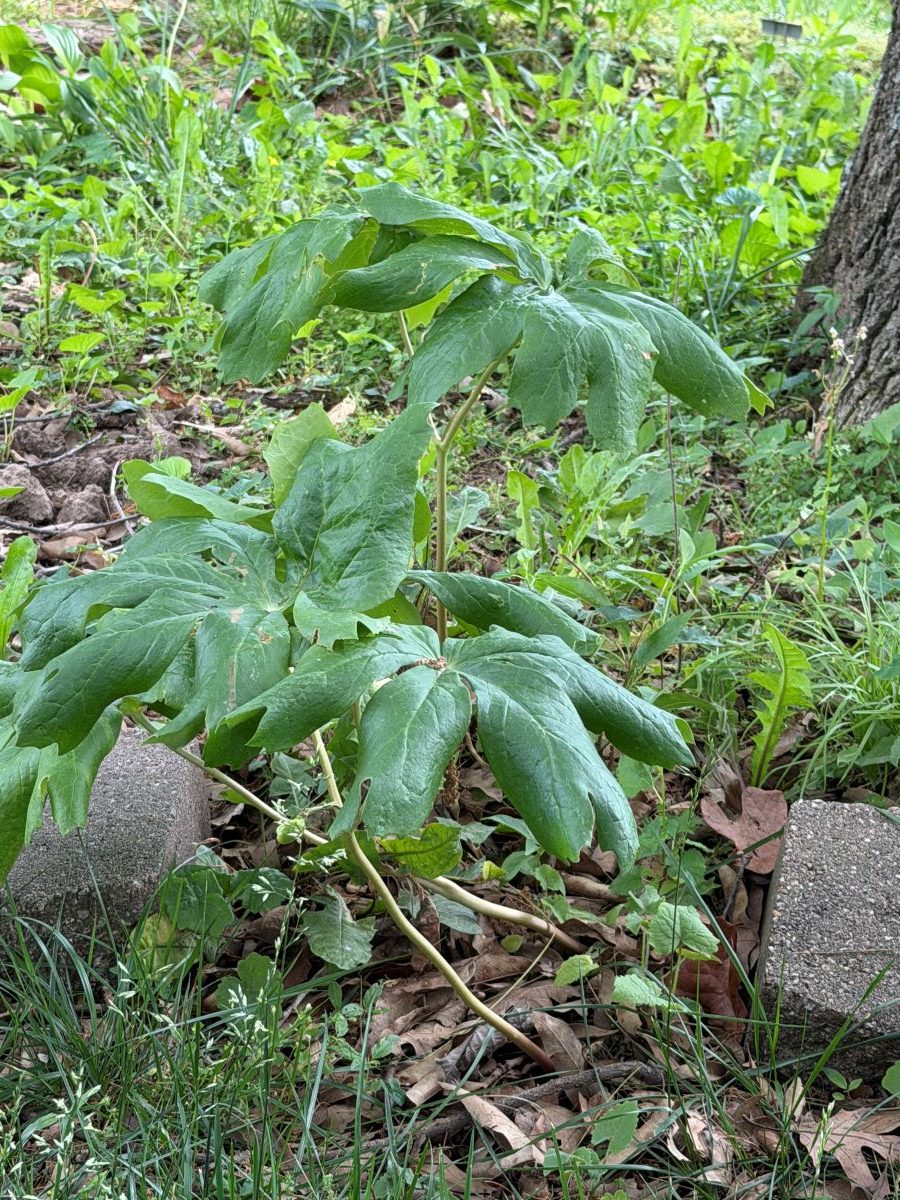
We have three mayapples under one of the large oak trees. They bloomed and have formed fruit. We’re watching to see how they develop. The Asiatic lilies came from our previous home. There are two clumps, both on the east side of the shed. I think they would appreciate a sunnier home, so, after blooming, I’ll have my garden gnome move them to the south side of the house.
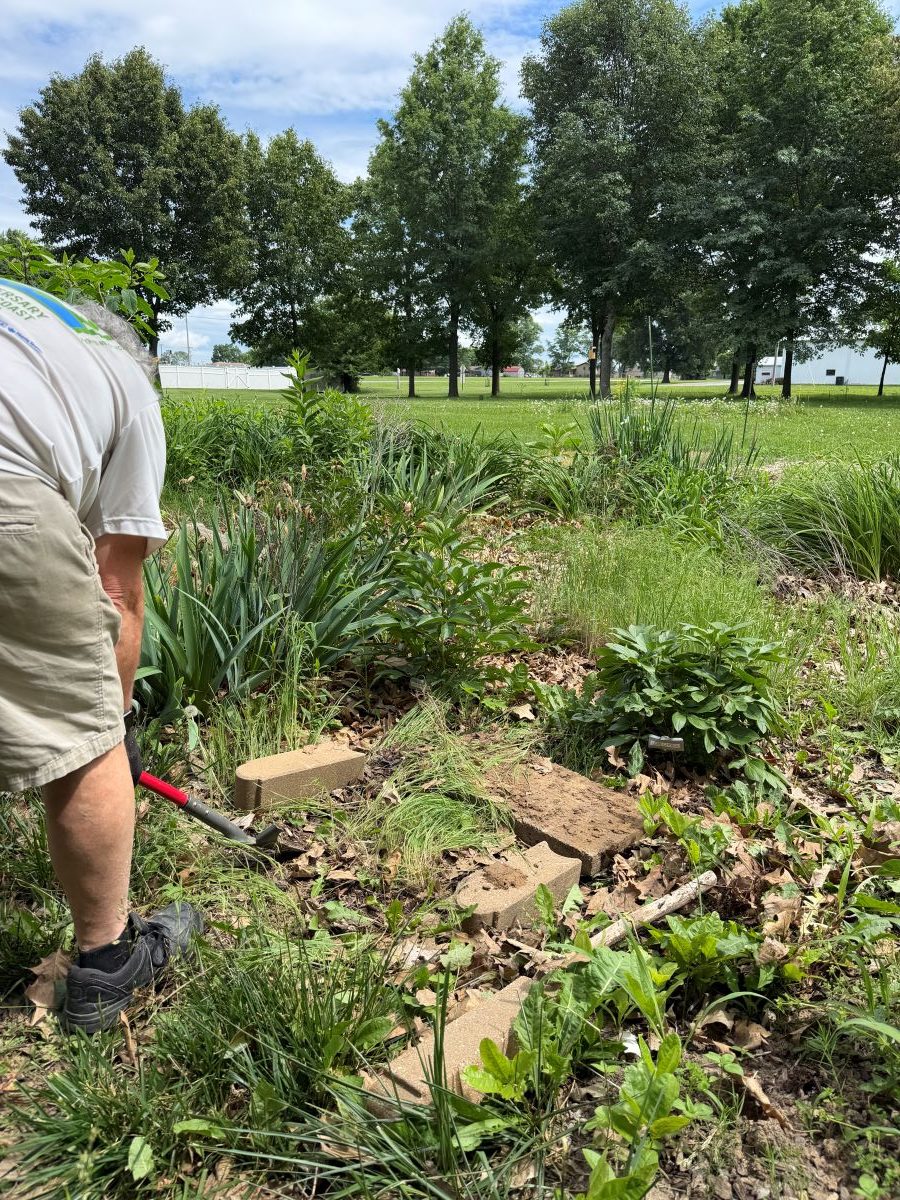
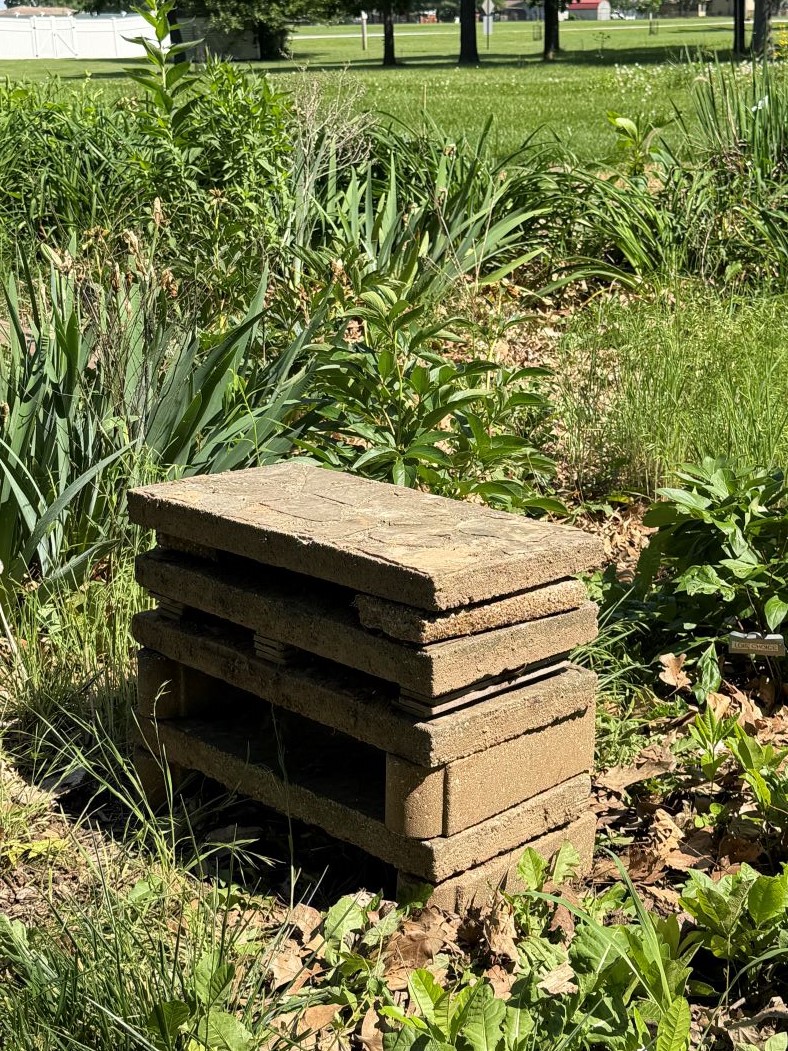
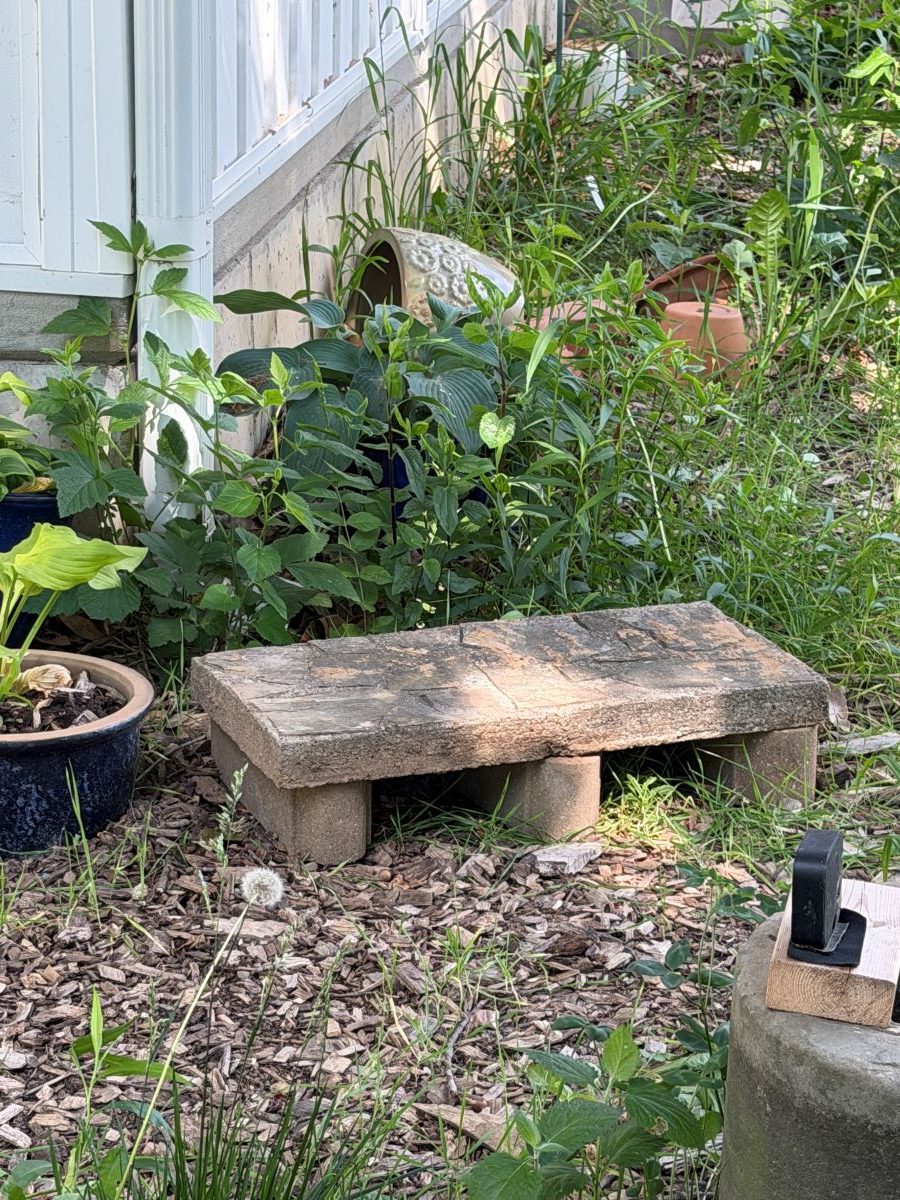
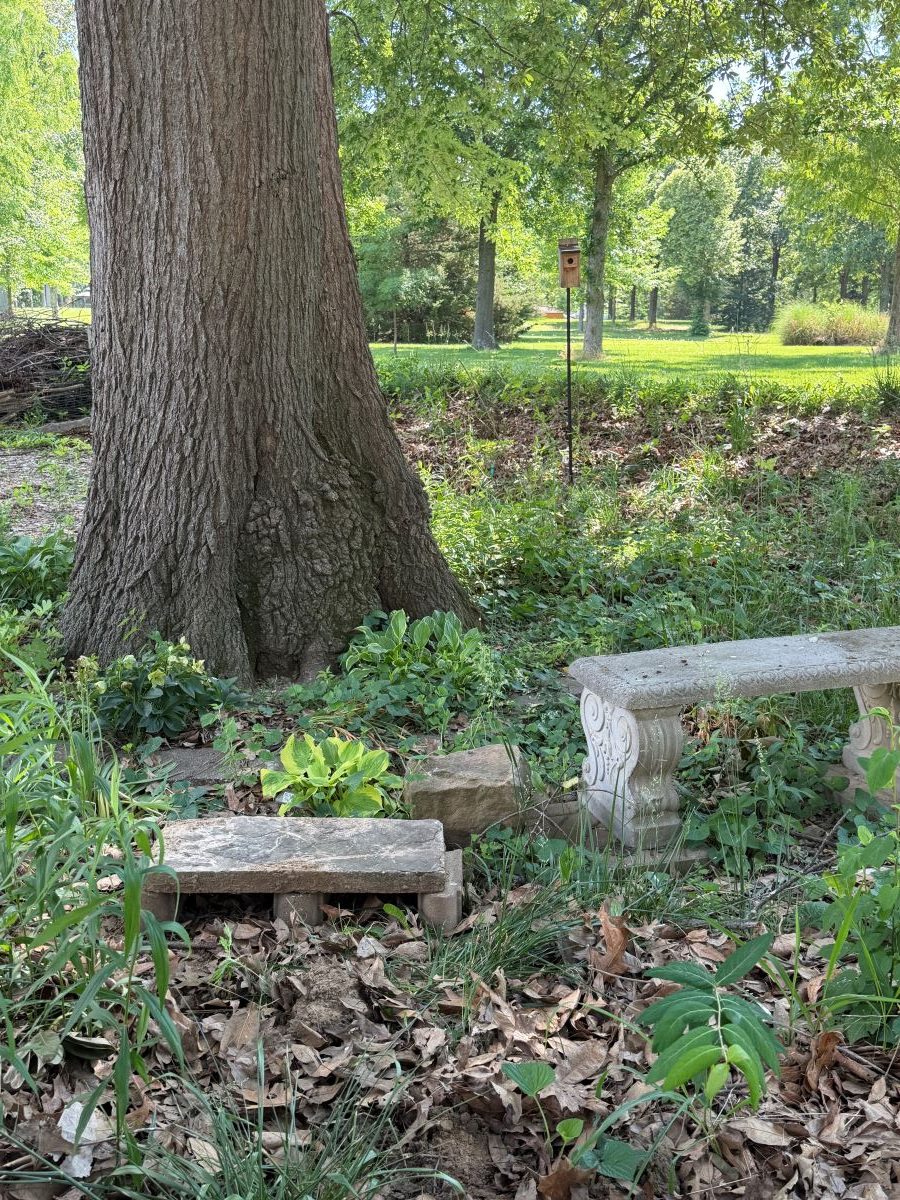
Proof I have a garden gnome. Here he is, building a toad/reptile/critter house from old paving stones and landscape bricks. We are eager to see who uses this little stone house.
We also put up two smaller ones, also intended as toad houses, but everyone is welcome. All three structures were very easy to set up. BTW, I say “we” but that means “the garden gnome.” I am the supervisor.
Though we still have our favorite hosta and daylilies, we are slowly “going native” by planting native flowers, shrubs and trees. Diversifying the eco system draws more and more wildlife to our yard. The wildlife is entertaining and fun to watch as the seasons go by. We get deer, of course. Doesn’t everyone? Also, foxes, skunks, opossums, woodchucks, squirrels, chipmunks, etc. We don’t see rabbits, though there are several feral cats in the neighborhood and they may be the reason the rabbits don’t live here. We don’t feed the four-legged wildlife. They are better off foraging for their natural food than by surviving on human handouts.
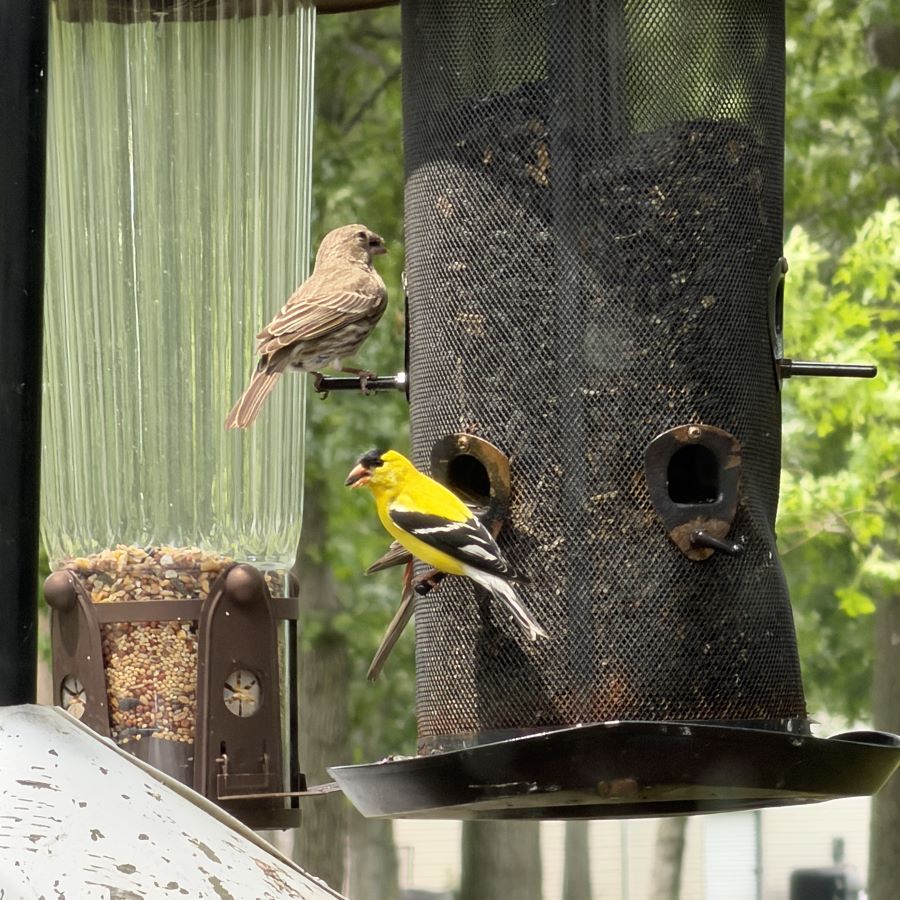
We do feed the birds, however. I know there is discussion about whether or not birds should be fed. I follow the advice of Dr. Doug Tallamy, an entomologist who has spent his life studying the impact of civilization on local eco systems, particularly the insects that support bird life. Please read his books. They are packed with information and advice about improving eco systems in one’s own backyard. Dr. Tallamy emphasizes that bird feeders feed adult birds. That is especially important in winter, and serves as a supplemental source of food in summer. Baby birds don’t eat seeds. They need insects. For example, Chickadees need 6000-9000 caterpillars to raise one brood of baby birds. Those caterpillars have to be found near the nest. To support the feeding of baby birds, our yards need to support native plants because native plants support the necessary insects.
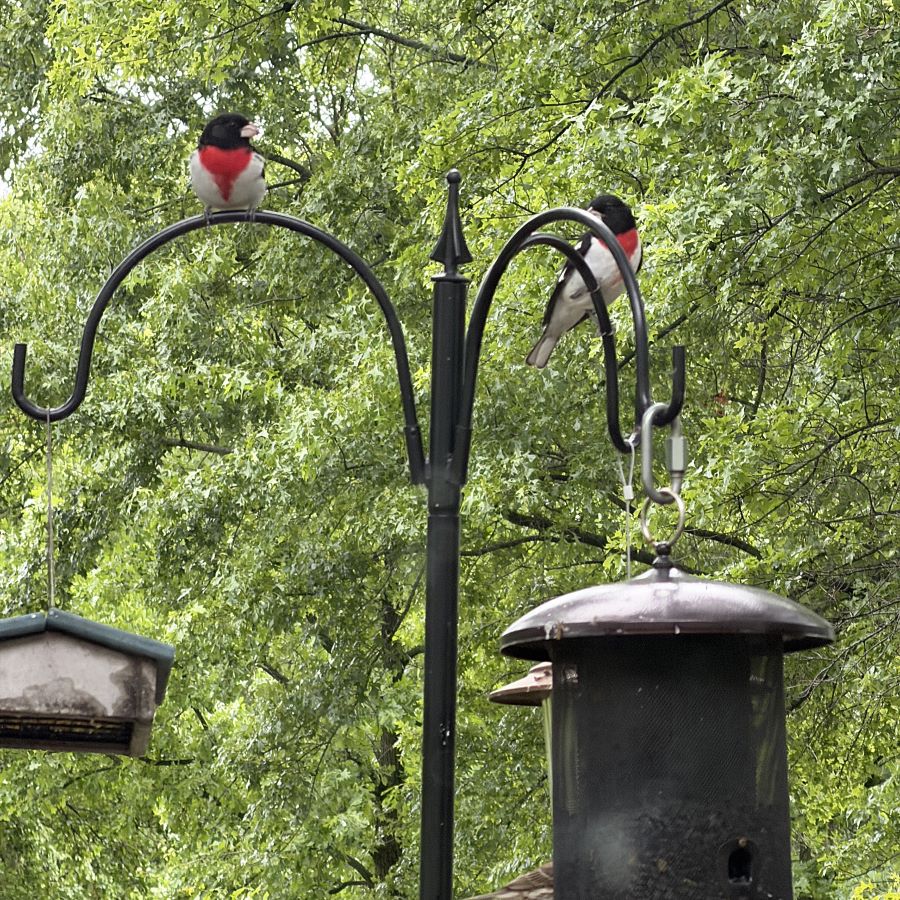
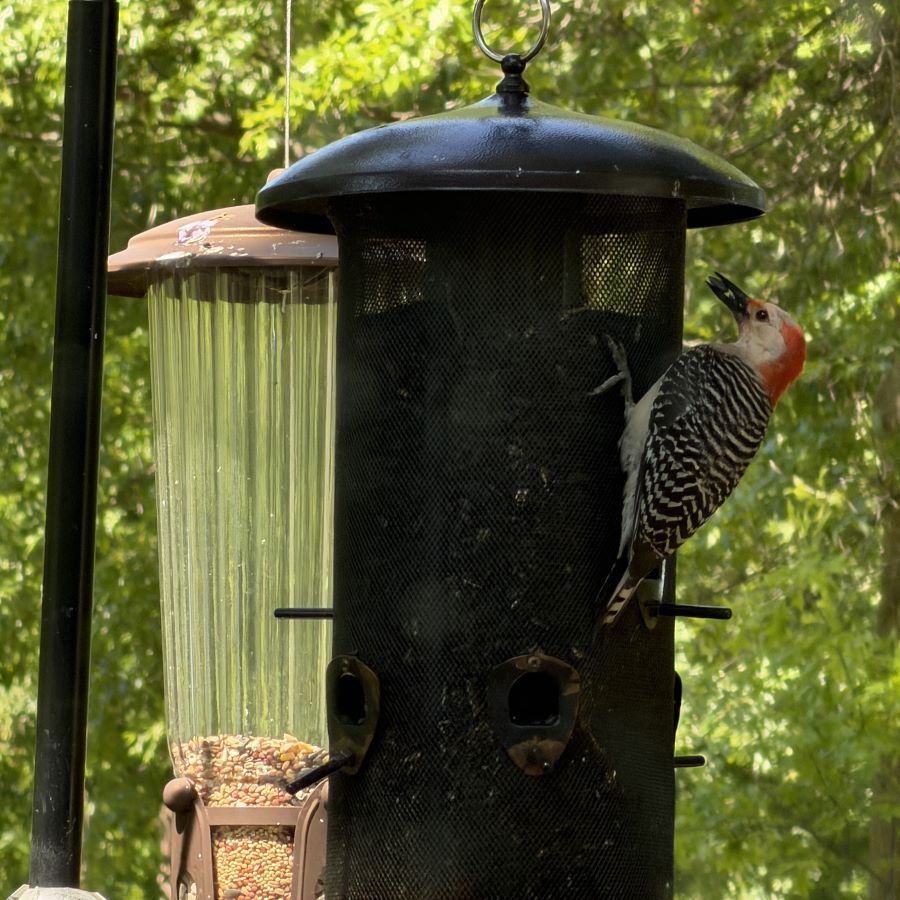
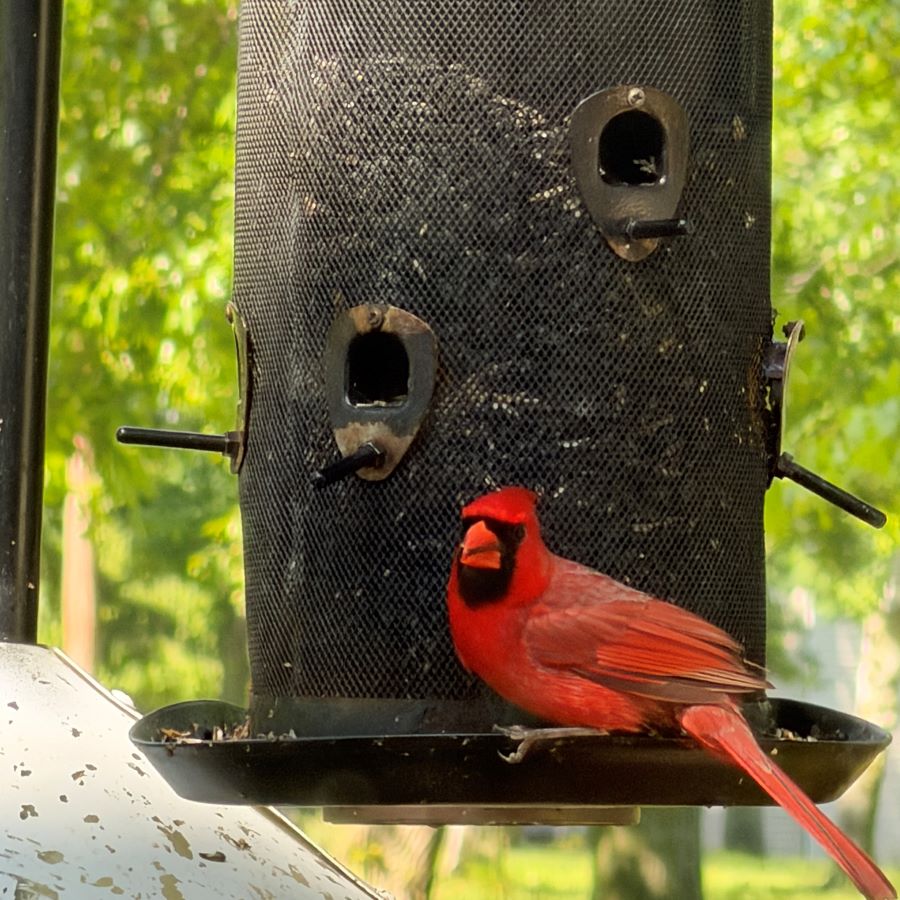
This year we had Red-breasted Grosbeaks for about two and a half weeks. These spring visitors normally stay for a few days, then move on. There were at least four males and several females. Just as we began to hope they might stay in the area, they were gone, no doubt flying north for territory more suitable for nesting. There are a couple of Red-bellied Woodpeckers nearby. We see them everyday. We get a lot of Cardinals. Beautiful birds. They are the last to leave the feeders in the evening, waiting until almost full dark before going home to bed.
The Northern House Wren checked this box early on and even worked on a nest for three days with his mate, but settled on a different box for nesting. We don’t see Goldfinches as often in summer as in winter. It’s always a nice surprise to spy one on the feeder.
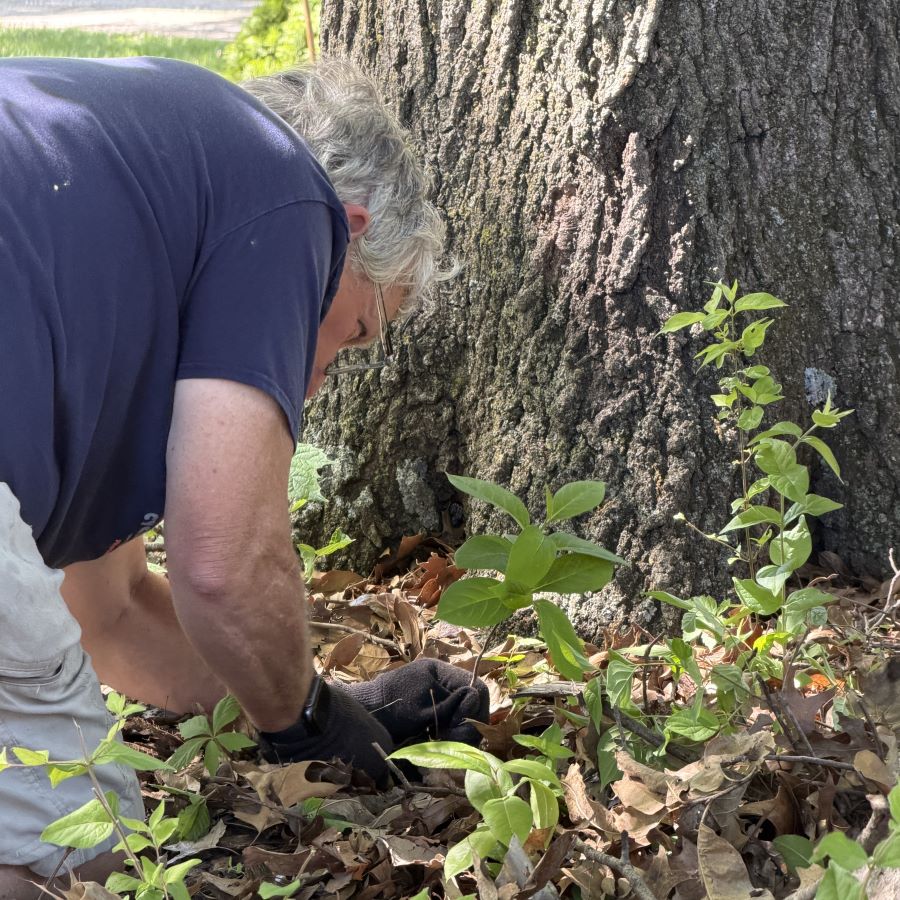
As we tour the yard, we continually find trees planted by the wildlife, critters and birds alike. The garden gnome has transplanted multiple persimmon trees that have sprouted in the yard. He spied this one at the base of one of the oak trees and moved it to the 3/4 acre lot we purchased just south of our house. It’s affectionately known as “the south forty.” Persimmons need male and female trees to make fruit. We’re sure we have this covered, as the garden gnome has transplanted plenty of them. He has also transplanted ash, rough-leafed dogwood, red buds, cottonwood, tulip trees, black cherry, elm, hackberry, oak, and cedar, all of which sprouted in the yard. He has also transplanted flowering dogwood and sassafras from our previous home. There are thousands, literally thousands, of Bradford pears (AKA Callery pear) as well, which is a full time battle to combat. The garden gnome is constantly pulling these massively invasive, non-native trees out of the yard, along with invasive, non-native, bush honeysuckle. Below, the transplanting of another persimmon tree. Anyone local want one…or two…? We keep finding more.
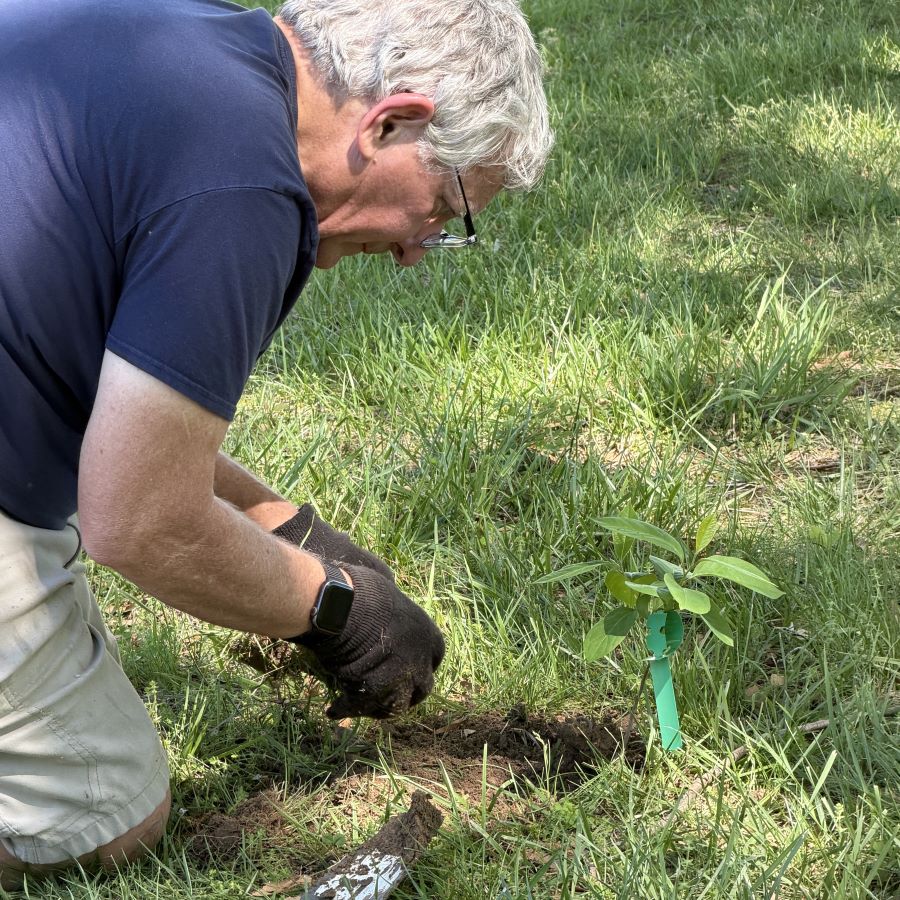
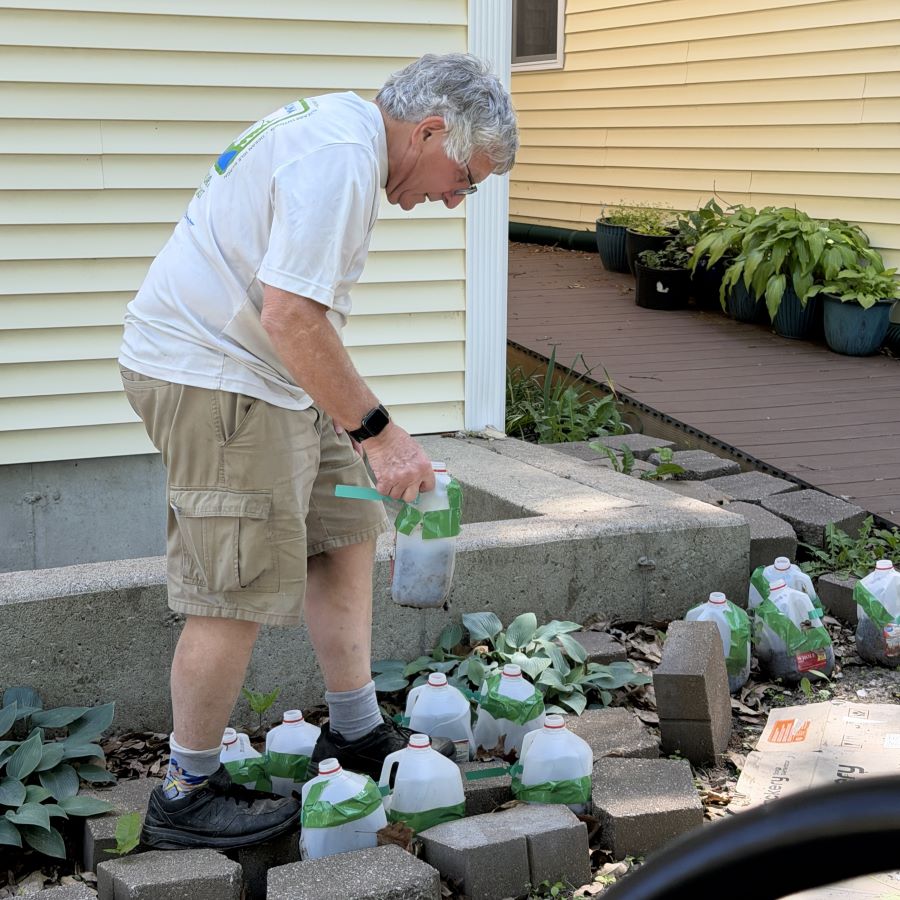
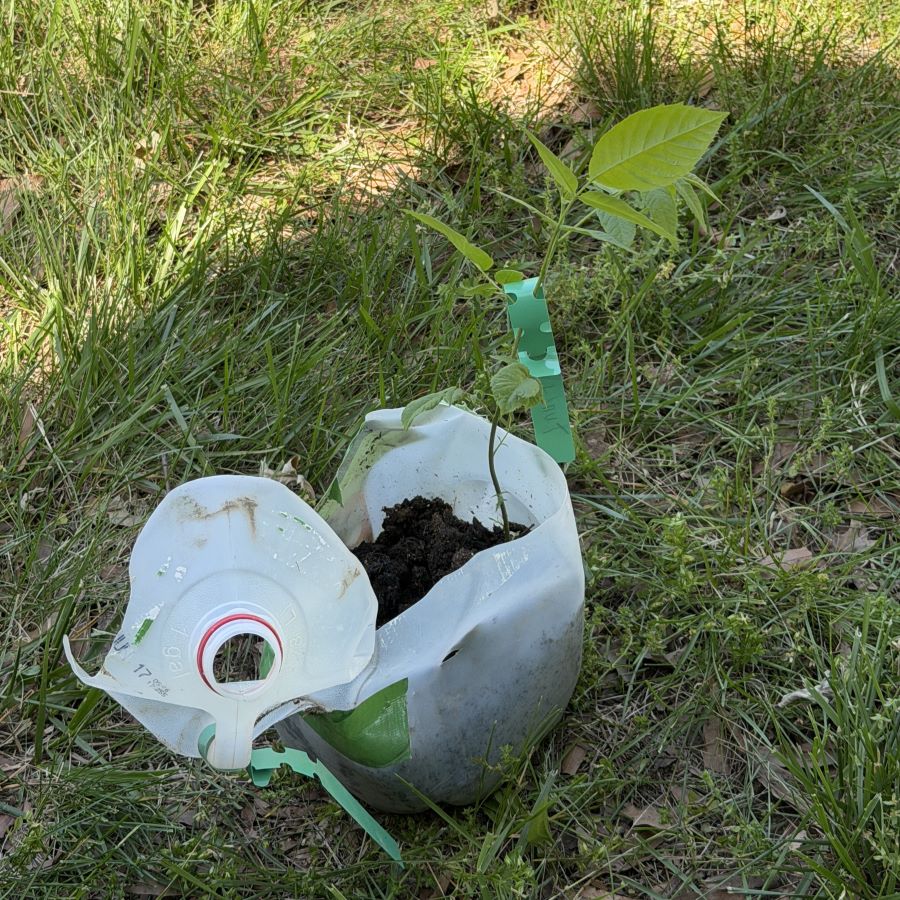
We tried winter sowing for the first time this year. Last fall we collected wild hickory nuts, pecans, and walnuts at Old Salem Cemetery. In January, they were planted in milk jugs, sealed except for the cap, and set outside to wait out winter. Now they are sprouting. This one is a hickory tree. It has been transplanted to the south forty.
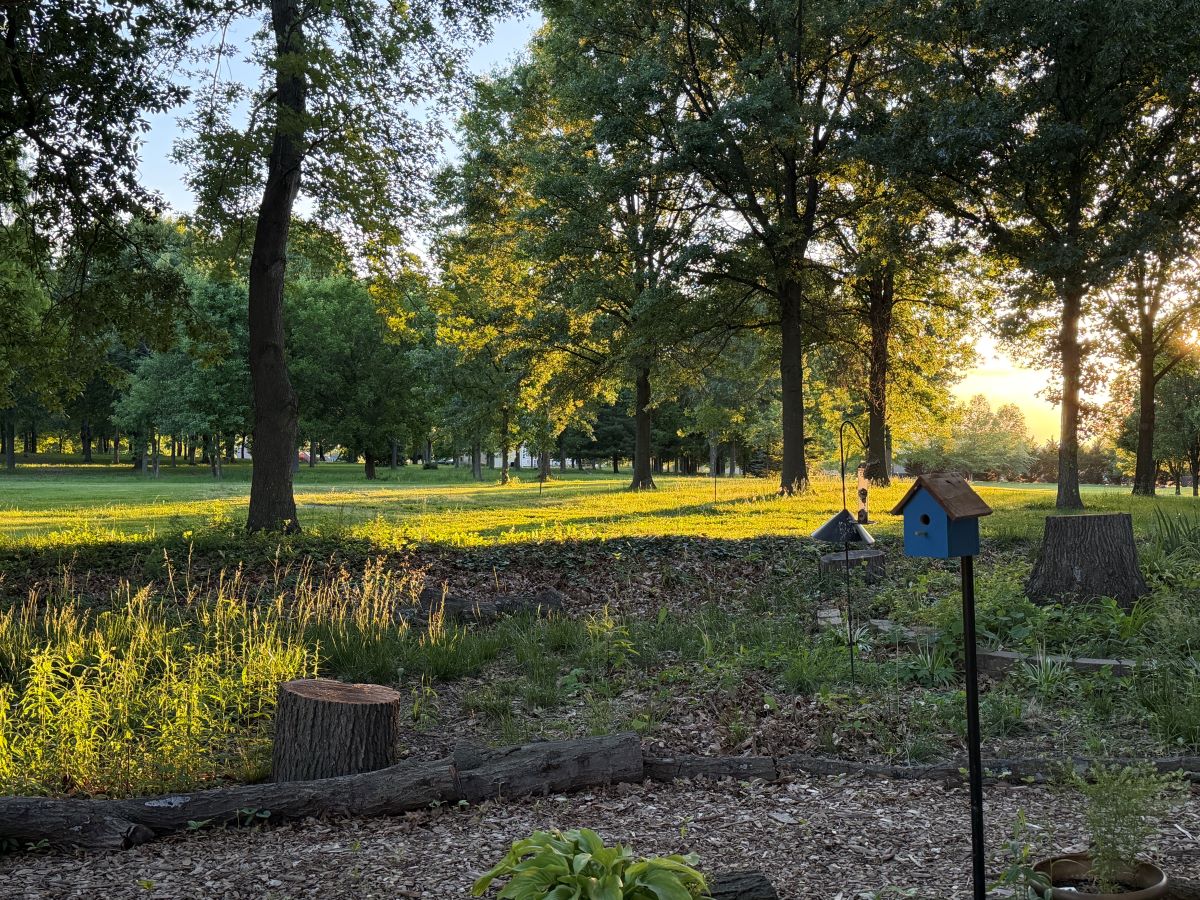
Our view from the catio is bountifully enhanced by our neighbors’ property, planted with many oak trees. Below, the evening sun passes through the neighbors’ trees to highlight our native plants. We are blessed with a peaceful view that supports native plants, insects, wildlife and birds.
I hope you find inspiration to improve the local eco system in your own yard. One plant or many, every native plant, shrub and/or tree helps!
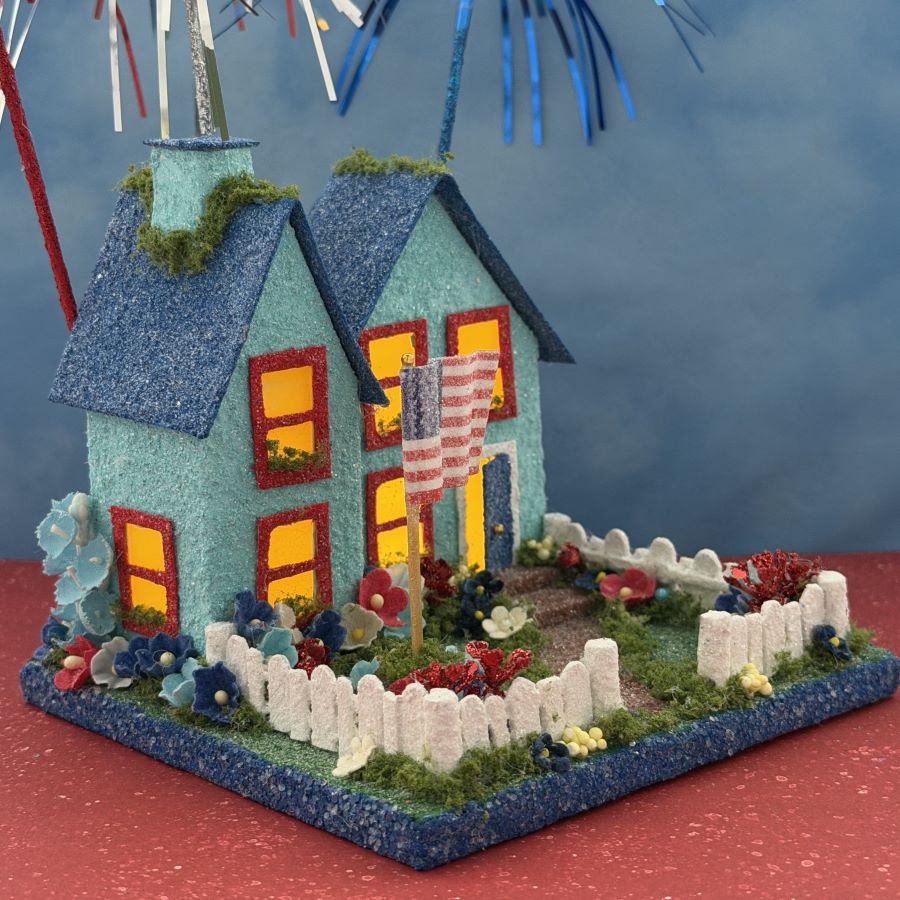
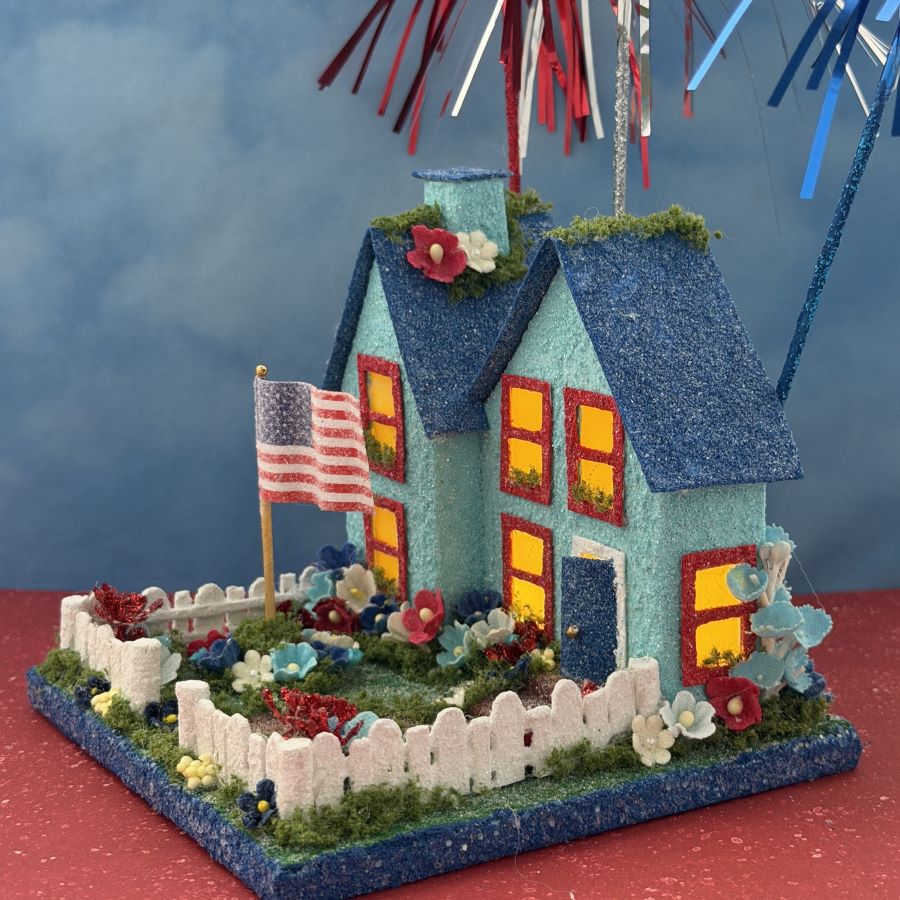
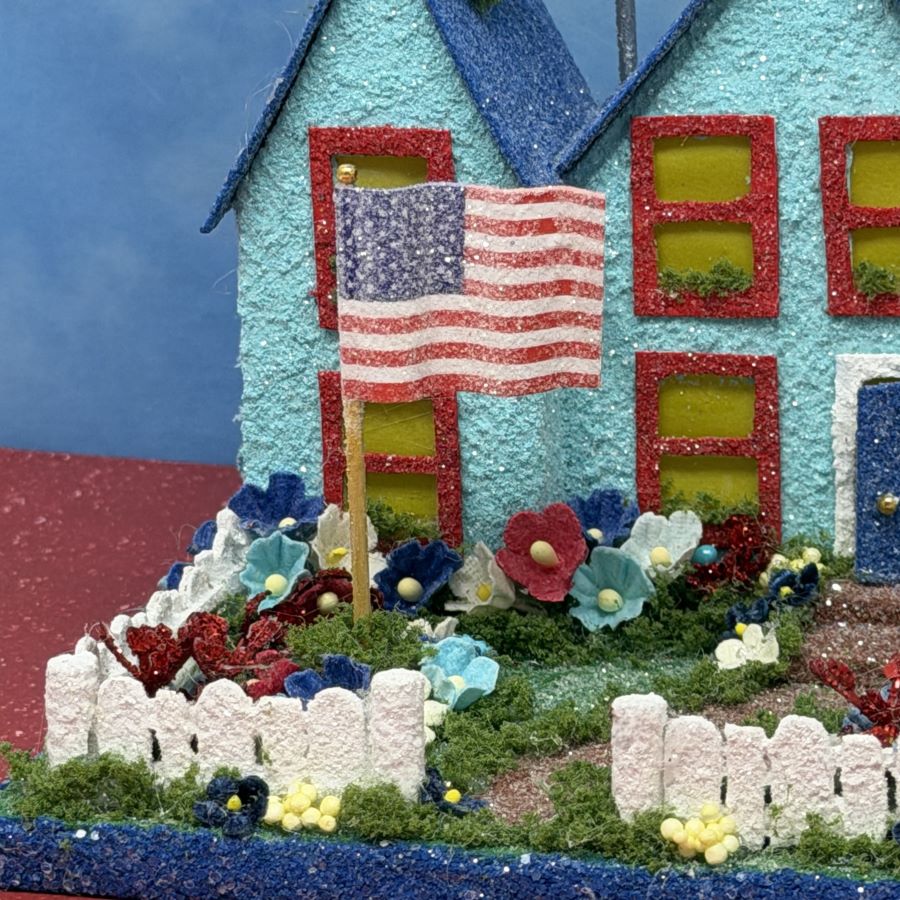
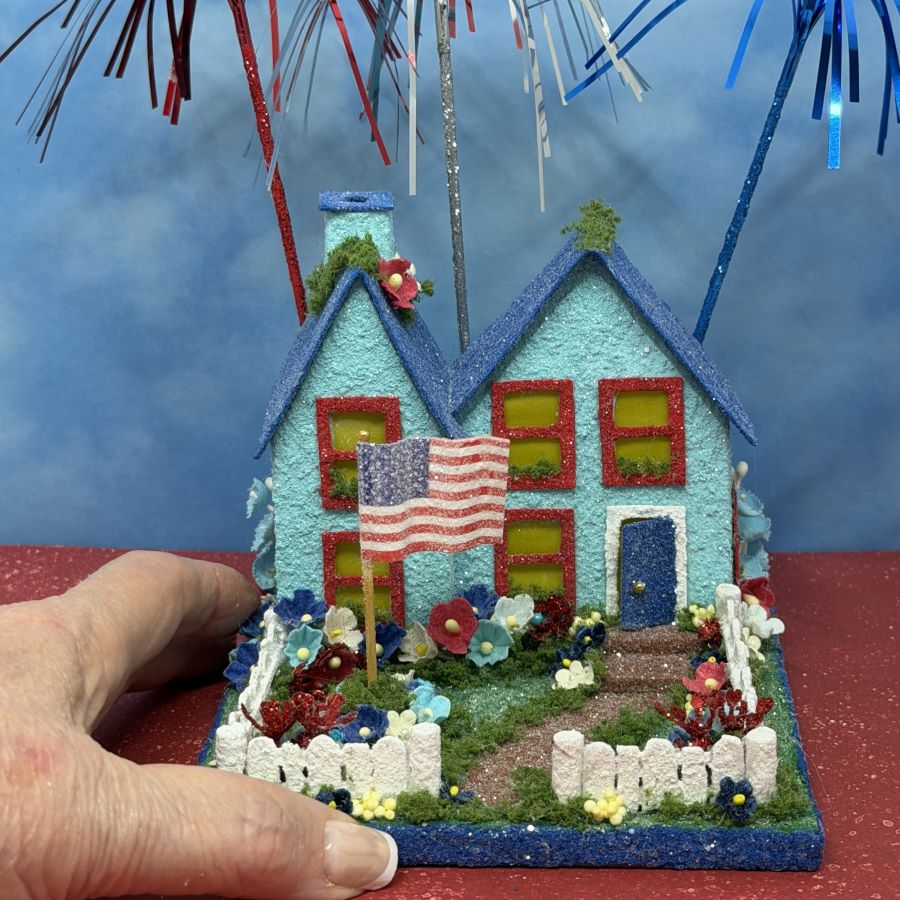
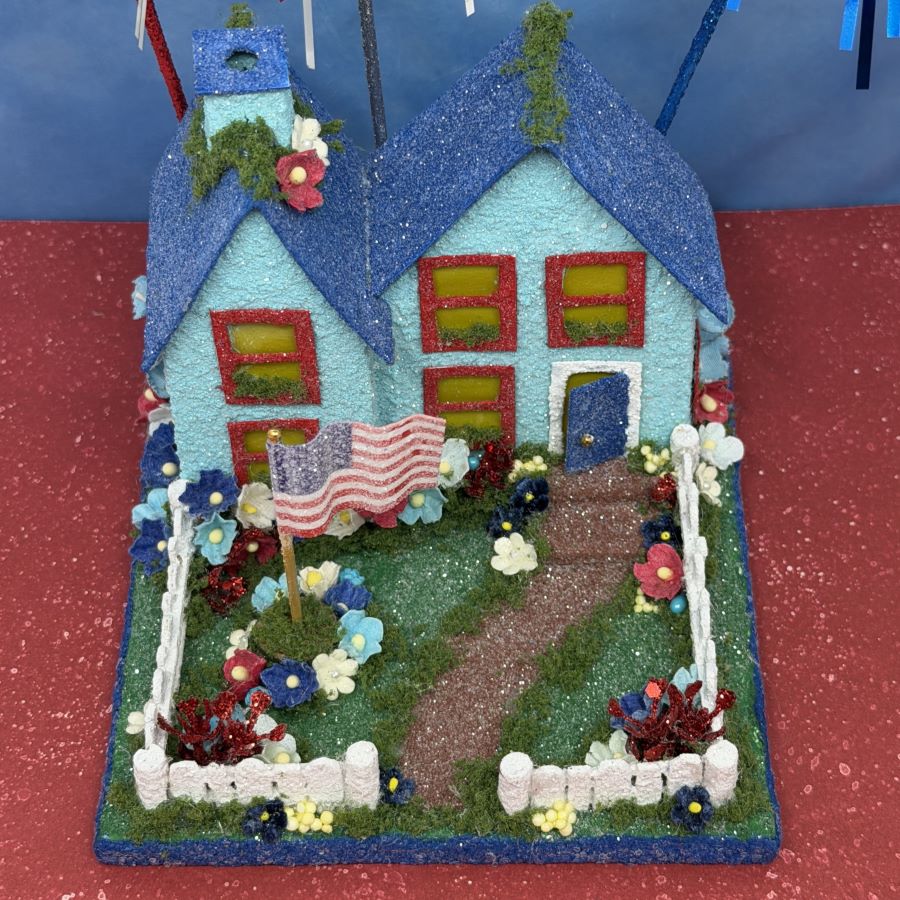
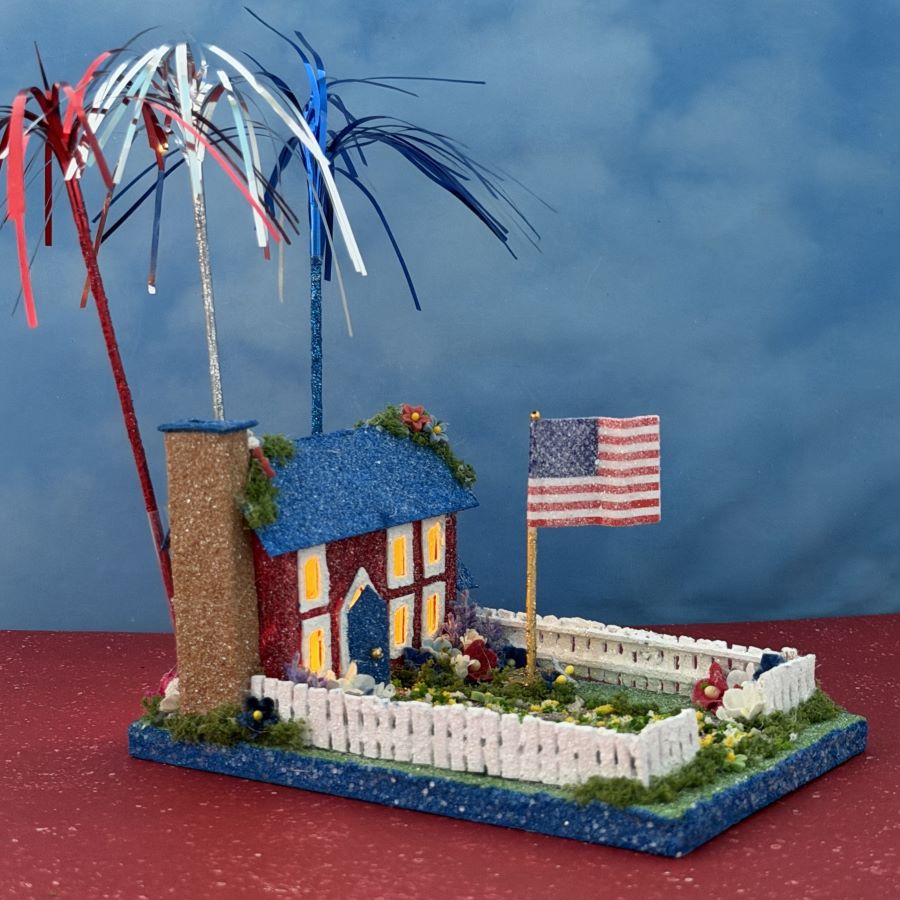
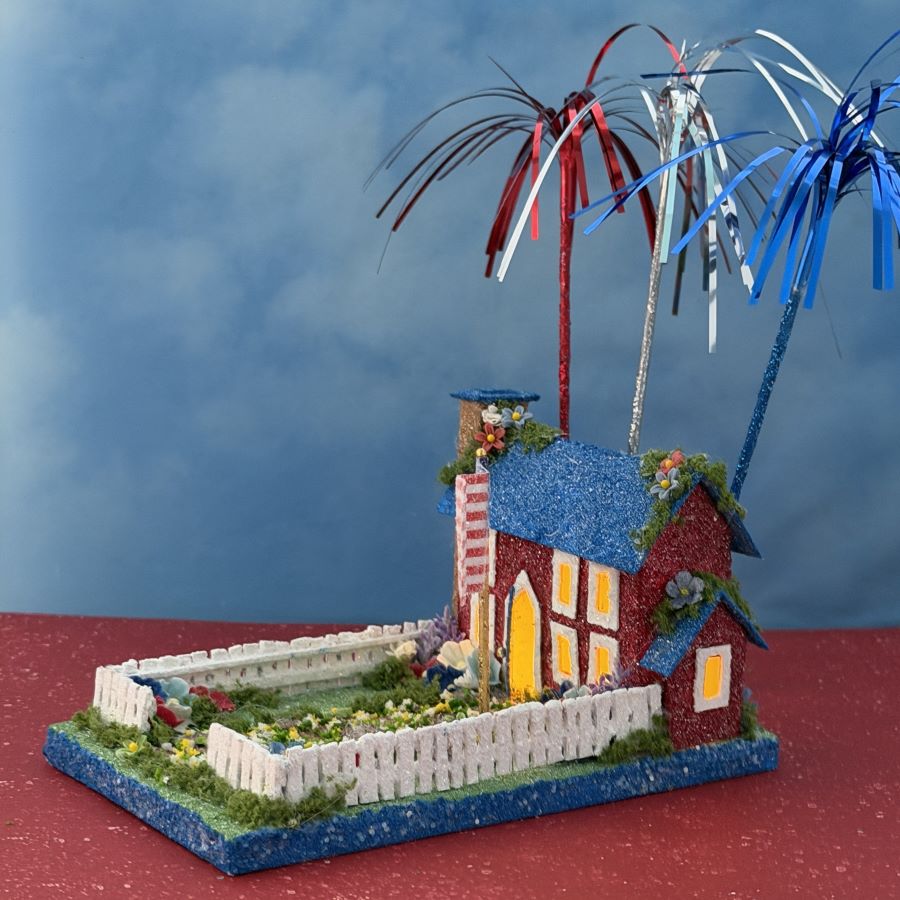
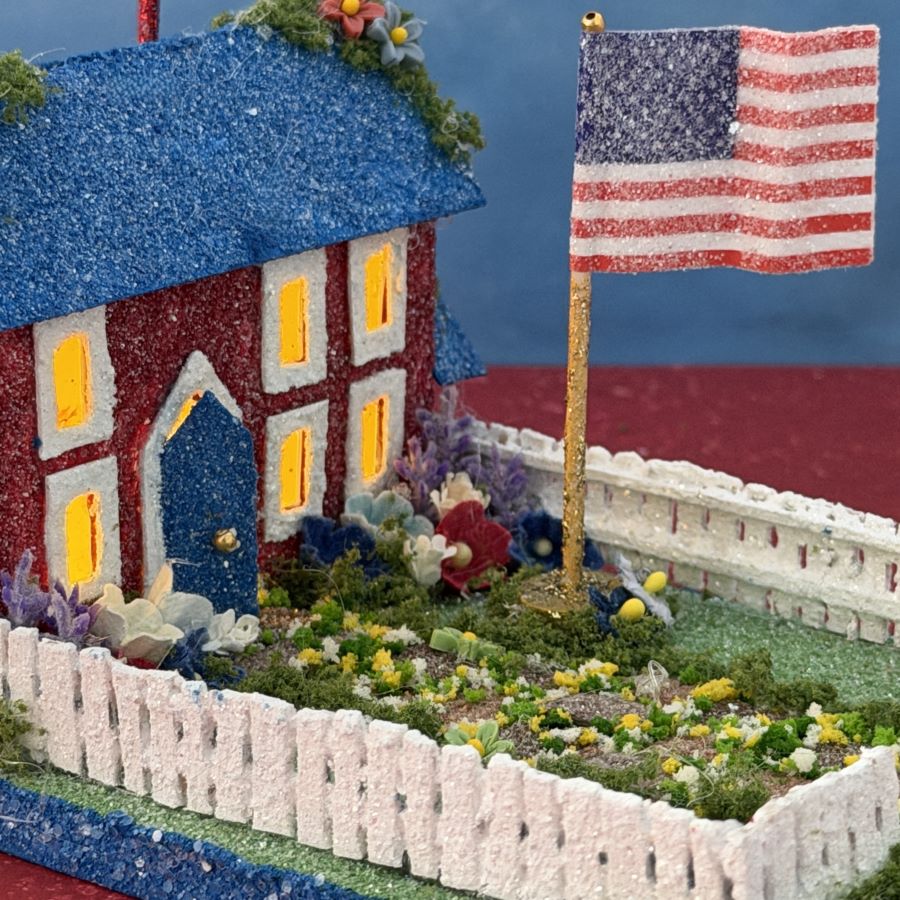
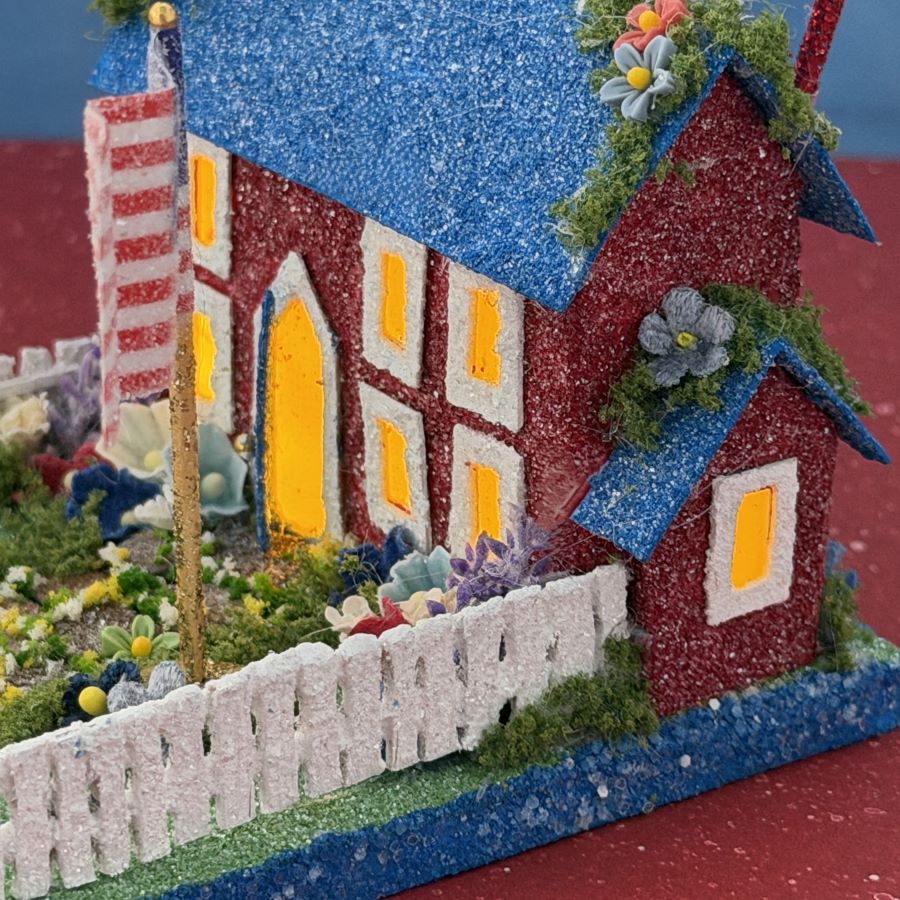
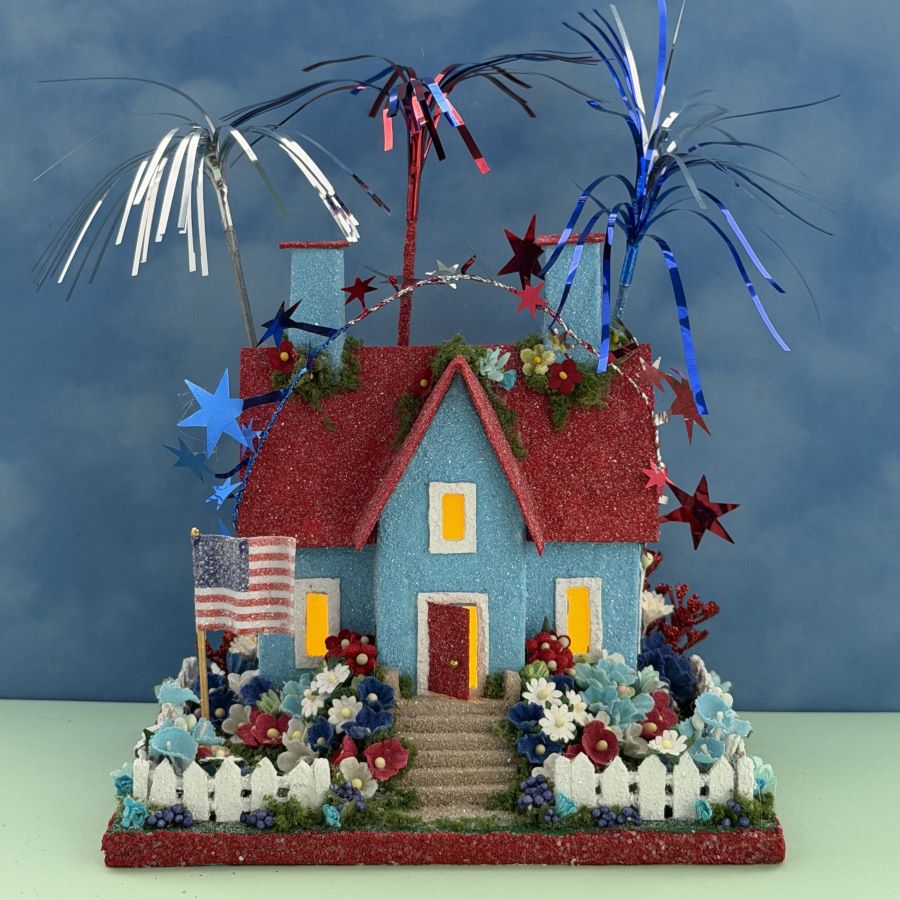
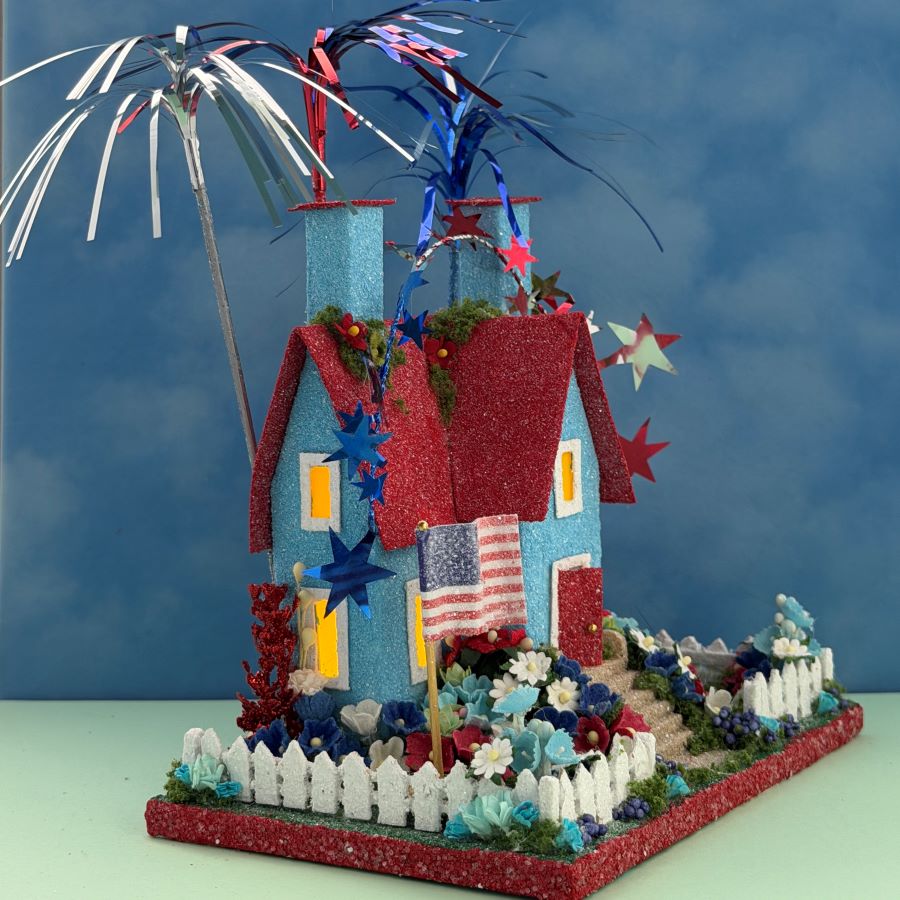
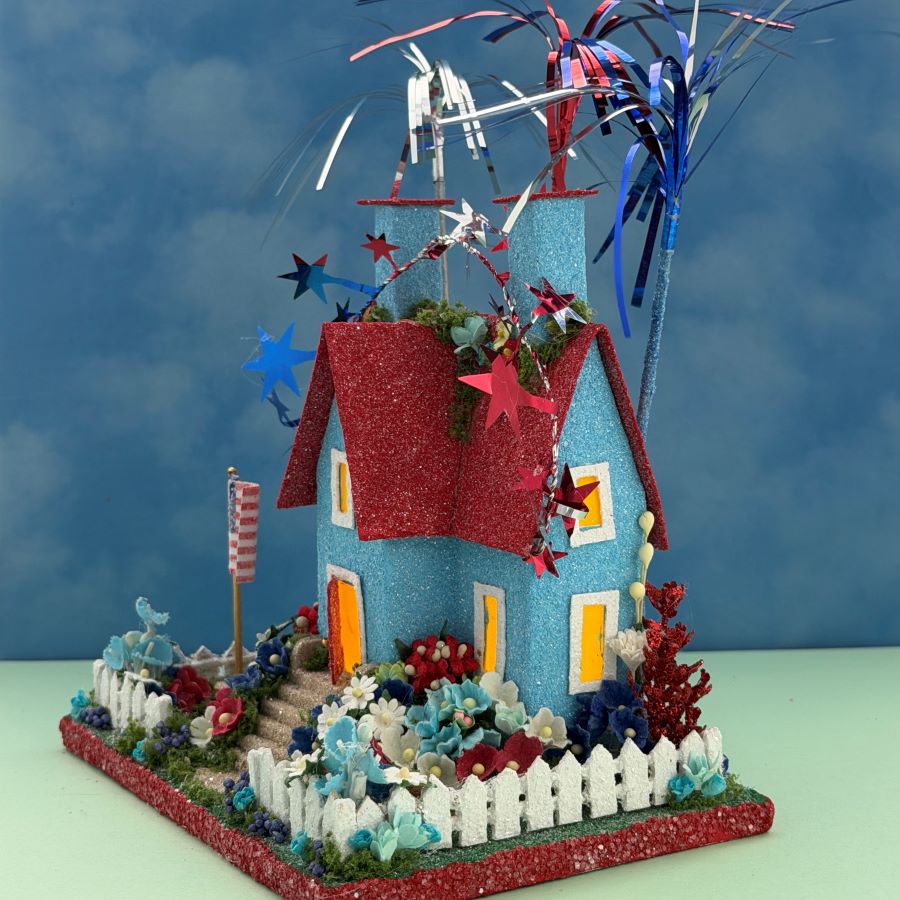
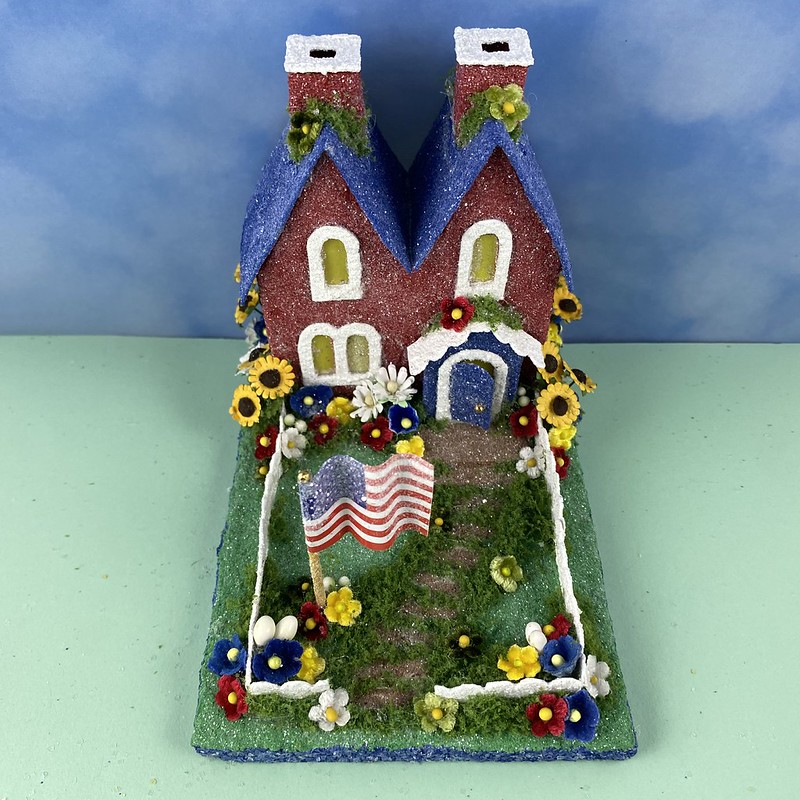
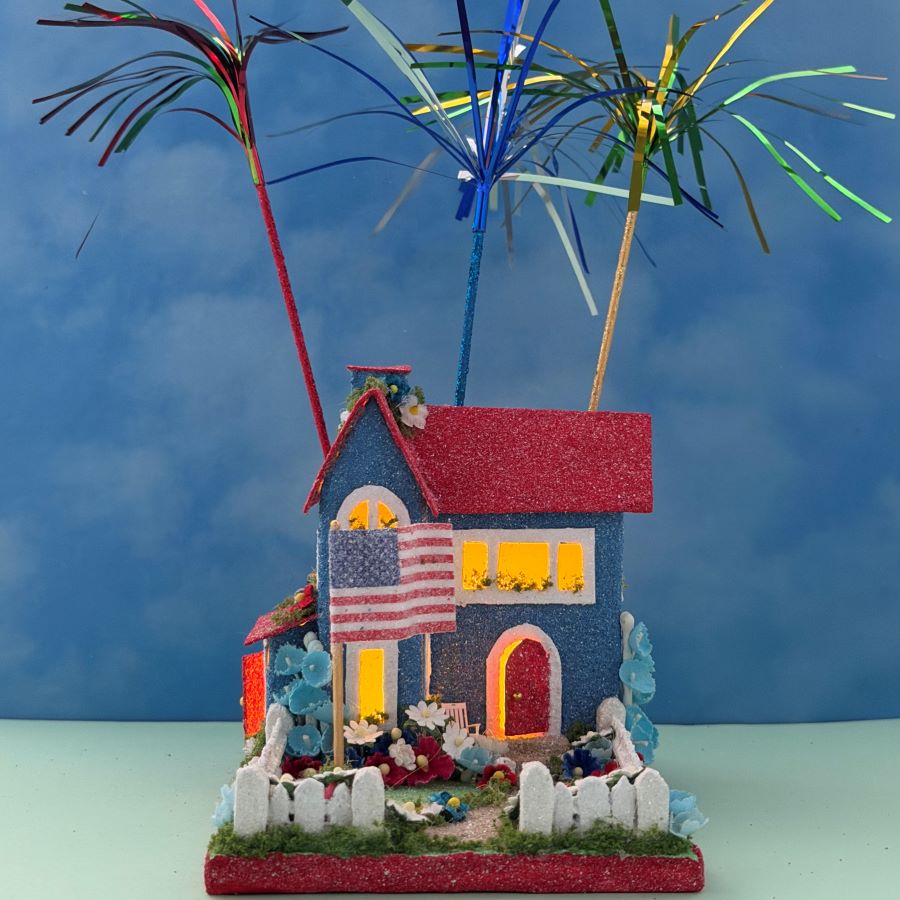
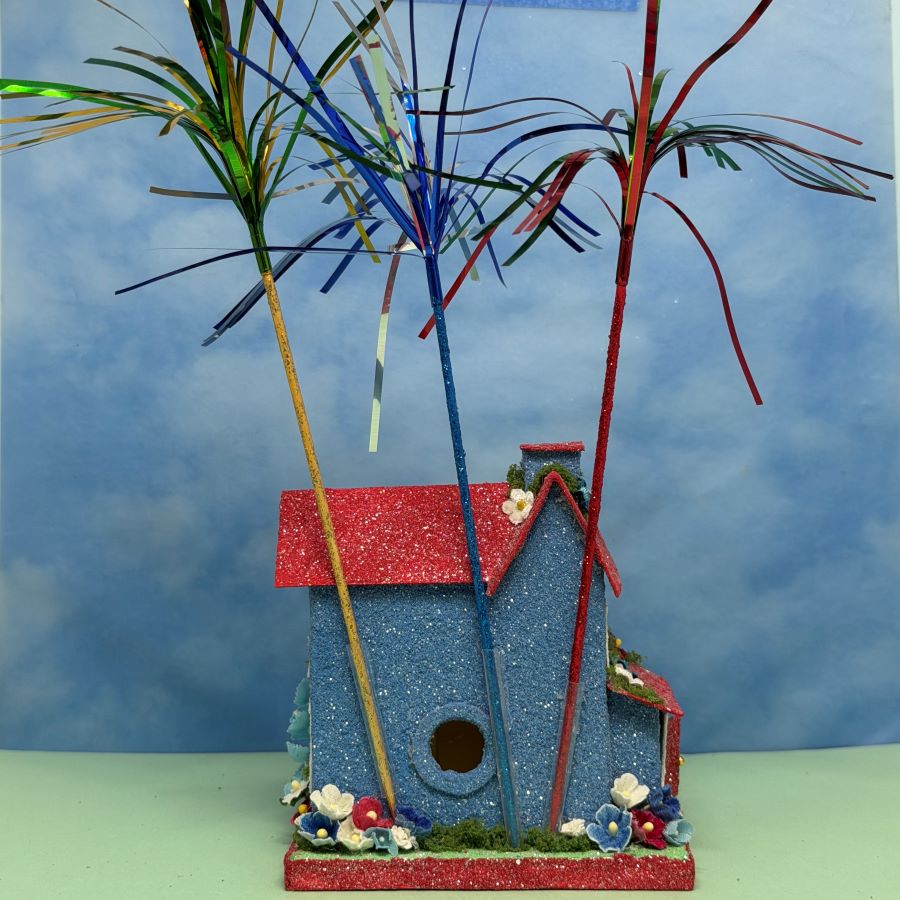
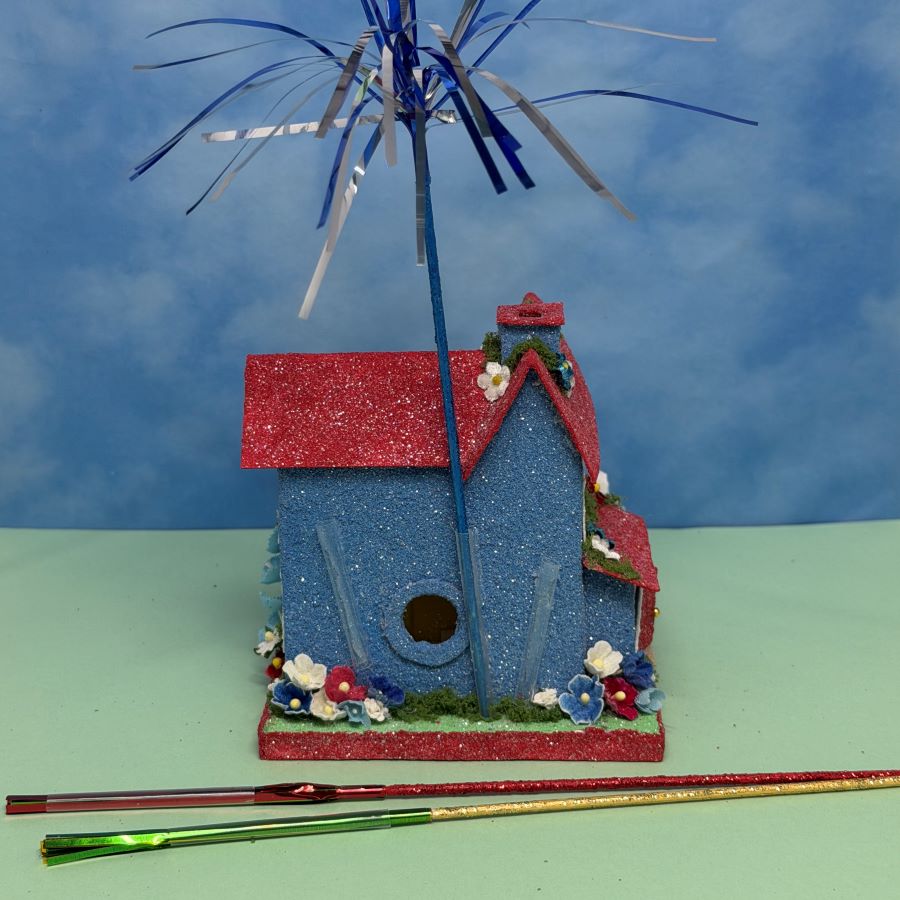
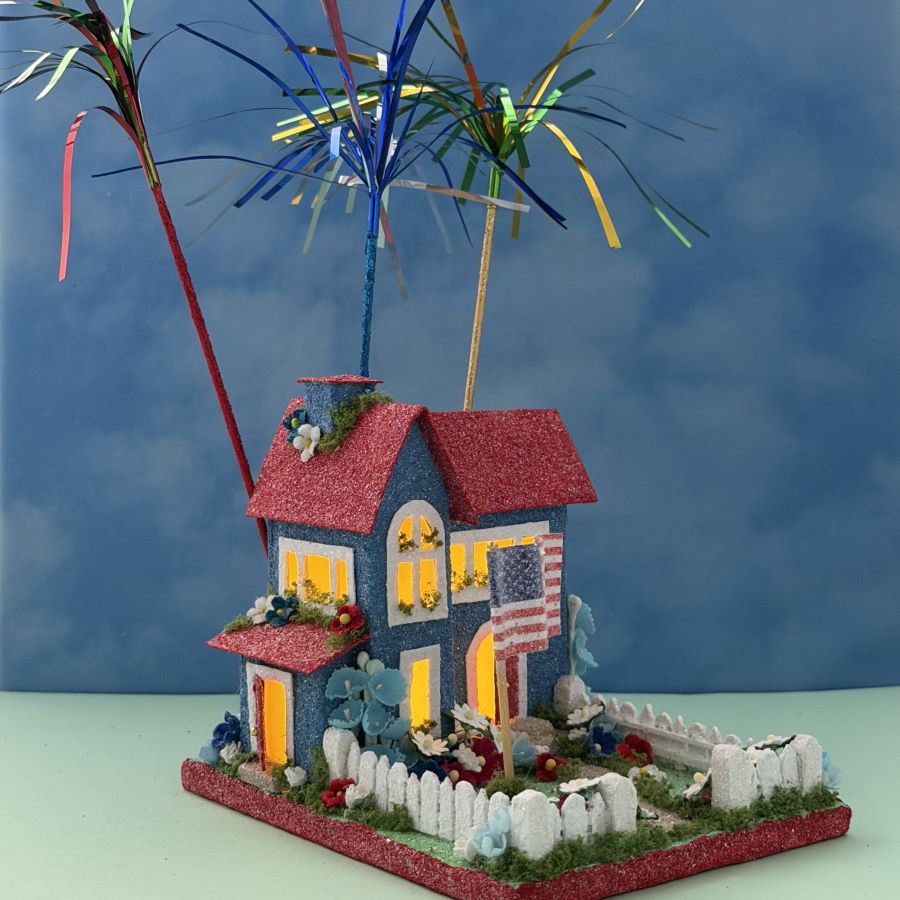
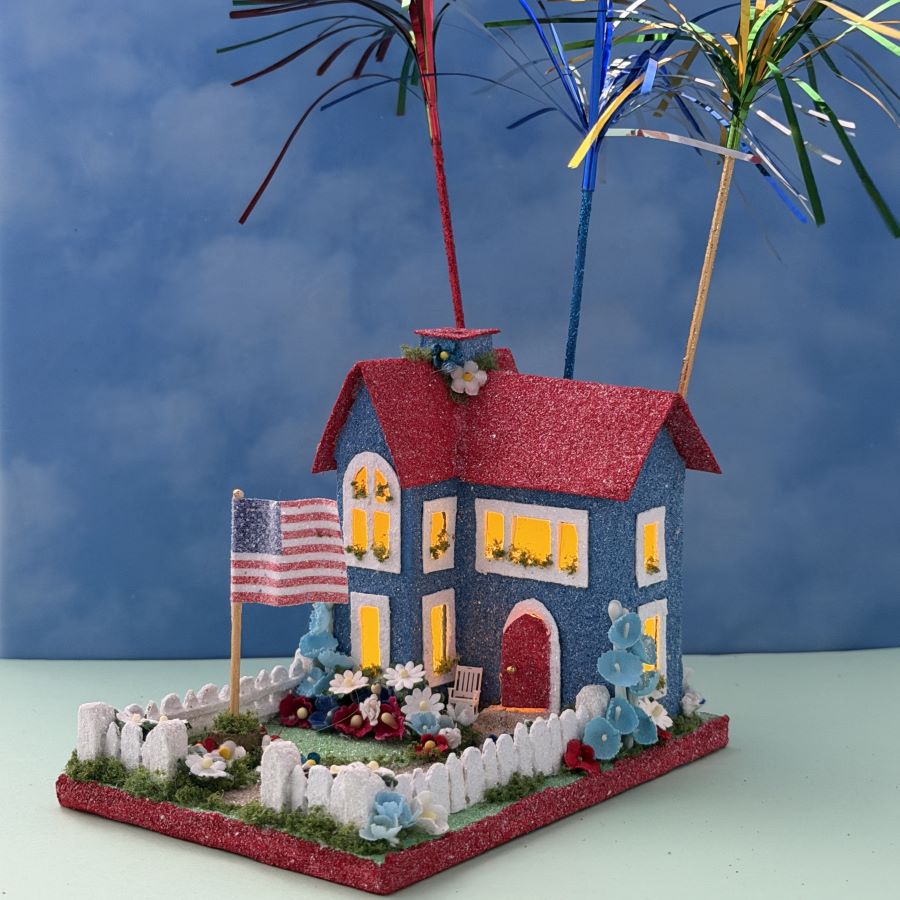
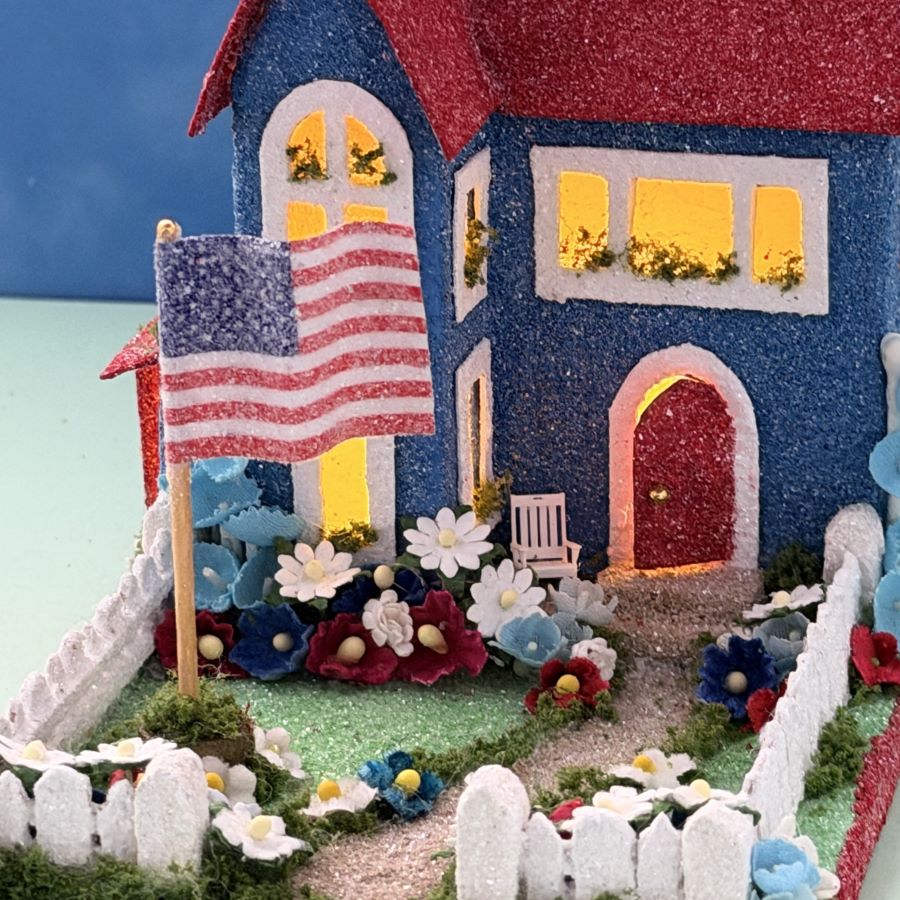
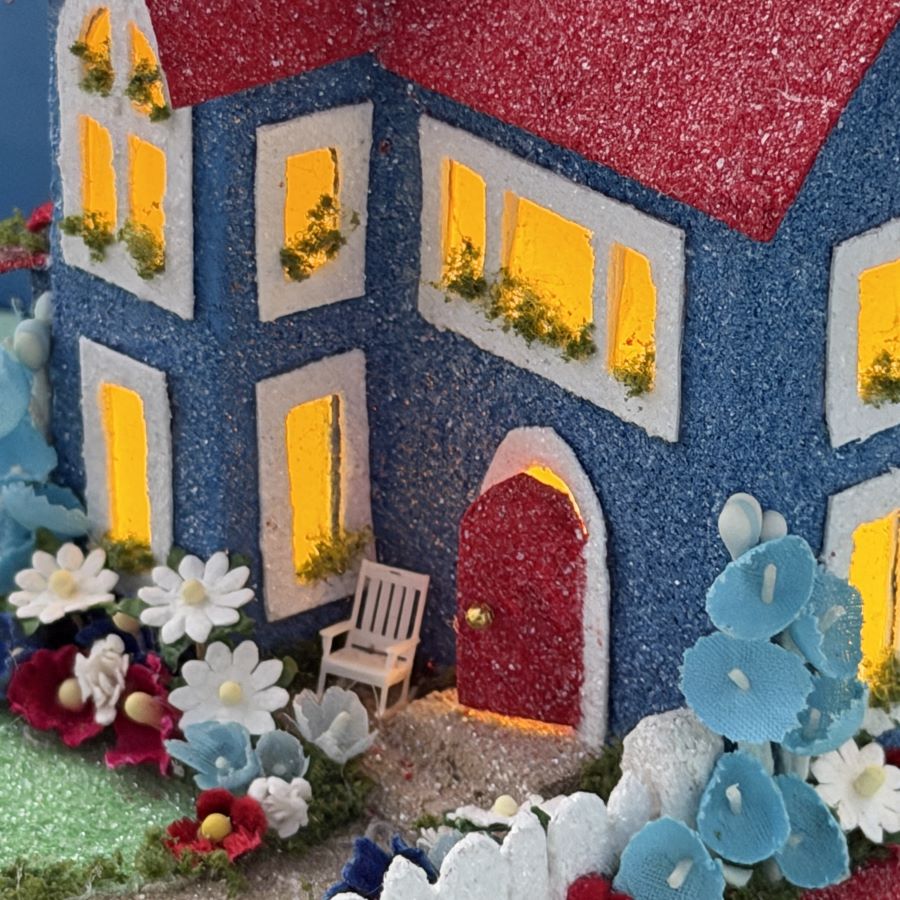
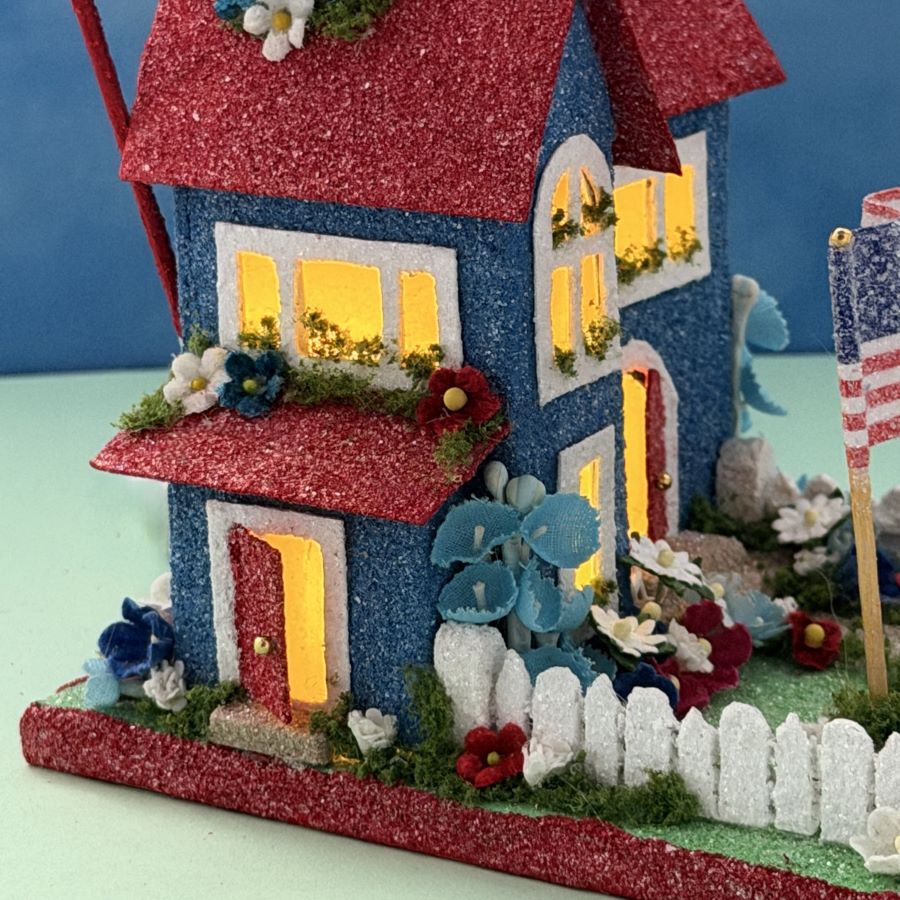
I love the aqua blue color on this greeting card. At first, I couldn’t decide if the roof should be a dark blue or the red. I’m glad I went with red. The house looks very festive!
I did make a pennent garland of red and white stripes and blue stars, but it didn’t seem to fit this house very well. I decided to use a wired star garland as a highlight on the roof.
The fireworks are tinsel picks, fitted into clear plastic tubes on the back of the putz house. They are removable for storage.
I made the wooden picket fence from coffee stir sticks.
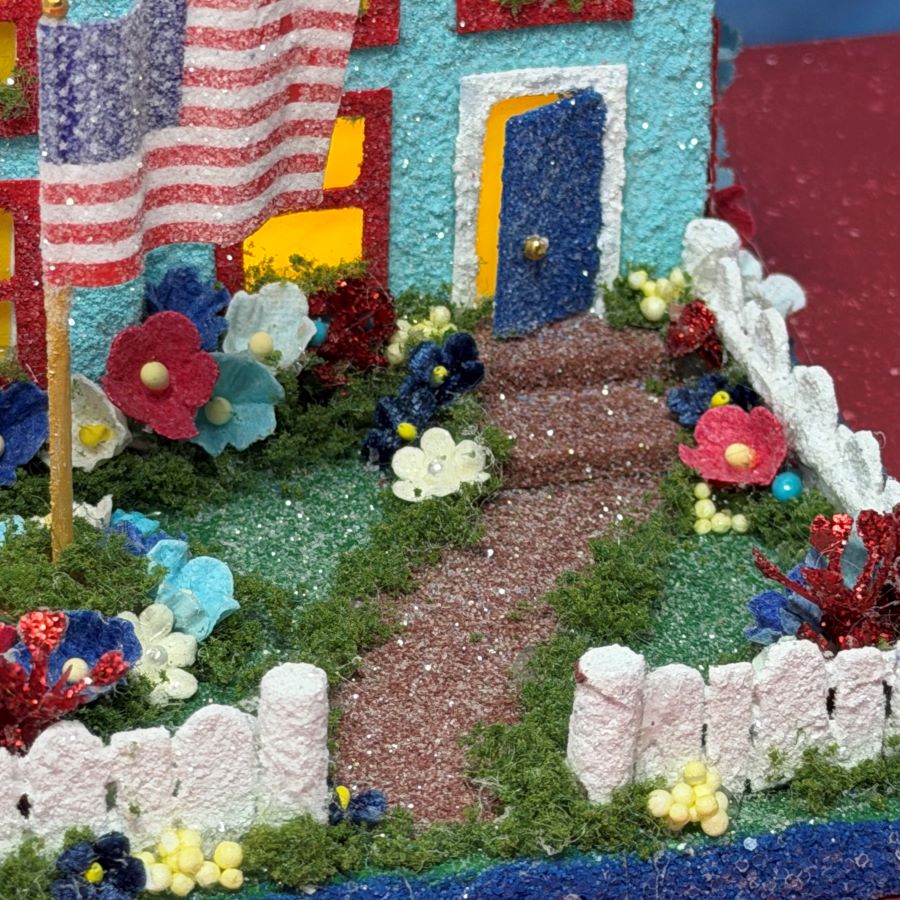
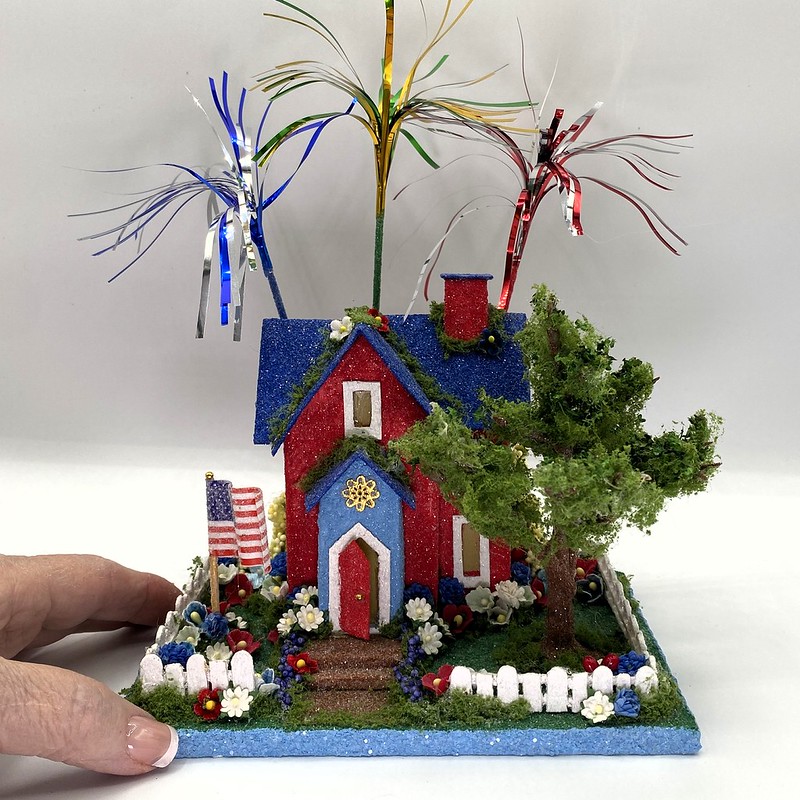
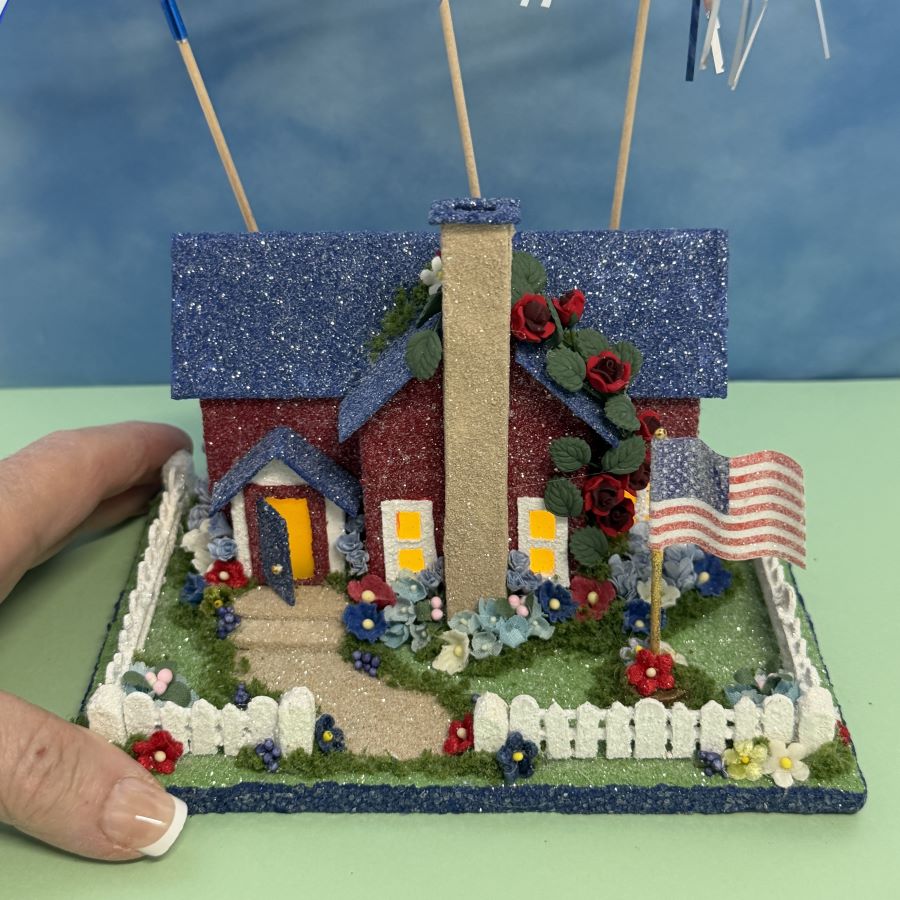
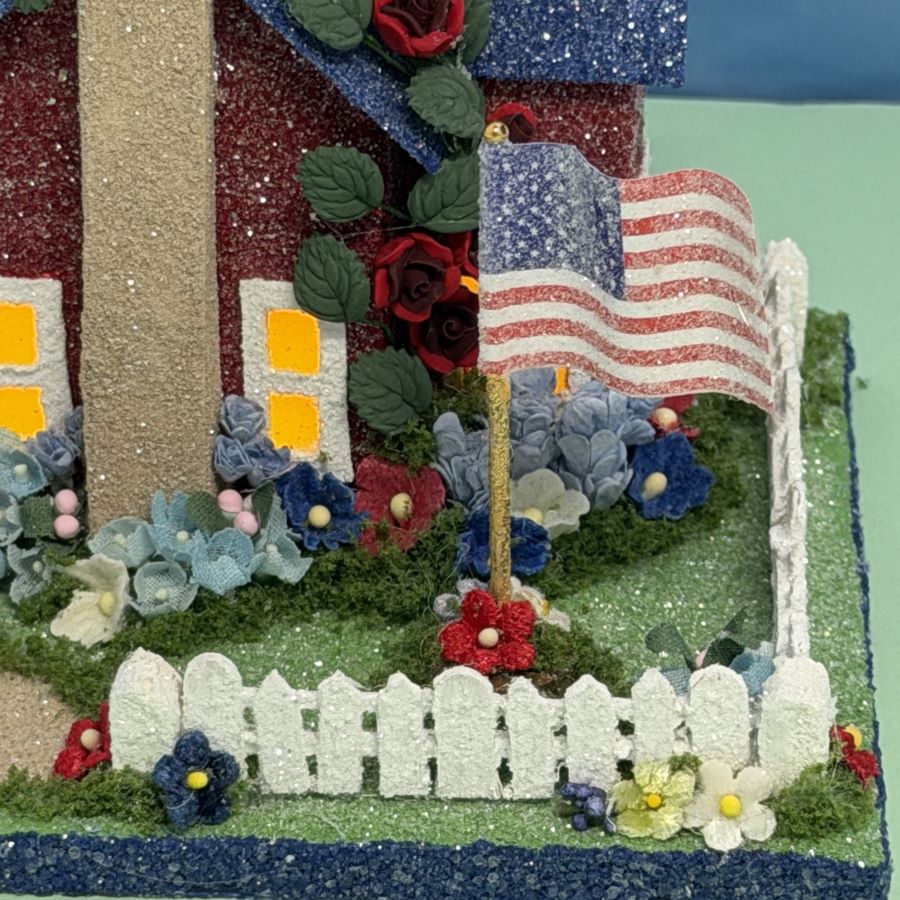
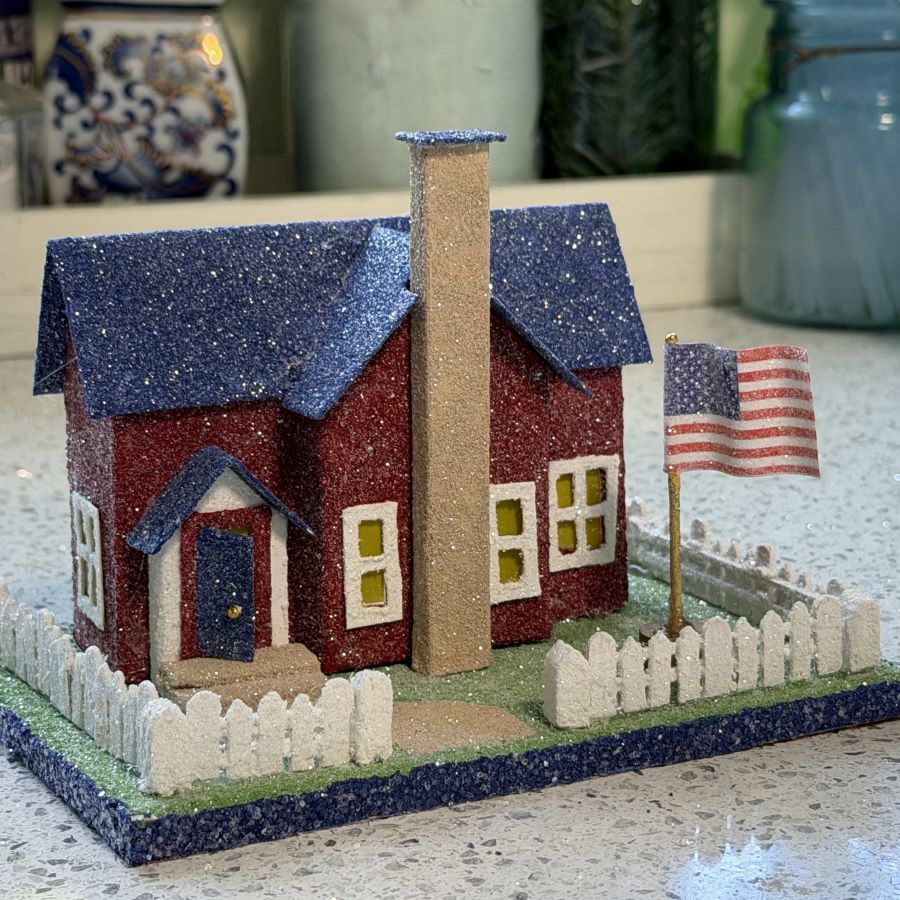
The front yard features an American flag, proudly flapping in the breeze.
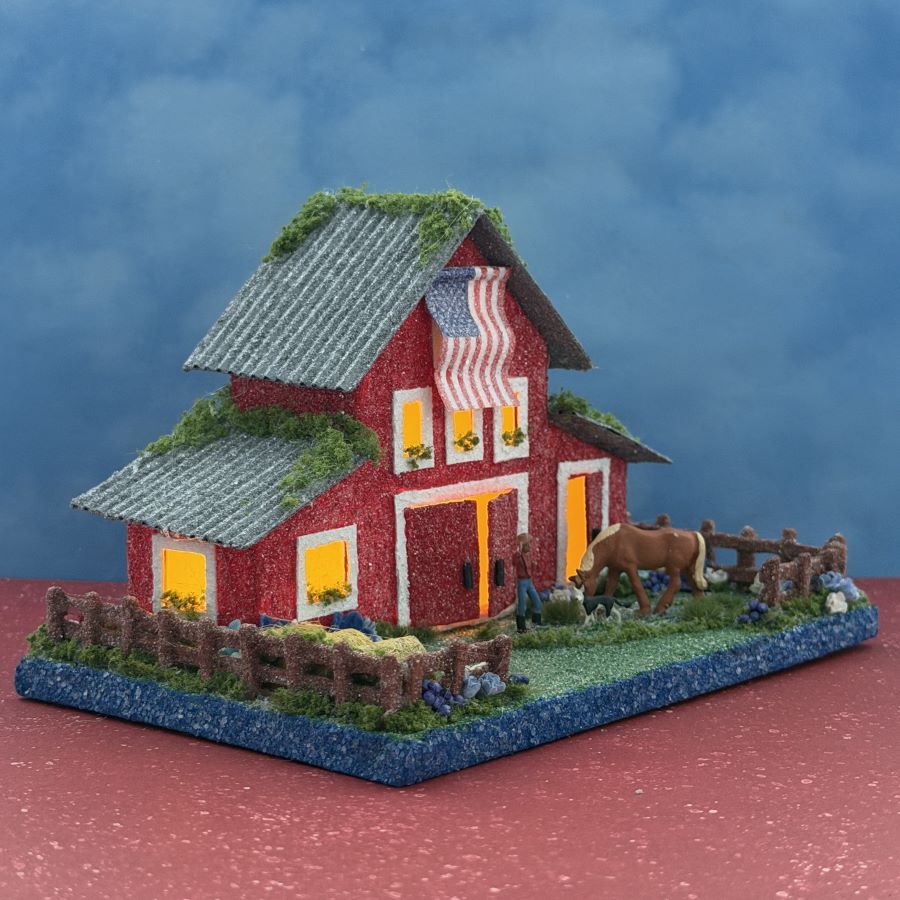
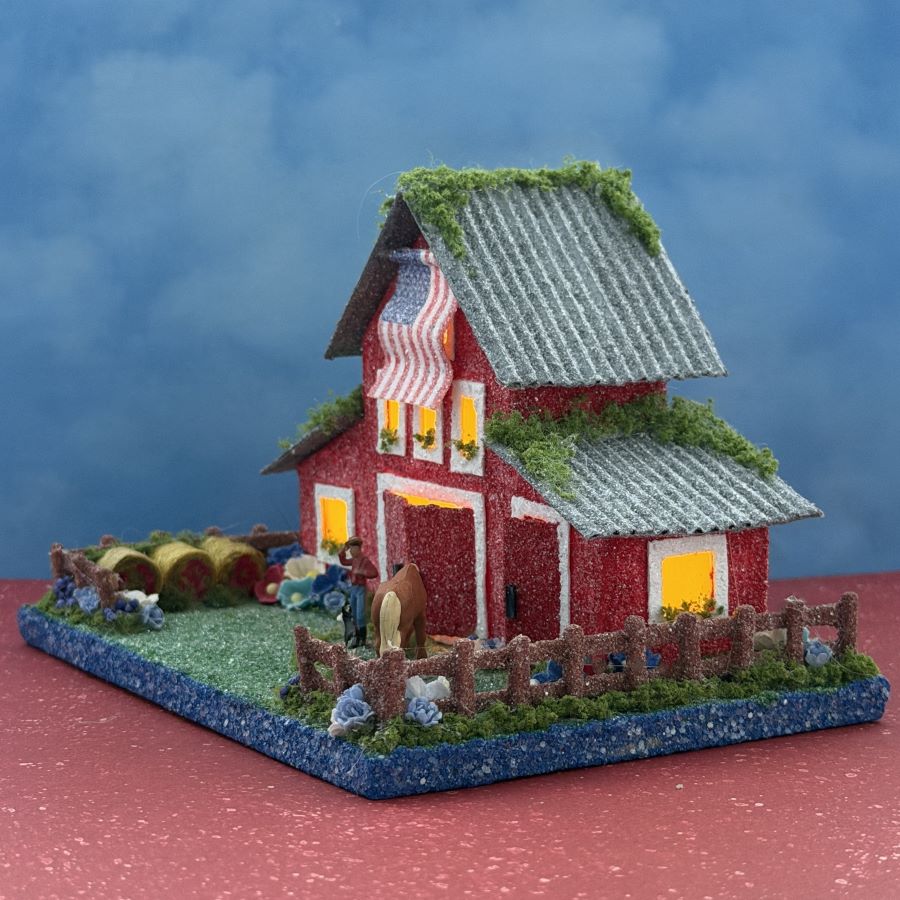
Shown below is a sampling of a few of the other Independence Day putz I have made over the years. As always, you can check out my Etsy shop, choose any building design and have it made in the colors and the season of your choice.
If you have questions about my posted putz houses, or about creating your own putz houses, please ask. I am happy to share what I have learned about the art of putzing.
To see more of my putz houses, as well as Christmas ornaments I have made from upcycled holiday cards, please visit my Etsy shop.
All proceeds from my Etsy shop benefit Kenya Mercy Ministries. Run by native Kenyans, KMM works with the urban poor of Nairobi, Kenya, particularly the children and their families who live in Kibera, the largest urban slum in Africa. Thank you for your part in helping these children when you purchase items from my shop!
Would you like to create your own putz houses? Check out my putz tutorials for more information. My blog is searchable, as well. You may find turorials that aren’t listed on the tutorial page.
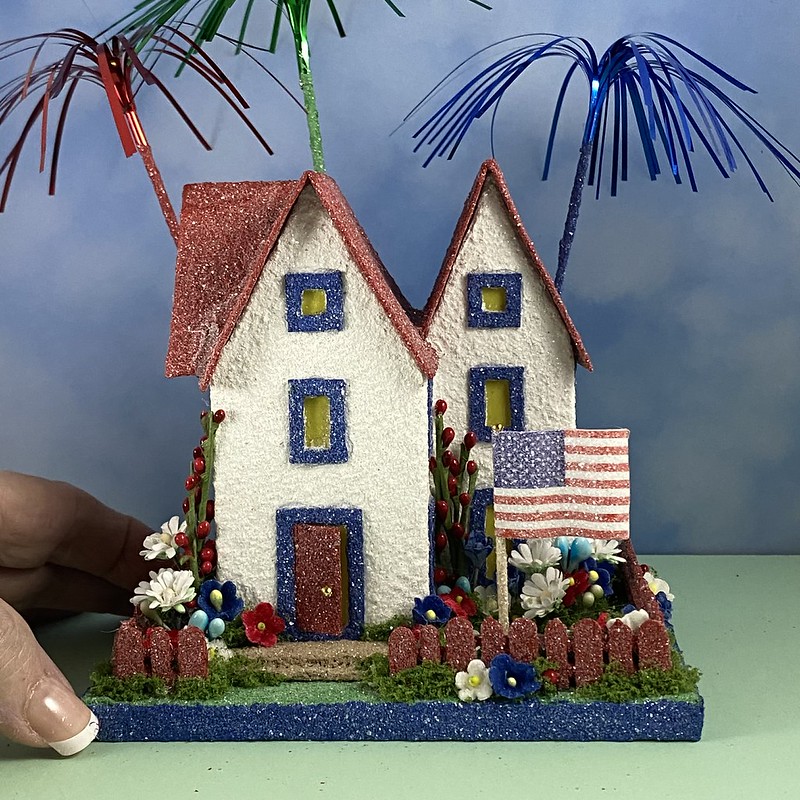
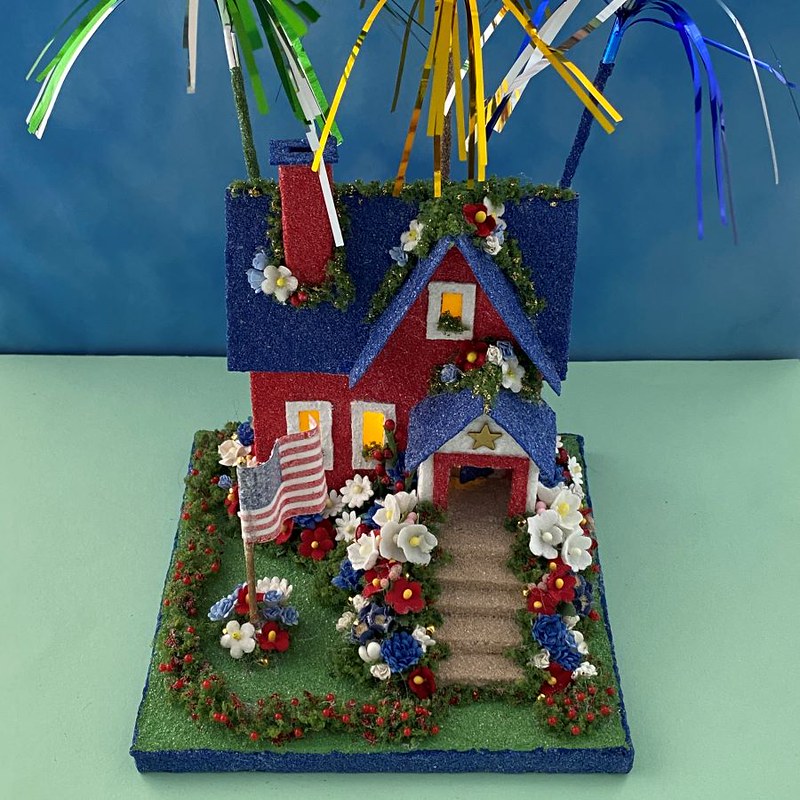
Celebrate our country’s birthday with this Independence Day putz house, complete with fireworks.
The fireworks fit into clear tubes on the back and are removable for storage.
The wooden picket fence is made from coffee stir sticks. I make my own picket fences in a variety of styles.
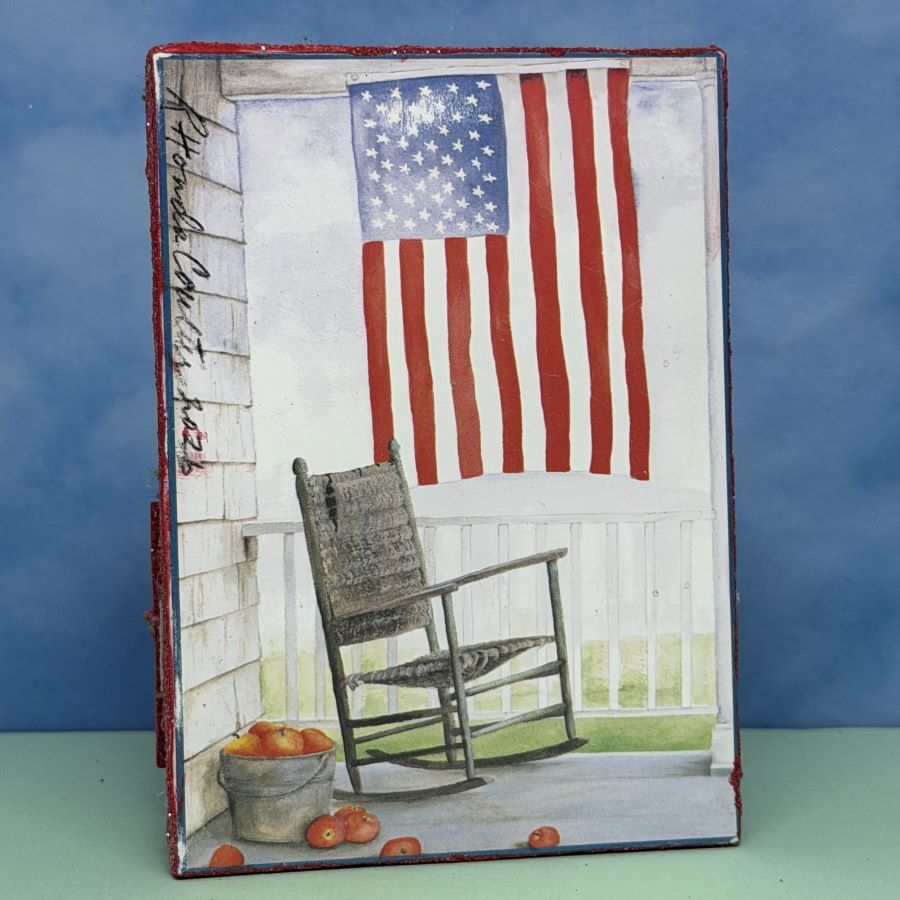
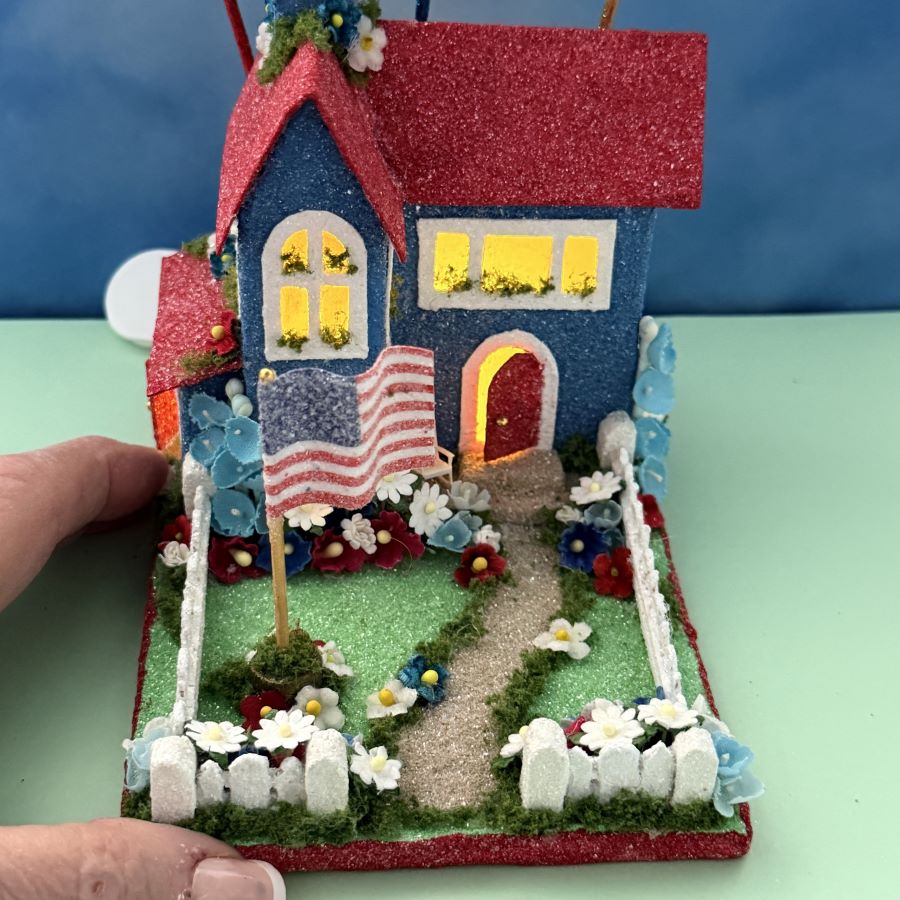
The flag flaps in the breeze on a beautiful July 4th day. There is a tiny rocking chair by the front door. The perfect place for watching fireworks.
This little house features a side door as well as a winding sidewalk.
If you have questions about my posted putz houses, or about creating your own putz houses, please ask. I am happy to share what I have learned about the art of putzing.
To see more of my putz houses, as well as Christmas ornaments I have made from upcycled holiday cards, please visit my Etsy shop.
All proceeds from my Etsy shop benefit Kenya Mercy Ministries. Run by native Kenyans, KMM works with the urban poor of Nairobi, Kenya, particularly the children and their families who live in Kibera, the largest urban slum in Africa. Thank you for your part in helping these children when you purchase items from my shop!
Would you like to create your own putz houses? Check out my putz tutorials for more information. My blog is searchable, as well. You may find turorials that aren’t listed on the tutorial page.
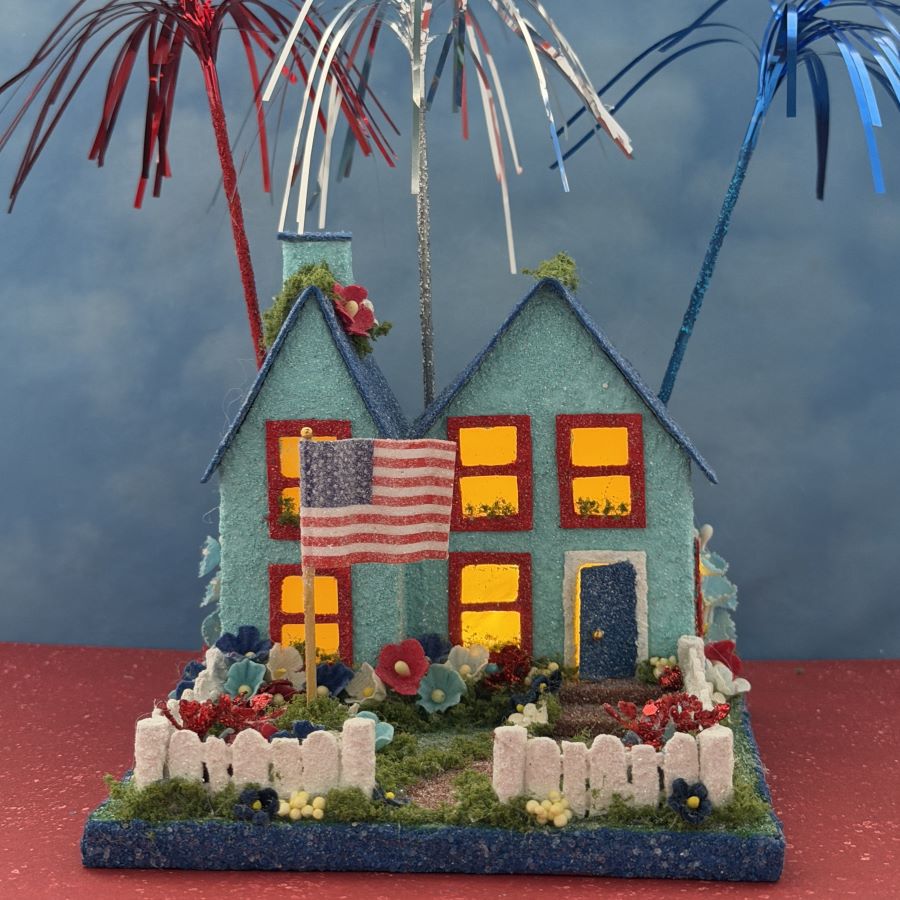
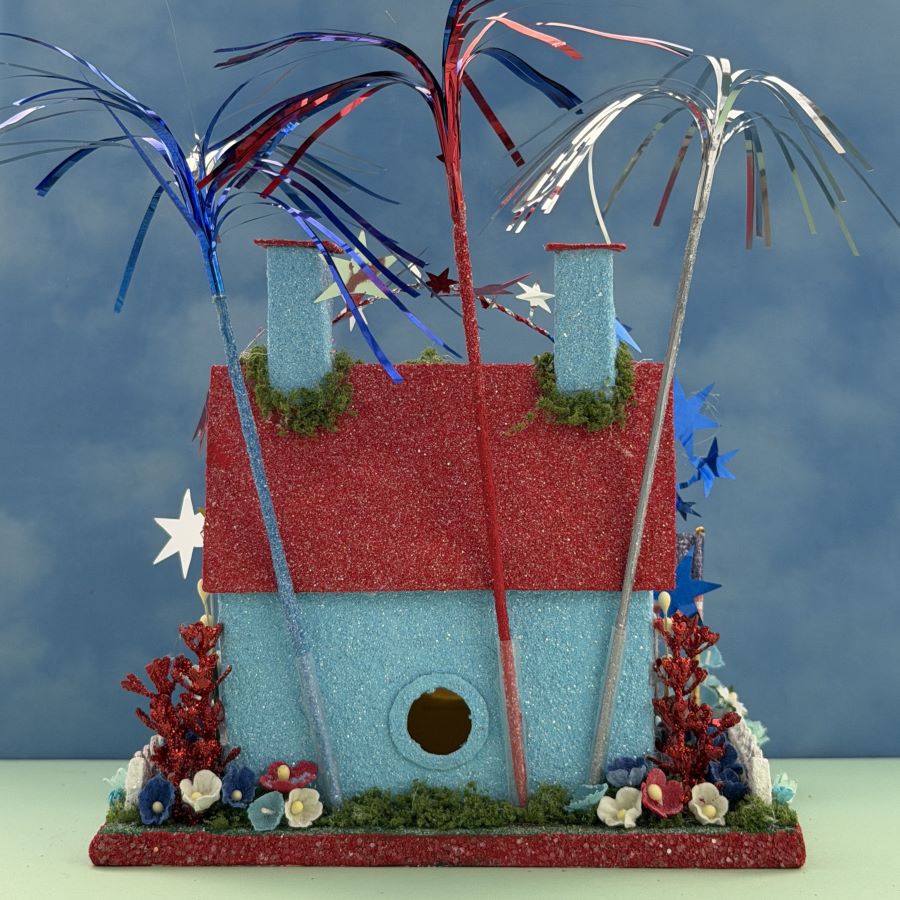
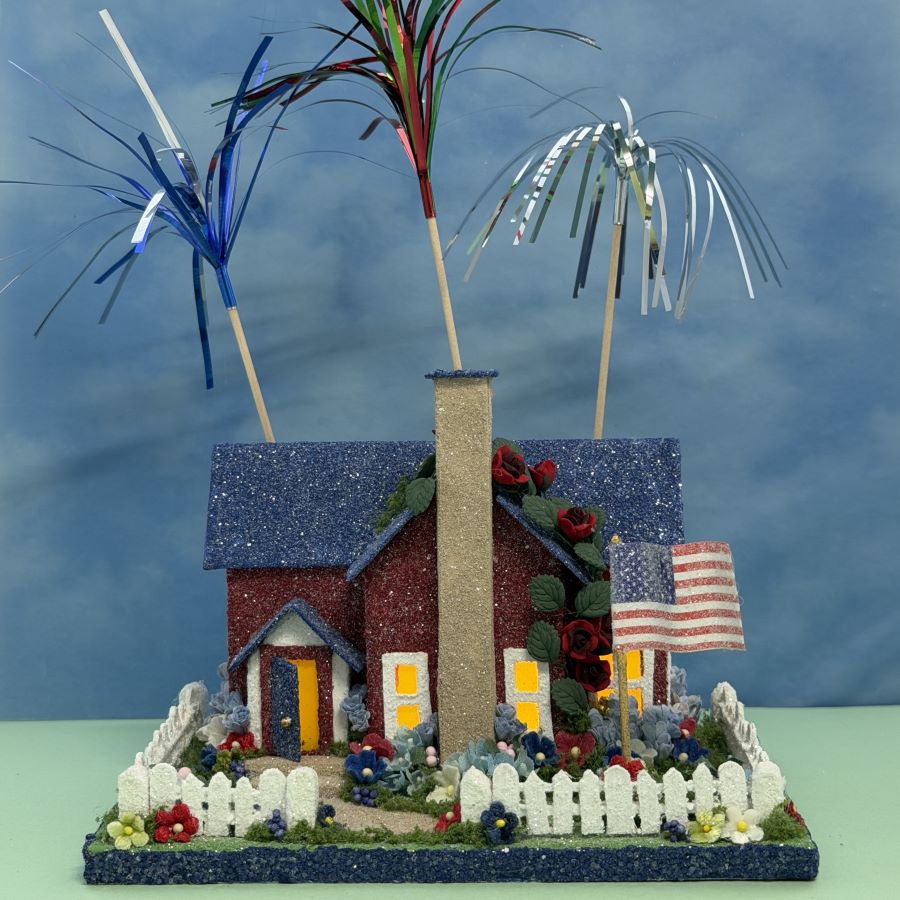
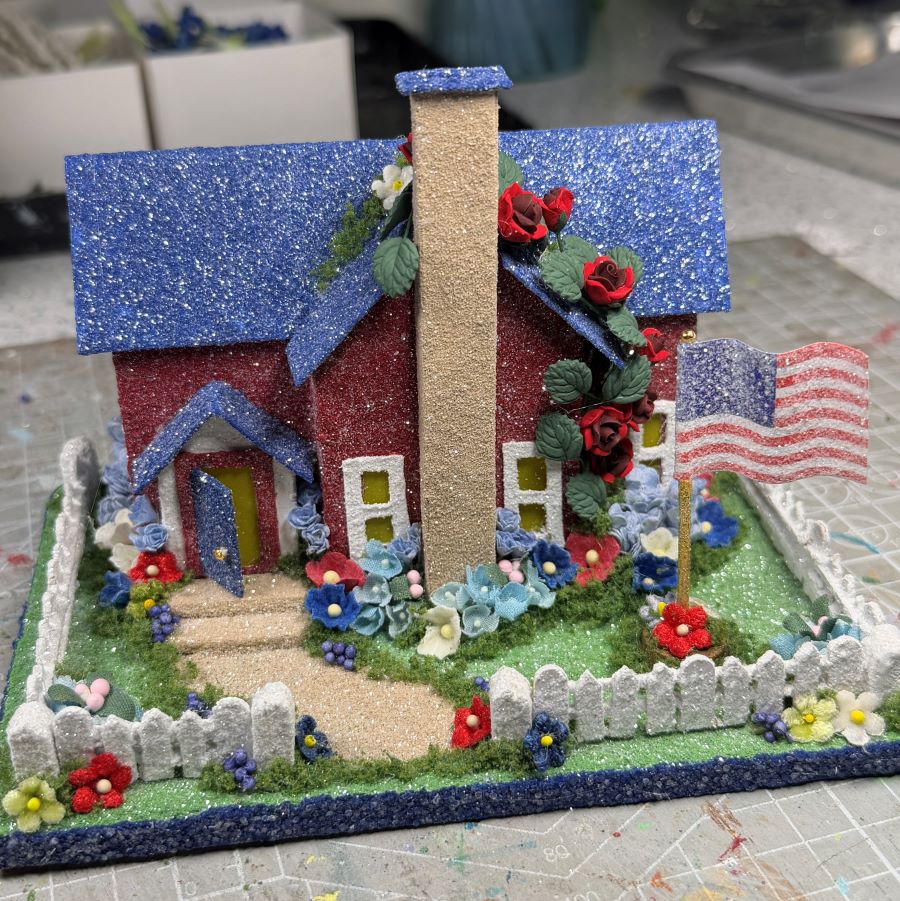
Sparkling fireworks highlight this Fourth of July putz house. Sit back and enjoy the celebration!
I handcrafted the picket fence from coffee stir sticks.
The fireworks fit into plastic tubes on the back of the house. When the season is over, remove the fireworks and store them with the house for next year’s celebration. The putz comes with a protective sleeve for storing the fireworks.
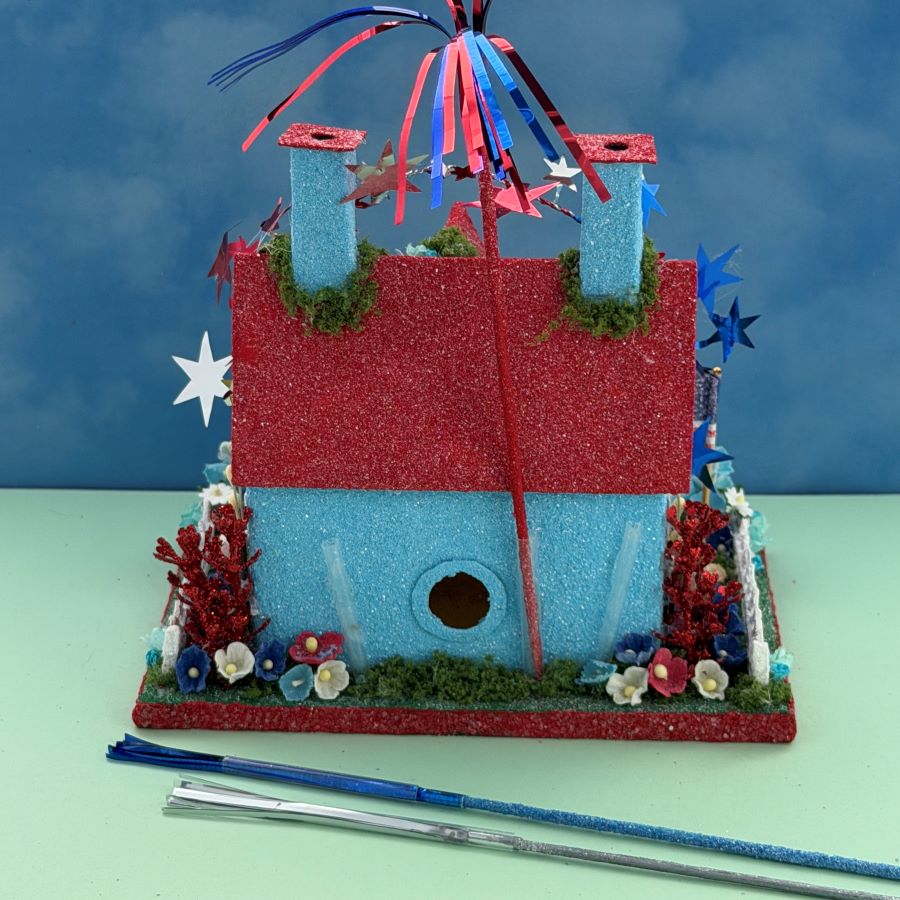
My hand for scale. This putz is made in the size I call ORIGINAL. Putz this size range between 4″ – 6″ tall. ORIGINAL size churches are an exception in height, as they may have steeples that measure 8″ – 9″ tall.
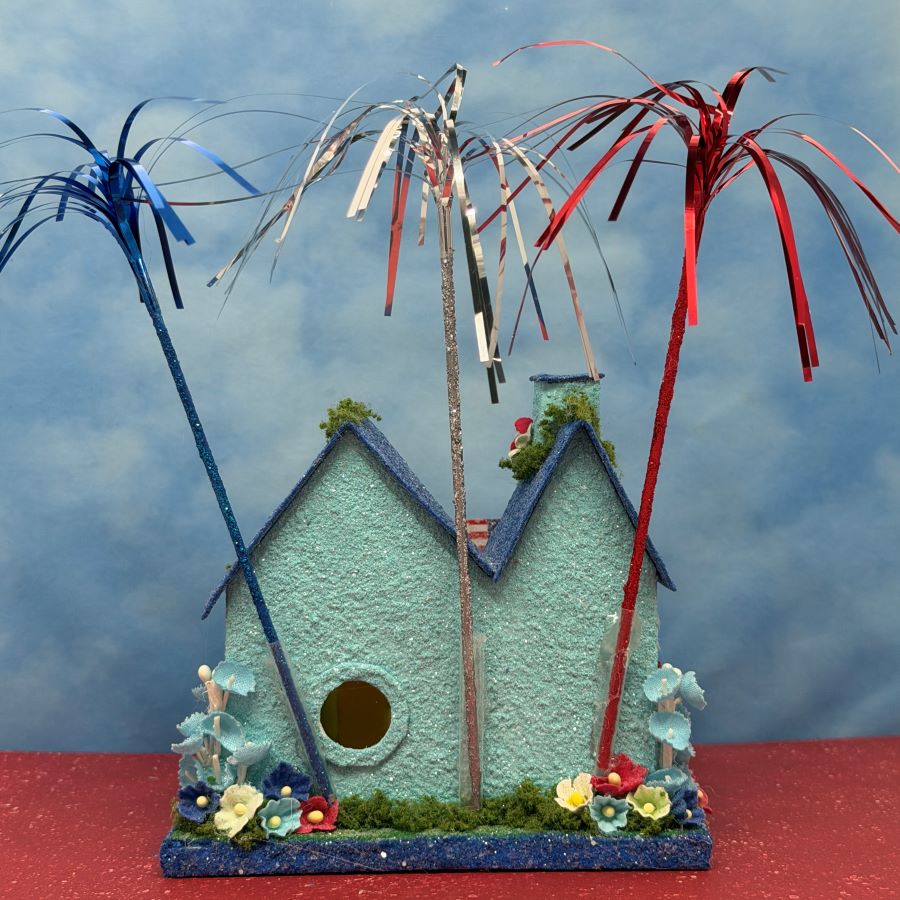
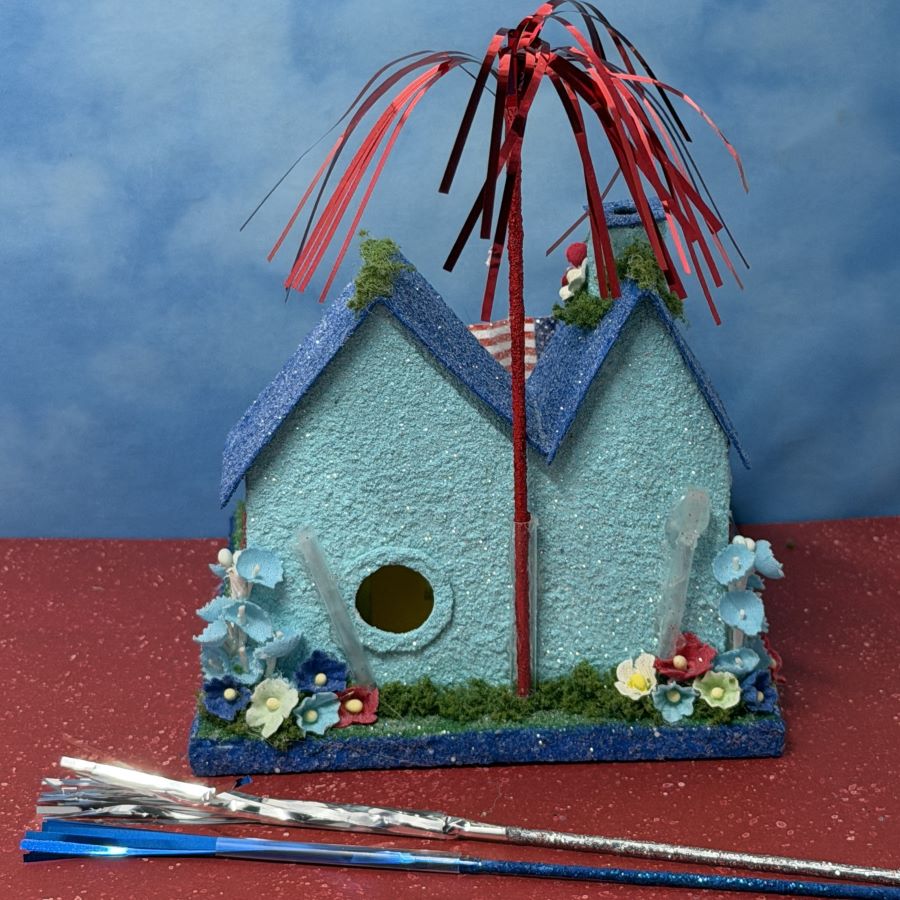
In process. The first picture shows the house after it has been painted, assembled, and glued to the base. The fence and flag are added. The second shot shows the house and landscaping done except for the addition of the fireworks.
If you have questions about my posted putz houses, or about creating your own putz houses, please ask. I am happy to share what I have learned about the art of putzing.
To see more of my putz houses, as well as Christmas ornaments I have made from upcycled holiday cards, please visit my Etsy shop.
All proceeds from my Etsy shop benefit Kenya Mercy Ministries. KMM works with the urban poor of Nairobi, Kenya, particularly the children and their families who live in Kibera, the largest urban slum in Africa. Thank you for your part in helping these children when you purchase items from my shop!
Would you like to create your own putz houses? Check out my putz tutorials for more information. My blog is searchable, as well. You may find turorials that aren’t listed on the tutorial page.