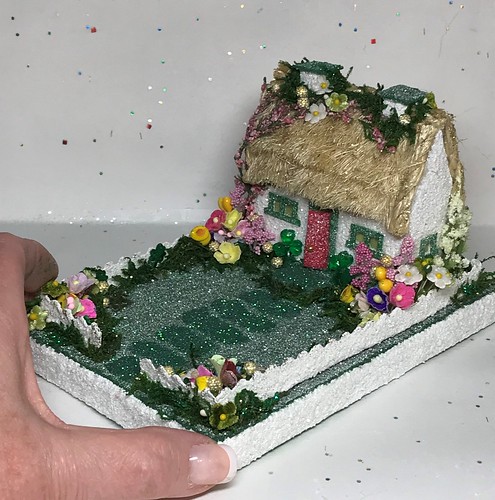
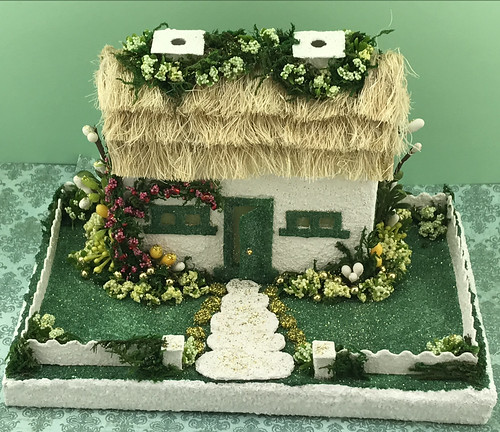
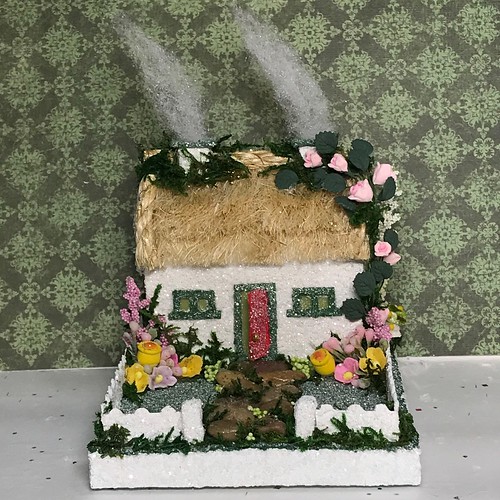
I love these little Irish cottages. The thatched roof on the Putz shown here is my own creation and design. Every time I thatch a cottage, I learn something new and tweak the process to make it better than the last time.
The first time I thatched an Irish cottage, I used rafia. I like the look of the sisal much better for an Irish cottage than the rafia, though the rafia does has a look that I think would be great on a fairy house or other woodland cottage. If you find other fibers you like to use, please share!

Following is a tutorial for making a thatched roof using sisal. This is the way I do it, though it’s not the only way, I’m sure. It’s just my way. Give it a try! If you have any questions about the process, please ask in the comment section, below. I am always happy to help others learn the skill of Putzing.
Supplies List
- twisted sisal rope (I use 1/4″ wide roping.)
- Scissors
- Cutting mat
- Carding / Combing tool
- Chipboard or poster board
- Hot glue gun and glue sticks
- Paper folding tool (also called a bone folder)
- Acrylic ruler
- X-acto knife or box cutter
- spray bottle of water
NOTE: The first time I bought twisted sisal rope, I bought this one: Wellington Cordage. When I ran out of that, I bought SGT KNOTS. The one I just purchased (SGT KNOTS) hasn’t had the knots the Wellington had, and is easier to work with. I haven’t used much of it yet, but am liking it better than the first brand. The second brand has three stands to make the rope and each of those stands is made of two strands. I bought these on Amazon.com, but you can purchase this kind of rope at any hardware store. Be sure it is labeled “sisal.” And be sure it isn’t coated with anything.
Glue a roof to your Putz to use as a base for gluing down the thatching strips. I use a medium-weight poster board. I painted and glittered it to match the sisal, but that isn’t really necessary. After you’ve thatched a few houses, you will have a feel for how thick the thatching should be so the roof base doesn’t show through the thatch. Painting it just insures that any places that do show the base are much less noticable than if the chipboard or poster board is left plain.
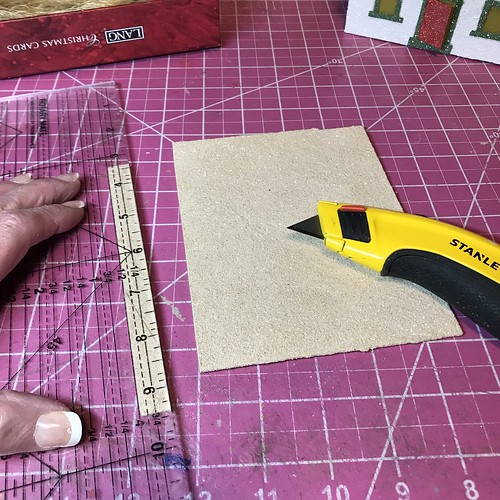
To make the strips that the sisal is glued to, find a piece of poster board (or cardboard) just a bit wider than the width of the roof. It will be trimmed before it is glued to the roof.

Cut the poster board into 1/2″ wide strips. I used a box cutter to do this because the sand in my paint mixture is hard on the X-acto blades. I should have painted it without the sand mixed it, but didn’t think about that until I had it painted.
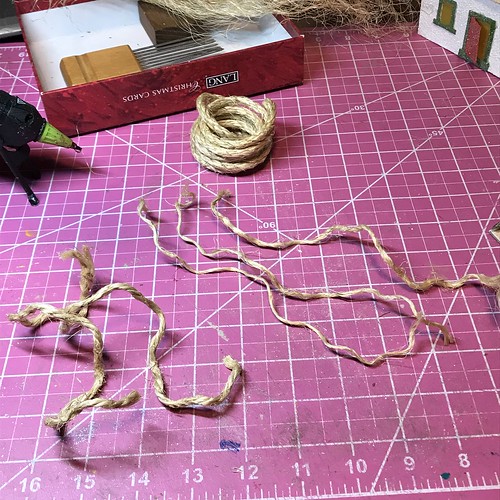
The sisal rope I used is a 1/4″ twisted rope of three strands, each of which are made up of three strands. Those strands need to be separated.
I have found that three rows of thatching works well for most of my cottages, but this pattern, which I drew recently, needed an extra strip on top. More about that later. Cut at least six strips to start with.
NOTE: The thatching could be made on one long strip, then cut as needed. For reference, I made 15 inches of thatching with 30 inches of rope. Fifteen inches of thatching made three strips for the front of the cottage. Length needed depends, of course, on how big your cottage is. This particular one is five inches wide.

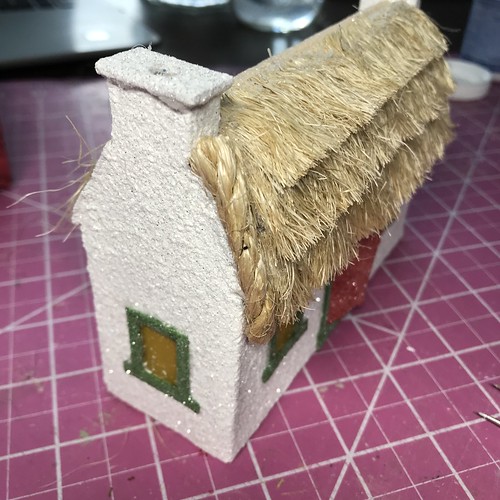
I originally drew the pattern for this cottage so that the sides of the roof extended 1/4″ past the walls of the house.
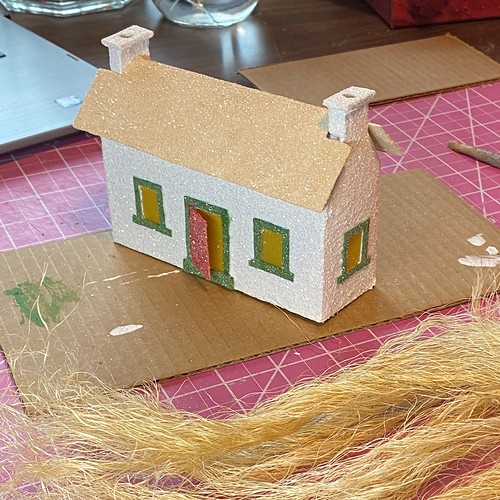
I decided later that the house would look better if the side walls were not obstructed by those overhangs. I cut the 1/4″ overhangs off and was happier with the cleaner look. I think it shows off the shape of the chimney better than it had before. I changed the pattern to reflect that. I mention it here, so there is no confusion about overhangs in some pics and no overhangs in others.
Cut a 10″ length of rope. This is a comfortable length for me to work with. As you work with the rope you have, try different lengths to see what works best for you.
Separate the strands that make up the rope.

Depending on the rope you are using, the strands that make up the rope may be made of two or three stands themselves. Those need to be separated, too.
You could even leave the rope on the roll, unwrap a section that is comfortable to work with and cut it off the roll after it has been combed. Find a way that works for you.

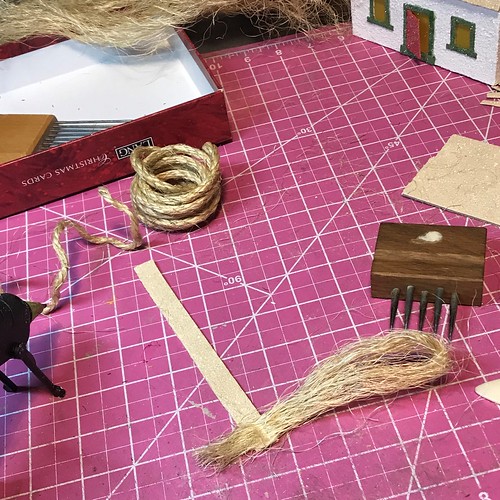
The next step is to “card” or comb the strands to separate the individual fibers. I have what I assume is a carding tool. It came from my mother. I don’t know what it’s use is supposed to be, but it works great for this process. I am not sure what else would work, but perhaps a felting tool? Or a wool or flax carding tool? If you’re handy, you could possibly make your own carding tool using a board and long nails. If you have other suggestions, please post them below.

Pull the tool through the strands of sisal. You can work with as many strands at a time as you are able to comb through. Sometimes sisal rope has lumps or knots in a strand and those have to be worked out. Be careful. Work slowly until you get the hang of it. It’s not fun to bring those spikes down on your thumb or fingers. Also, this is hard on your cutting mat. Use an old one if you have one handy.
The following picture shows the results of the beginning of the combing process. The fibers on the end of the strands are becoming unraveled from each other.

I work on each end, and when they are done, I work out the middle. It’s easier to comb the strands in two or three-inch sections than to try to do the entire length at one time.

When the entire length has been combed, put all the strands in a tray or on a cookie sheet. Spritz the strands with a light mist of water. This will quickly relax the sisal and the strands will become straighter than if not misted.
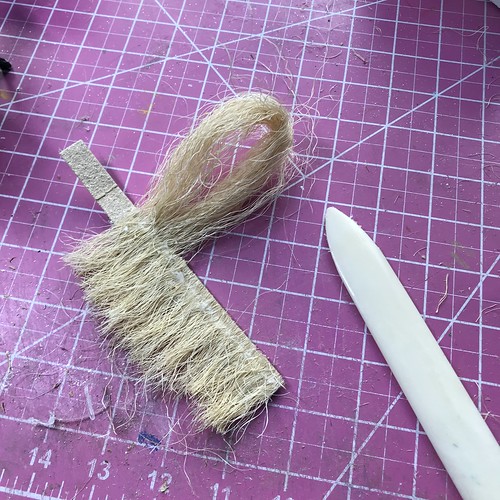
When it is completely dry, I fold it in half so I have a nice chunk to work with. Don’t trim the ends yet. The trim is more even if the entire length of thatching is trimmed at the same time.

Put enough hot glue on the chipboard strip to match the width of the fiber bundle. Cover the area completely.

Set the fibers on the glued strip, leaving plenty to trim later.
Trim the looped fibers along the strip of poster board. Continue gluing down fibers until the strip is covered. I use the paper folding tool (bone folder) to hold the fibers down as the glue hardens.
Moving it back and forth slightly as the glue cures keeps the folding tool from sticking. Any glue that does adhere to it comes right off the plastic.

If you look closely at the photo, you can see the pressed line where the folding tool was used.

Trim the fibers to a straight line.
The back of the strips will look like the following. Note that since I took this picture, I have learned to trim the top of the fibers very close to the strip. It will help the strips fit together more tightly when glued to the roof. Fewer gaps.
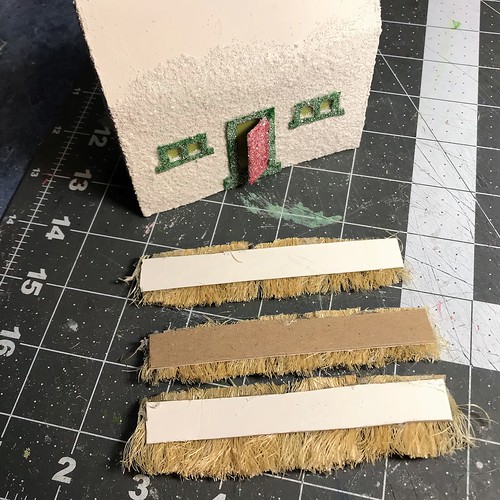
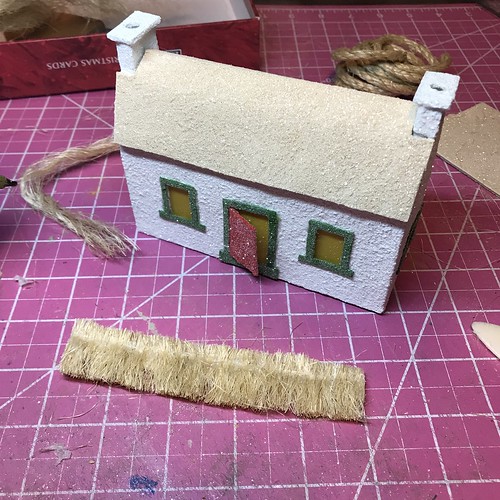
Trim each end of the strip so it is about 3/8″ short of either side of the roof. Glue the strip to the bottom of the roof. Set the poster board strip just above the edge of the long side of the roof.

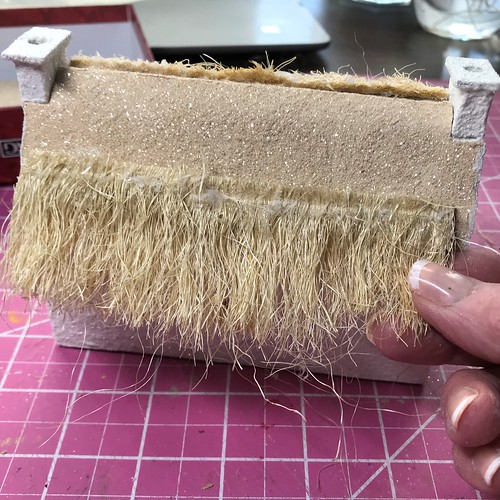
Make more strips. 🙂 Glue the second strip so the trimmed thatching on strip #2 overlaps the thatching of the first row. I find the 1/2″ strips can be glued right up against the one below it. But the placement will depend on how high the roof is and how thick the thatch is. Sometimes you have to eyeball it.

Thatching row #3 may need to be trimmed a bit shorter to fit against the chimney.

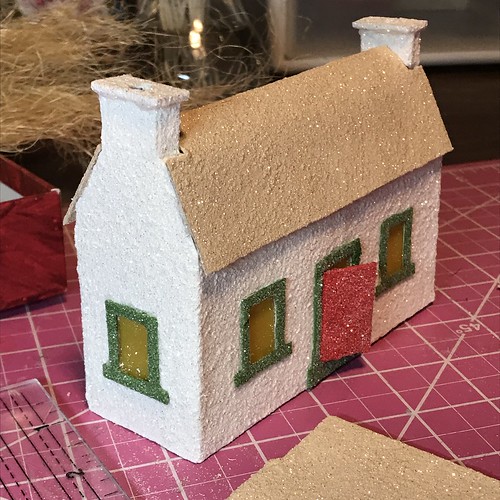
You can see the raw edges that were left when I trimmed the extra 1/4″ overhang off the sides of the roof.

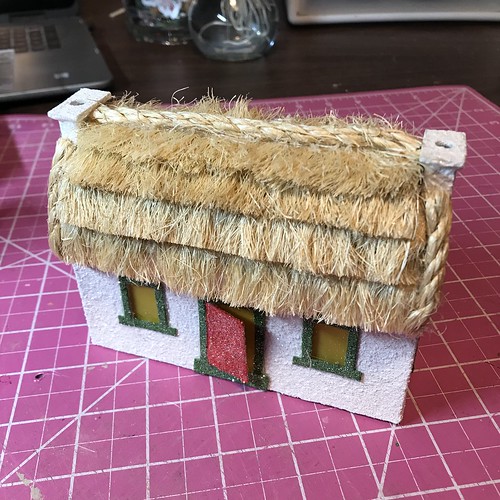
I painted and glittered them. All better.

Time to do the back of the Putz.

Here is the first strip for the back, prior to trimming.
And now, trimmed and glued down.

To finish the edges of the roof, I use intact rope, cut to length. Use sharp, heavy-duty scissors and cut slowly to get a clean cut that doesn’t unravel the rope.

This piece of rope will give the edge of the thatching a finished look. The 1/4″ wide rope works very well for this step. Just the right size. I haven’t found it necessary to put glue on the ends of the strands on this piece, but that can be done with white glue if it looks like the rope may unravel.
Check the top of the roof. If a piece of rope will cover the remaining gap and the glue line, you can glue that piece of trim down. If the gap is too wide to cover with one piece of rope, you can fill it with more thatching.

Cut a piece of poster board to fit inside the remaining gap. Glue thatching across it, so it extends the same width on either side of the post board.

It will look like this from the bottom.

Glue the strip into the gap, poster board down, thatch on top.

Glue a piece of rope on top the thatching.


Any spots that don’t look their best can be covered with dried moss, artificial foliage or flowers.

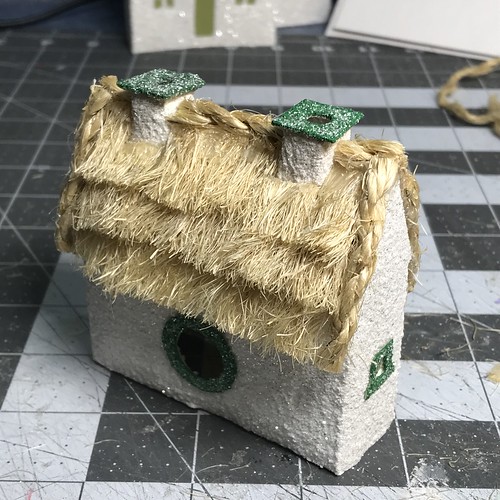
If you have a cottage with the chimneys set on the ridge of the roof, you will need to make some adjustments to thatch around those chimneys. In this example, five separate pieces of thatch were used: to the outside of each chimney, between the chimneys and under the chimneys.

When the first three patches were on, I went back and set a bit of thatching under each chimney.
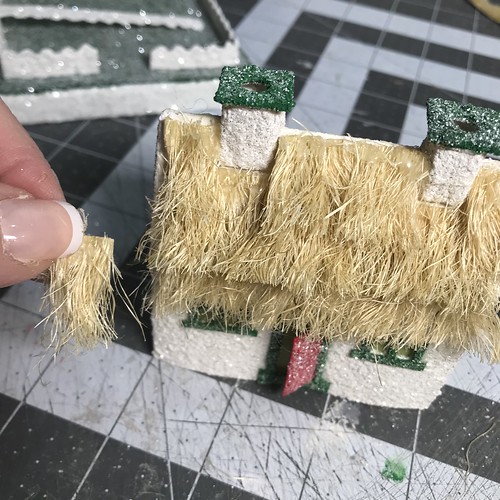
When all the pieces are glued down, trim the bottom of the thatching row to a clean, straight line.

To add the rope trim, I glued it next to the chimney before I cut it.


Because the trim piece is so short, it unravels less if already glued to the roof before cutting.
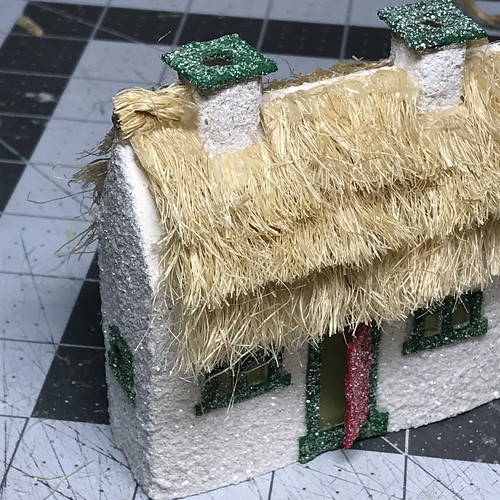
A short piece in the middle and the trim along the sides of the roof, and it’s ready for landscaping.

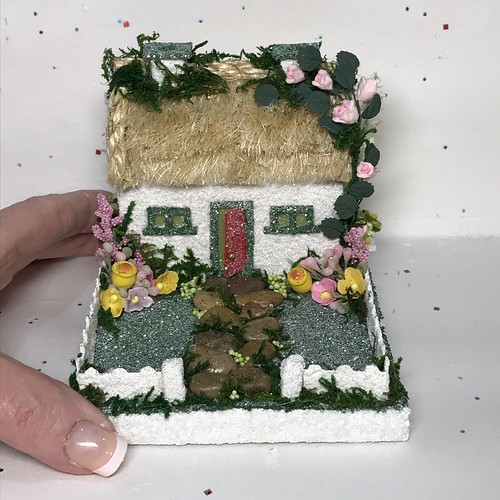
How cute is that?? I find them so appealing. And the landscaping is so much fun.

If you look closely, you may be able to see that I brushed the thatch with gold glitter glue for a light shine and a tiny bit of glitter. It IS a Putz house, after all! I didn’t want a heavy hand of glitter that might mask the charm of the thatch, but I did like the effect the glitter glue gave it. Just a nice shimmer that ties the thatching to the rest of the glitter on the Putz.

For a very light glitter finish, I like this brand. I have it in gold, silver, green, red, blue and opalescent. It contains a very fine glitter. They all flow well from the bottle except the silver. I think I’m on my third bottle of silver, and they’ve all been thicker and more sluggish than the other colors. I just use a paint brush to dip out the silver glue and apply it.

I hope you’ve enjoyed the tutorial. I would love to see pictures of what you create! If you have any questions about the art of Putzing, please ask. I am happy to help.
If you have suggestions or other supplies you like to use for this process, please share!
~~Rhonda
One Comment
This is really neat. I’m glad to see your post and such pictures! Very, very nice. I’m working on a Holly Hobbie cross stitch pattern in greens and browns for St. Patrick’s Day decorating. I just don’t have anything that expresses my love for our slight Irish roots. A tiny thatched cottage… now that would be great. Thanks for the post and tutorial. Always nice as usual;)