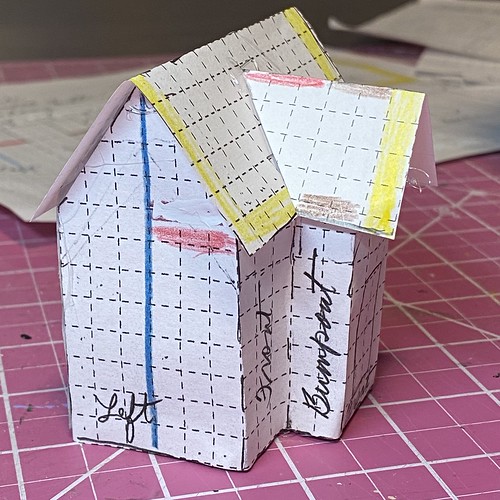
If you have questions about this process, please ask. I will edit the tutorial to reflect points that clarify the instructions. Following is a picture of the simple pattern I drew to illustrate the process.

On the pattern, dotted lines are fold lines and solid lines are cut lines.
Brown = The depth of the bumpout or porch.
Blue = Midline of the side of the house
Red = Half the width of the side of the house
Yellow = Roof overhang
Purple = Length of the roof angle of the bumpout, plus 1/4″ overhang
To draw a pattern for the roof of a bumpout or a porch, several measurements are needed. You need to know:
How wide is half the side of the building (red)?
How deep is the bumpout (brown)?
How long is the slant of the roof line of the bumpout (purple) plus 1/4″ for the overhang?
The measurement of the folded part of the roof from back to front (Line AB), is the total of (1) half the width of the side of the house (red) plus (2) the depth of the bumpout (brown) plus (3) the depth of the overhang (yellow).

Draw the length of the fold line of the roof, using the total of the three measurements. Line AB.
From the bottom of the fold line (at point B), draw a perpendicular line to each side. Line BC and Line BD. Each side of this line is the length of the angle of the roof line (purple) plus a 1/4″ overhang (yellow).
On this pattern, the length of the angle of the roof line is 7/8″. That plus the 1/4″ of the overhang equals 1 1/8″. The front of the bumpout roof (Line DC) is a total of 2 1/4″ (twice the length of the roof angle including the overhang).
At each end of the perpendicular line, draw a line up that is the depth of the bumpout (brown) plus the 1/4″ overhang (yellow). Line DE and Line CF.
From the tops of the lines on the sides, draw angled lines to the top of the fold line. Line EA and Line FA.
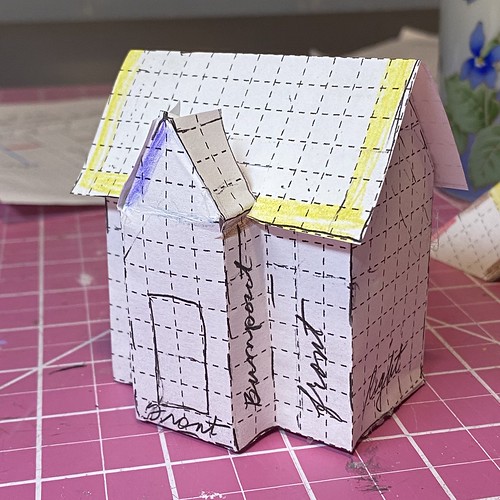
When fitting the roof to the bumpout or porch, check that the ridge line (folded part) of the roof is level. Also, check that the end of the fold (at point A) is in line with the middle of the bumpout or porch section.
I use hot glue to attach the roof.

In this photo, you can see the roof supports that I build into my pattern. This gives a good platform for adding hot glue before attaching the roof. When the Putz is assembled, I run a line of hot glue in the valley where the roof of the overhang meets the main roof of the house. That is covered with faux snow in the finishing of the house.

There are surely others ways to do this process, but this is my way. I hope you find it useful!
Here are a couple of examples of such roofs on Putz I’ve made.
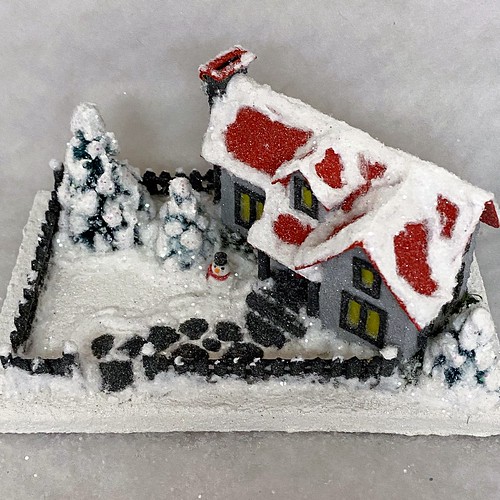

You can see my Putz houses and Christmas ornaments in my Etsy shop.
If you are interested in crafting Putz houses of your own, check out my other Putz tutorials for more information. Putz House Tutorials
I am always happy to answer questions about the process. Please ask, if you are wondering about the details of putzing!
All proceeds from my Etsy shop benefit Kenya Mercy Ministries. They work with the urban poor of Nairobi, Kenya, particularly the children and their families who live in Kibera, the largest slum in Africa. Thank you for your part in helping these children when you purchase items from my shop!
~~Rhonda